How to Master Energy Recharge Mechanics in Genshin Impact
Ever feel like your character's ultimate ability is almost ready, but you're stuck waiting a few frustrating seconds for that final sliver of energy? In Genshin Impact, that's the core challenge of Energy Recharge (ER)—the stat that determines how often you can unleash your most powerful attacks. This guide breaks down the fundamental math so you can stop guessing and start optimizing.
Combat and elemental mechanics
At its heart, Energy Recharge is a simple multiplier. Every character starts with a 100% base rate, and any ER you build on top of that increases the energy you gain from elemental particles and orbs. The formula is your key to understanding it all:
Actual Energy Gained = Base Energy × [1 + ER%]
For example, if your character with 150% ER catches a particle that gives 3 base energy, they actually receive 3 × [1 + 1.50] = 7.5 energy. It’s that straightforward. However, this multiplier only applies to energy from particles and orbs. Direct energy sources—like flat energy restored by a character’s talent, a weapon passive, or an artifact set effect—are not boosted by your ER stat. They give a fixed amount, period.
Think of ER as a bonus on your "income" from particles, not a boost to a one-time "gift" from other sources.
Managing your energy isn't just about gaining it—you also need to protect it. Be aware that your hard-earned energy can be drained by certain environmental effects and gear. Ley Line Disorders in domains, like High Voltage, can sap your energy, and equipping artifacts like Shimenawa's Reminiscence consumes energy to power up your attacks. If you're running a Burst-reliant team, these are pitfalls you must plan around.
Mastering this basic math is the first step to flawless rotations. Once you understand what ER does (and doesn't) affect, you can precisely build your characters to have their game-changing Bursts ready exactly when you need them.
Elemental Particles and Orbs in Genshin Impact
Here’s the thing about energy in Genshin Impact: not all energy is created equal. While Energy Recharge (ER) acts as a multiplier, the fuel you’re multiplying—Elemental Particles and Elemental Orbs—comes in different flavors, and understanding the difference is the key to unlocking consistent, powerful rotations. This section will break down the two primary energy sources and the critical rule of elemental matching that governs them all.

Elemental gameplay exploration
The Two Energy Sources: Particles vs. Orbs
Your characters generate energy primarily through two types of collectible objects: Elemental Particles and Elemental Orbs.
Elemental Particles are the small, colored orbs you see fly toward your character after using an Elemental Skill or when an enemy’s HP drops to certain thresholds. They are your bread and butter for energy generation. At a base 100% ER, an active character catching a particle that matches their own element gains 3 energy. If the particle is from a different element, they only gain 1 energy.
Elemental Orbs are the larger, more potent versions, often dropped by Boss Enemies like Hypostases upon defeat or from specific abilities. They follow the same matching rules but provide triple the base energy: 9 energy for a same-element orb and 3 energy for a different-element orb when caught on-field. Think of orbs as a big, juicy energy injection for your Burst gauge.
The Golden Rule: Element Matching
This is the single most important concept for energy management in Genshin Impact: element matching. A same-element particle grants 3x the energy compared to a different-element particle. This multiplier is why building teams with characters of the same element (a "battery") is so powerful. For example, using Bennett’s Pyro Skill to generate particles for Xiangling is astronomically more efficient than using Fischl’s Electro Skill for the same purpose.
When you see particles fly out, quickly swap to the character you want to charge. The on-field character always gets the lion’s share of the energy, making this "funneling" technique essential for energy-hungry supports.
The Off-Field Penalty and Special Cases
There’s a catch for characters not actively on the field. In a standard 4-person party, inactive characters receive only 60% of the energy from any particle or orb. This "off-field penalty" means your off-field supports need significantly higher ER to get their Bursts back on time.
There’s also a third, special type of particle: Clear/Neutral Particles. These are typically generated by Favonius weapon passives. They don’t belong to any element, so they don’t get the 3x matching bonus. At base ER, they grant 1.8 energy to the on-field character and 1.6 energy to off-field characters. While not as efficient as matching particles, their universal team-wide energy generation makes Favonius weapons incredibly valuable.
Mastering the flow of particles, respecting the element-matching rule, and accounting for the off-field penalty will transform how you build your teams. With this knowledge, you’re ready to dive into the specific strategies that turn energy theory into combat dominance.
How to Use Battery Characters and Funneling Techniques
You’ve mastered the mechanics of Energy Recharge and particles—now it’s time to put that knowledge into action. In Genshin Impact, a perfectly built character is useless if they can’t use their Burst. This is where Battery Characters and the technique of Funneling become your most powerful tools for keeping your team’s ultimate attacks ready on demand.

Character ability effects
What is a Battery?
A Battery is a character whose primary role is to generate a high volume of elemental particles for their teammates. They are the energy lifeline for characters with high-cost Bursts. The key rule to remember: a battery is most effective when they share an element with the character they’re charging. Same-element particles grant 3 energy on-field versus just 1 for a different element—that’s a massive 3x efficiency multiplier.
Here are the premier batteries for each element, pulled straight from the meta:
- Pyro Battery: Bennett. Found at the Adventurers' Guild in Mondstadt, this 4-star swordsman is far more than a healer. His Elemental Skill generates 2.25 Pyro particles every 4 seconds (or every 2 seconds inside his Burst field), making him absolutely essential for fueling energy-hungry Pyro units like Xiangling.
- Universal Battery: Raiden Shogun. As the Electro Archon in Inazuma, Raiden transcends elemental matching. Her Elemental Burst, Musou Shinsetsu, restores a flat amount of energy to the entire team after its duration, making her the ultimate battery for any team composition.
- Electro Battery: Fischl. This 4-star archer from Mondstadt provides consistent, off-field particle generation through her raven, Oz. Each attack from Oz generates approximately 0.67 Electro particles, offering a steady energy drip for characters like Beidou or Yae Miko.
- Anemo Battery: Sucrose. Located at the Favonius Alchemy Station in Mondstadt, this catalyst user is Xiao’s best friend. Her Elemental Skill creates 4 Anemo particles per cast, which is crucial for charging Xiao’s expensive 70-energy Burst.
- Cryo Battery: Diona. This 4-star archer from Mondstadt’s Cat’s Tail tavern is the go-to support for Cryo DPS units. When equipped with a Sacrificial Bow, she can often use her Elemental Skill twice, generating a high volume of Cryo particles to fuel Eula or Ayaka.
Mastering the Funneling Technique
Simply having a battery isn’t enough—you need to collect the particles correctly. Funneling is the active process of directing energy from your battery to your intended target. Here’s the exact sequence:
- With your battery character active, press your Elemental Skill.
- Immediately swap to your energy-hungry target character.
- Ensure the target character is on-field when the generated particles reach them.
This technique is non-negotiable for teams like the National Team, where you funnel Bennett’s Pyro particles directly into Xiangling.
Practice your funneling rotations on a harmless enemy like a Hilichurl. The timing of the swap is critical—if you’re too slow, the particles will be absorbed by your battery instead of your DPS.
Building an Effective Battery
To maximize your battery’s potential, a few gear choices are paramount:
- Weapons: Favonius weapons are king for team energy. Their passive generates 6 clear energy particles for the whole team on a CRIT hit. Sacrificial weapons are a close second, as resetting a Skill cooldown effectively doubles your battery’s particle output.
- Stats: For Favonius users, building around 30-50% CRIT Rate is key to triggering the passive reliably. Otherwise, prioritize your battery’s own Energy Recharge to ensure they can use their Burst to support the team.
By strategically deploying batteries like Bennett for your Pyro carries or Sucrose for your Anemo DPS, and mastering the swift swap of Funneling, you’ll transform your team from sporadically powerful to relentlessly efficient. Your Bursts will always be ready when you need them most.
Best Energy Recharge Weapons for Every Role
Think of your character's Elemental Burst as a loaded gun. The best Energy Recharge weapons in Genshin Impact are the ones that hand you the bullets, letting you fire off those game-changing ultimates on cooldown. This is where you turn energy anxiety into pure, consistent power.

Your weapon choice is one of the most direct ways to solve energy problems, and the options range from free-to-play staples to premium 5-star powerhouses. Here’s a breakdown of the best tools for the job, categorized by how they get the job done.
The Universal Team Players: Favonius & Sacrificial Series
These 4-star series are the backbone of energy management for a reason. They don't just help the wielder—they support the whole squad.
- Favonius Series: This is your team's energy lifeline. Any Favonius weapon provides a hefty 61.3% ER substat. Its passive, Windfall, is the real star: a CRIT hit has a 60-100% chance (based on refinement) to generate 6 clear energy particles for the entire team. The catch? You need to build some CRIT Rate on the wielder (around 30-50%) to proc it reliably.
- Sacrificial Series: Perfect for characters whose value is tied to their Elemental Skill. With a 30.6% ER substat, its Composed passive gives an E hit a 40-80% chance to reset that Skill's cooldown. This lets characters like Xingqiu or a pre-C1 Yelan use their Skill twice in a row, effectively doubling their personal particle generation and drastically slashing their—and often their teammates'—ER needs.
Favonius weapons are for feeding your team. Sacrificial weapons are for making a character self-sufficient. Choose based on who’s struggling for energy the most.
Premium Power & Support: 5-Star ER Weapons
When you want high ER and top-tier damage or buffs, these 5-star options are the goal.
- Engulfing Lightning: The signature weapon for Raiden Shogun and a top pick for any polearm support. It offers 55.1% ER and its passive converts ER above 100% into a substantial ATK bonus for the wielder, making every point of ER you stack doubly valuable.
- Elegy for the End: The ultimate support bow for characters like Yelan or Venti. It also provides 55.1% ER, but its passive delivers a massive team-wide ATK and Elemental Mastery buff when its conditions are met. It solves the wielder's energy needs while supercharging the team's damage.
Exceptional Free-to-Play & Craftable Options
You don't need to wish to get some of the best energy solutions in the game.
- The Catch: Arguably the best free weapon in Genshin Impact. Earned via Fishing, this polearm gives 45.9% ER and increases the wielder's Burst DMG and CRIT Rate. It's the best-in-slot for Xiangling and a fantastic option for any Burst-focused polearm user like Raiden.
- Amenoma Kageuchi: A craftable Inazuman sword with a unique mechanic. After using an Elemental Burst, it generates Succession Seeds that, after a short delay, restore up to 36 flat energy to the wielder. This lets characters like Ayaka or Jean run much lower ER in their artifacts.
Equip the right tool, and you'll stop watching your energy bar and start dominating the rotation.
Best Artifact Sets for Energy Recharge in Genshin Impact
You've got your weapons and batteries sorted—now it's time to make your artifacts work for you. In Genshin Impact, the right artifact set can transform Energy Recharge from a stat you need into a stat that actively boosts your damage. This is where you turn energy management into a power play.

The Definitive Artifact Sets for Energy
When you're building for burst uptime, your artifact choice is more than just a stat stick; it's a core part of your character's identity. These sets either provide the ER you need or reward you handsomely for building it.
Emblem of Severed Fate: The Burst-Damage King
For any character whose damage lives and dies by their Elemental Burst, the Emblem of Severed Fate set is non-negotiable. Its 2-piece bonus grants a solid +20% Energy Recharge, while its 4-piece bonus is the star of the show: it converts 25% of your total ER into Burst DMG, with a maximum bonus of 75% at 300% ER.
This set is tailor-made for high-cost, off-field damage dealers. Think Xiangling, Xingqiu, Yelan, and Raiden Shogun. It elegantly solves the core dilemma: you need high ER to use your burst on cooldown, and this set ensures that investment directly pays off in damage. You’re not sacrificing power for consistency—you’re building both at once.
For Emblem users, aim for that sweet spot of 200-250% ER. This gives you a massive 50-62.5% Burst DMG bonus while leaving room to invest in CRIT and ATK/HP stats. Chasing the full 300% cap is often less efficient than balancing your stats.
Foundational & Support Sets
For characters whose primary role is enabling the team, other sets offer powerful utility alongside ER.
- The Exile set is a fantastic early-game option. Its 2-piece gives +20% ER, and the 4-piece effect restores 2 Energy to all other party members every 2 seconds for 6 seconds after the wearer uses their Burst. This is excellent for low-investment supports who just need to feed energy to your main DPS.
- The Scholar set also provides a +20% ER 2-piece bonus. Its 4-piece effect grants 3 Energy to all party members who use a Bow or Catalyst every time the wearer gains particles, once every 3 seconds. This is more niche but can be powerful in specific catalyst-heavy teams.
Main Stats & Substat Strategy
Your artifact main stats are your foundation. For the Sands of Eon piece, an ER% Sands is your most powerful tool for hitting high ER thresholds, providing a massive 51.8% ER at level 20. Use it when your character can’t reach their required ER through weapons and substats alone—common for supports and solo-element damage dealers.
Once your main stats are set, substats seal the deal. After meeting your specific ER goal (use a calculator!), your priority typically shifts to offensive stats like HP%, ATK%, CRIT Rate, and CRIT DMG. However, getting there means hunting for ER rolls in your substats. Each roll on an artifact can provide between 4.53% and 6.48% ER. You’ll want to aim for these rolls across your Flower, Feather, Goblet, and Circlet to meet requirements without forcing an ER% Sands, freeing it up for an offensive main stat instead.
This is the final piece of the energy puzzle in Genshin Impact. With the right artifact set converting your ER into raw power and a smart approach to main stats and substats, you’re not just building for uptime—you’re building a character that dominates every rotation.
National and Hyperbloom Team ER Requirements
Now we get to the heart of the matter—the specific Energy Recharge targets for the teams that define the Genshin Impact meta. You can understand all the theory, but if your Raiden National team can't Burst on cooldown, you're dead in the water. This section cuts through the guesswork and gives you the concrete numbers you need to build these powerhouse teams.
Elemental power application.
National Team: The Classic Energy Machine
The National Team (Bennett, Xiangling, Xingqiu, and a flex slot like Raiden Shogun or Sucrose) is a symphony of high-cost Bursts. Its power comes from chaining them together perfectly, which means hitting precise ER breakpoints is non-negotiable.
Here’s the consensus ER distribution for a smooth, 20-second rotation:
- Bennett: 180-200% ER. He’s the Pyro battery and healer. He needs his Burst up first to buff the team and funnel particles to Xiangling. An ER weapon like Favonius Sword or Sapwood Blade is almost essential.
- Xiangling: 160-180% ER. She generates almost no particles herself. With Bennett funneling Pyro particles to her, this range is achievable. Without him, her needs skyrocket to over 200%.
- Xingqiu: 180-220% ER. His Rain Swords are the team's Hydro engine. With a Sacrificial Sword, you can aim for the lower end. Without it, you'll need significant ER from artifacts and potentially an ER% Sands.
In a Raiden National variant, Raiden Shogun's universal energy refund lets everyone run about 30-40% less ER. This is why the team is so strong—freed-up substats go straight into damage.
Hyperbloom Team: Focus on the Trigger
Hyperbloom teams shift the energy burden. Here, the Electro trigger (built for full Elemental Mastery) needs minimal ER, while the aura appliers need enough to maintain constant Dendro and Hydro.
- Electro Trigger (Kuki Shinobu or EM Raiden): 100-120% ER. Their job is to hit Dendro Cores with their off-field Electro, not to Burst. Kuki's Skill has 100% uptime, and Raiden's Skill lasts 25 seconds. You can ignore their Bursts and focus entirely on EM and HP (for Kuki's healing).
- Hydro Units (Xingqiu/Yelan): 180-220% ER. They must apply Hydro constantly to create Bloom cores. The requirements are similar to their National Team builds.
- Dendro Units (Nahida, Dendro Traveler): 140-160% ER. They need their Bursts or Skills for consistent Dendro application. Nahida can often get by with less if she's on-field collecting particles.
Yelan: A Case Study in ER Scaling
Yelan perfectly illustrates how team composition dramatically alters ER needs. Her 70-cost Burst is her entire kit, so hitting 100% uptime is critical.
- Solo Hydro Yelan (no other Hydro character): This is the most demanding scenario. Without a battery or her C1, she can require a staggering 260-324% ER. Using her Skill twice per rotation (enabled by her C1 or a high-refinement Sacrificial Bow) can slash this to around 208%.
- Double Hydro Synergy: Pairing her with Xingqiu is a game-changer. The extra Hydro particles reduce her needs to a much more manageable ~160-180% ER, allowing her to use an HP% Sands for massive damage gains. This is why the Yelan+Xingqiu core is so dominant.
Nilou Bloom: HP Over Everything
For Nilou Bloom teams, throw the usual ER rules out the window. Nilou's core damage comes from her Bountiful Cores, which scale directly with her Max HP via her passive talent, Dreamy Dance of Aeons. Energy Recharge is a pure comfort stat.
- Priority: Stack HP% everywhere—weapon ( Key of Khaj-Nisut), Sands, Goblet, Circlet. Aim for over 60,000 HP to maximize her core damage.
- ER Needs: You can run 0% ER and the team functions perfectly via her Skill. If you want her Burst for extra damage or crowd control, 120-160% ER is sufficient, especially if you run a second Hydro character like Kokomi as a battery.
⚠️ Watch out: Using an ER weapon like Favonius Sword on Nilou sacrifices too much HP, directly lowering your team's Bloom damage. It's rarely worth it.
Mastering these ER thresholds transforms these meta teams from clunky concepts into seamless engines of destruction. Dial in these numbers, and you'll feel the difference immediately.
How to Optimize Character-Specific Energy Needs
Now we get personal. While team energy is a group effort, every character in Genshin Impact has their own unique energy appetite. Getting to know these individual quirks—from their Burst cost to their special talents—is the final step in crafting a team that hums with perfect, unbreakable rotations.

Character-Specific Burst Costs and Ascensions
Your first stop is the character’s talent menu. A character's Elemental Burst cost is the single biggest factor in their Energy Recharge needs. You can break them down into clear tiers:
- High-Cost Bursts (80-90 energy): Characters like Eula, Xiangling, and Beidou operate in this demanding tier. They typically need 180-220% ER to function, and that’s with a good battery on the team. Without one, their requirements can skyrocket.
- Low-Cost Bursts (40 energy): On the other end, characters like Zhongli, Albedo, and Tighnari are far more flexible. They can often maintain perfect uptime with just 100-120% ER, letting you invest almost entirely into their offensive or defensive stats.
Don't just look at the cost—check the cooldown, too. A character with an 80-cost Burst on a 20-second cooldown (like Yelan) has more time to generate energy than one with the same cost on a 15-second cooldown.
Next, check their Ascension stat. Some characters get a massive head start. Mona, Raiden Shogun, Venti, Bennett, Kaeya, and Yun Jin all gain a significant percentage of Energy Recharge as they level to 90. This built-in stat means you need far less from artifacts to hit your targets, freeing up your Sands piece for an offensive main stat.
Pivotal Constellations That Change Everything
For some characters, a single Constellation completely rewrites their energy economy. These are game-changers for building them comfortably.
- Yelan's C1 - "Enter the Plotters": This is the premier example. Gaining a second charge of her Elemental Skill means she can generate double the Hydro particles per rotation. This single constellation slashes her ER needs by 80-116% across different teams, often allowing you to swap an ER% Sands for an HP% one for massive damage gains.
- Faruzan's C6 - "The Wondrous Path of Truth": For Anemo hypercarry enthusiasts, this is non-negotiable. Pre-C6, Faruzan has crippling energy needs, often requiring a "ridiculous" 250-300% ER to Burst every rotation. Her C6 not only triggers extra attacks but also generates a flood of Anemo particles, reducing her requirement down to a manageable ~180-200% ER and finally enabling smooth Xiao or Wanderer teams.
Putting It All Together: A Building Checklist
When gearing any character, follow this mental checklist to find their perfect ER threshold:
- Check the Menu: Note their Burst cost and cooldown.
- Check their Ascension: See if they get free ER (like Raiden Shogun or Mona).
- Check their Constellations: Does C1 or C6 solve their energy problems? (Yelan, Faruzan).
- Evaluate their Team: Are they solo element or with a battery? Is there a Favonius weapon user?
- Test and Refine: Run your rotation in a domain. If your Burst is ready before the cooldown, you have too much ER. If it’s not ready, add more in 10% increments.
This tailored approach moves you from copying generic guidelines to crafting a build that fits your character, in your team, like a glove. Once you nail this, your rotations will feel effortless.
Genshin Impact Energy Management Tips and Tricks
This is where theory meets execution. You've learned the mechanics, built your characters, and planned your teams—now it's time for the advanced techniques that separate good rotations from flawless ones in Genshin Impact. Mastering these final tricks is what ensures 100% burst uptime isn't just a spreadsheet number, but a consistent reality in the heat of battle.
Final Execution and Reliability Checks
Theory is clean, but combat is messy. Your calculated Energy Recharge needs are a perfect-world minimum. To guarantee your bursts are ready on cooldown, especially in the unforgiving Spiral Abyss, you need to build in a buffer and master a few key in-the-moment techniques.
⚠️ Critical Safety Net: Always build 10-15% more ER than calculated for reliability. Calculators give you the bare minimum for a perfect rotation. Real gameplay has missed particles, dodges, and enemies that don't cooperate. That extra cushion is your insurance policy against a stalled rotation and a massive DPS loss.
Master the Art of Pre-funneling
This is a subtle but game-changing timing trick. The goal is to catch energy particles during a character's Burst animation, so the energy fills their gauge immediately after. Here’s how it works:
- With your battery character (e.g., Bennett), use their Skill to generate particles.
- Immediately swap to your energy-hungry character (e.g., Xiangling) and trigger their Burst.
- The particles will reach Xiangling while her Burst animation is playing, instantly refilling a chunk of her energy as soon as she's active again.
This technique is especially vital for characters who leave the field after their Burst, giving them less time to catch particles normally.
Leverage Enemy HP Threshold Particles
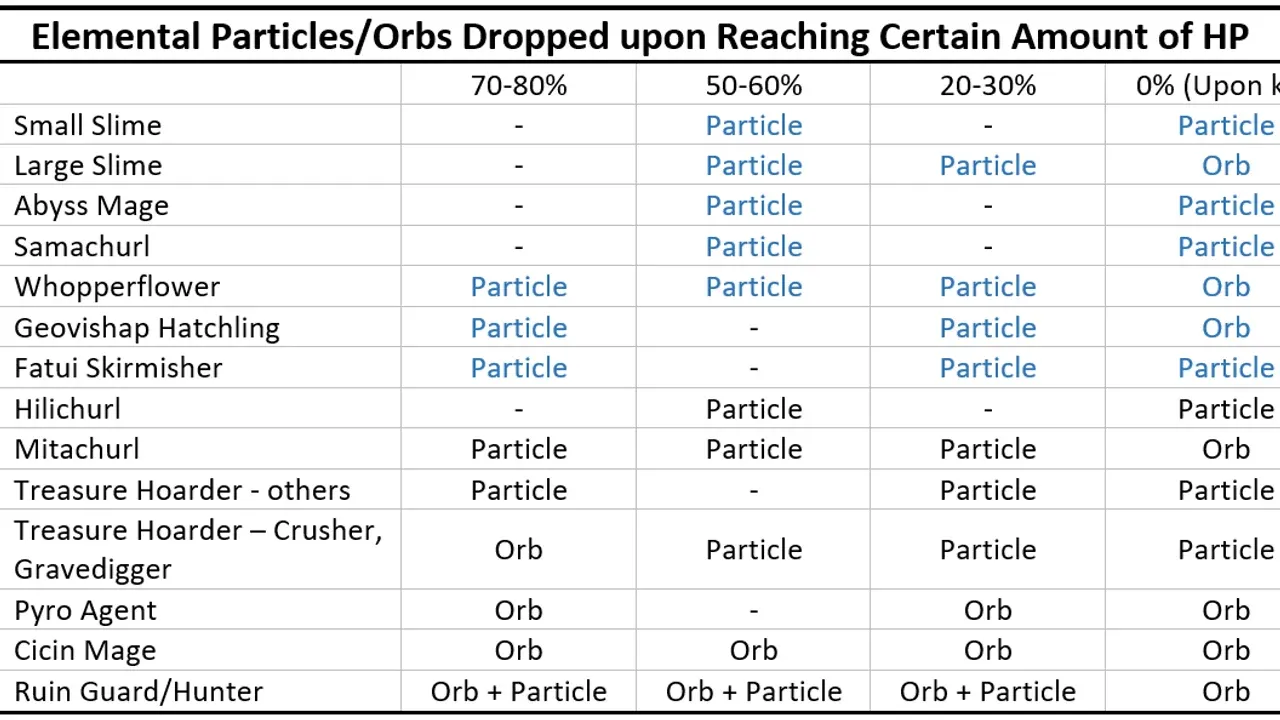
The game gives you a helping hand—if you know where to look. Enemies drop a burst of energy particles when their HP hits certain milestones, most notably at 50% and 0% HP. You can use this to your advantage:
- Focus Fire: If you're a few energy points short on your main DPS, focus your attacks to push a healthy enemy past the 50% HP threshold right before you need to Burst.
- Wave Management: In multi-wave content like the Abyss, try to defeat the last enemy of a wave with your battery's Skill to funnel those extra particles into your next rotation.
Avoid the Ultimate Penalty
This one is non-negotiable: Fallen characters lose all accumulated energy. If your key support gets knocked out, not only are you down a character, but you're also resetting their energy gauge to zero. This can completely break your rotation for the next 20 seconds. Prioritize survival—sometimes a healing bonus circlet or more HP substats is worth more than a perfect crit ratio if it keeps your team standing and your energy flowing.
Your Secret Weapon: The KQM Calculator
If you're serious about optimization, stop guessing. The KQM Energy Recharge Calculator (specifically the Monte Carlo version) is the community's gold standard. It doesn't just do simple math; it uses statistical modeling to account for the randomness of combat—variable enemy particle drops, the inconsistent timing of Favonius weapon procs, and slight rotation variances. You input your exact team, weapons, and rotation order, and it simulates thousands of combat scenarios to give you a reliable ER range for 95%+ uptime. It’s the most powerful tool you have to move from "I hope I have enough energy" to "I know I do."
With these advanced tactics in your arsenal, you're not just building characters—you're engineering reliability. Go into your next Spiral Abyss run with the confidence that your bursts will fire on command, every time.