How to Master Elemental Mastery and Aura Mechanics in Genshin Impact
Think of Genshin Impact’s combat not as a brawl, but as a high-stakes chemistry experiment. The difference between a frustrating fight and a spectacular explosion of numbers comes down to mastering two core systems: Elemental Mastery and ** Elemental Aura mechanics. This guide will demystify the stats and invisible rules that make your reactions tick, setting the foundation for every powerful team you'll build.
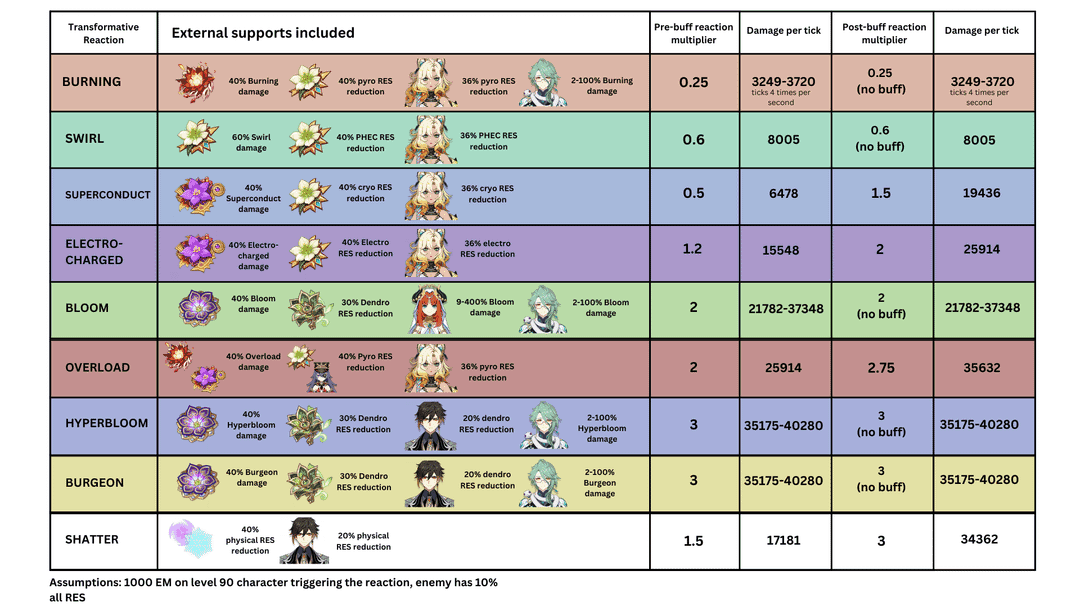
Detailed breakdown of reaction damage multipliers and support buffs.
The Power of Elemental Mastery
Elemental Mastery isn't just another stat in your character menu; it's the direct amplifier of your elemental reactions. Found in the Character Menu under Attributes, this number directly increases the damage of your Swirls, Hyperblooms, and Overloads. It also boosts the strength of shields generated by Crystallize reactions. For characters whose entire purpose is to trigger these effects—like Kuki Shinobu in a Hyperbloom team—stacking Elemental Mastery is your top priority. Trust me, watching those green homing missiles from Hyperbloom shred enemies is infinitely more satisfying when your EM is through the roof.
Understanding Elemental Auras: The Canvas for Reactions
Before a reaction can happen, you need a canvas. That canvas is the Elemental Aura. This is the status applied to an enemy (or object) when you hit it with an elemental skill like [E] or a burst like [Q]. You can't trigger a Vaporize reaction on thin air; you need a Hydro or Pyro aura already on the target for the second element to react with.
Here’s where it gets technical, but stick with me—this is the secret sauce. Every elemental application has a hidden strength value called Gauge Units (1U, 2U, etc.). When an element first lands as an aura, it gets hit with a 20% Aura Tax. This means a 1U attack becomes a 0.8U aura, a 2U attack becomes a 1.6U aura, and so on. This tax is why some auras feel fleeting while others last forever.
The duration of that aura is calculated by a specific formula: (2.5 × Gauge Units + 7) seconds. So, that 0.8U aura from a standard 1U attack will linger for 9.5 seconds, giving you a generous window to set up your big reaction hit.
Strong auras like Xingqiu’s Rain Swords (2U Hydro) create a 1.6U aura lasting 12 seconds, which is why he’s the gold standard for enabling consistent Vaporize reactions.
How Auras Interact and Decay
Auras aren't static; they decay over time and can be modified. When you apply the same element to an existing aura (like adding more Pyro to a Pyro-affected enemy), a rule called Decay Rate Inheritance kicks in. The new aura’s strength will be the higher of the two values, but it inherits the decay rate of the initial aura. This can sometimes make an aura last longer than you'd expect if you layer a strong application over a weak one.
However, there’s a famous exception to this rule. Since the Version 3.0 Update, the Pyro Aura no longer inherits decay from previous stacks. New Pyro applications will completely replace the old one with their own decay rate if they are stronger. This change made managing Pyro auras for Melt teams more predictable but also means you can't cheese extra-long Pyro durations with careful layering.
Mastering these fundamentals—knowing that Elemental Mastery powers your reactions, and that Elemental Auras follow specific rules for strength, tax, duration, and decay—transforms you from a button-masher into a tactical maestro. With this knowledge, you're ready to understand the deeper mechanics that dictate which reactions happen and how powerfully they hit, which we'll explore next.
Understanding Internal Cooldown (ICD) and Gauge Units in Genshin Impact
Ever wondered why your perfectly planned Vaporize combo sometimes fizzles out, leaving you hitting a neutral enemy? In Genshin Impact, the secret to reliable, high-damage rotations lies in two hidden systems: Internal Cooldowns (ICD) and Gauge Units (GU). Understanding these mechanics is what separates a chaotic elemental mess from a finely-tuned reaction machine.

Character ability usage in real-time combat.
The Rhythm of Elemental Application: Internal Cooldown (ICD)
Think of ICD as a built-in limiter on how often a character can apply their element. You can't just spam attacks and expect a reaction on every hit. The game uses a universal rule to control this: the Standard ICD Rule. After a character applies an element, they cannot apply it again until either 2.5 seconds have passed or they land 3 hits, whichever condition is met first.
This dual condition is crucial. A fast-hitting character like Yoimiya might exhaust the 3-hit window in under a second, resetting their application timer early. Meanwhile, a slower attacker might rely on the 2.5-second timer. This rule explains why some abilities feel incredibly consistent at enabling reactions while others are frustratingly sporadic.
To check a character's ICD, hit an enemy with a Slime or a torch. Watch for the elemental symbol above their head—if it doesn't appear, you're still on cooldown.
The rules get more specific with weapon types, which is vital for planning attack strings. In Genshin Impact, Claymore and Sword users share a single ICD timer between their Normal and Charged Attacks. If you use three Normal Attacks to apply an element, your following Charged Attack won't apply it again until the ICD resets. Conversely, Polearm, Bow, and Catalyst users maintain separate ICDs for each attack type. This is why a character like Hu Tao (Polearm) can effectively alternate between Normal and Charged Attacks to maximize her Pyro application.
The Strength of Your Elements: Gauge Units
If ICD is the rhythm of application, then Gauge Units are the volume. Not all elemental applications are created equal. Every attack or skill is classified with a hidden strength value: 1U, 2U, 4U, or the extremely rare 8U. This "Gauge" determines how long an elemental aura lasts on an enemy and how many reaction triggers it can withstand.
A stronger gauge (like 2U) creates a more durable aura. For example, Tartaglia's melee stance applies 2U Hydro, creating a robust aura that can fuel multiple Pyro triggers for Vaporize. A weaker 1U application, like many standard skills, creates a shorter-lived aura. This is why pairing characters with mismatched gauge strengths can break your rotation—a weak aura might be consumed before your main damage dealer can even attack.
Special Cases and Utility
Not every elemental interaction is about dealing damage or triggering reactions. Some abilities are designed purely for puzzle-solving and exploration. These are known as 0U Elemental Attacks. These skills, often triggered by pressing [E] or [Q], can activate environmental objects like Elemental Monuments, torches, or Dendro pillars without applying a functional aura to enemies or triggering combat reactions. They're your dedicated tool for overworld puzzles.
⚠️ Watch out: The shared ICD for Claymores and Swords is a common trap. If you're using a character like Diluc and weave in Charged Attacks, you might accidentally delay your next Pyro application, disrupting your Vaporize sequence.
Mastering the interplay between your characters' ICD patterns and the gauge strength of their applications is the key to flawless execution. With this knowledge, you can construct rotations where the aura never expires prematurely and every powerful hit lands with a satisfying reaction. You're now thinking in terms of the game's hidden language.
Best Characters with No ICD for Reaction Teams
In Genshin Impact, a character’s true power isn't just in their stats—it’s in how often they can apply their element. While most attacks are gated by Internal Cooldowns, a select few characters break the rules, applying their element with every single hit. These are your reaction powerhouses, the engines behind the game's most consistent and devastating teams.

Characters performing elemental bursts in the field.
The No-ICD All-Stars
These characters are invaluable because their ability to apply an element without restriction makes them the most reliable "enablers" or "triggers" in the game. They can sustain an elemental aura for others or trigger reactions on every attack, turning complex rotations into simple, high-damage loops.
Here are the top-tier characters whose key abilities have no ICD:
- Xiangling, the head chef at Wanmin Restaurant in Liyue Harbor, is a foundational Pyro Sub-DPS. Her Pyronado (Elemental Burst) and Guoba (Elemental Skill) both apply 1U Pyro with no ICD. This means every swing of her spinning fire wheel can trigger a reaction, making her the irreplaceable core of teams like National and Reverse Melt.
- Xingqiu, the young master of the Feiyun Commerce Guild in Liyue, is arguably the game's most important Hydro support. His Elemental Skill applies a strong, no-ICD Hydro aura, and his orbiting Rain Swords provide relentless Hydro application. This creates the perfect, persistent Hydro aura for Pyro DPS like Hu Tao to trigger consistent Vaporize reactions.
- Sangonomiya Kokomi, the Divine Priestess of Watatsumi Island in Inazuma, provides unparalleled off-field Hydro. Her Elemental Skill, the Bake-Kurage, applies no-ICD Hydro in an area, making her the premier enabler for Freeze teams and a comfortable driver for Bloom reactions.
- Kaedehara Kazuha, the wandering samurai often found with the Crux Fleet, is the ultimate Anemo support. His Elemental Burst absorbs an element and then continuously Swirls it with no ICD. This allows him to spread an element like Pyro or Electro to every enemy in the area with every tick, setting up massive reaction chains.
- Bennett, the unlucky adventurer from the Mondstadt Adventurers' Guild, is more than just an ATK buffer. His Elemental Skill (tap version) applies no-ICD Pyro, which is perfect for quickly breaking Cryo shields or triggering Melt reactions in quick-swap teams.
- Ganyu, the secretary of the Yuehai Pavilion in Liyue, reigns as a premier Cryo DPS. Her Frostflake Arrows and their bloom effect have no ICD Cryo. This allows her to trigger Melt on every single charged shot when paired with a consistent Pyro aura, or maintain a near-permanent Freeze.
While their key skills have no ICD, remember that these characters' Normal and Charged Attacks usually still follow standard ICD rules. The no-ICD effect is specific to the named abilities.
Why No-ICD Characters Dominate
The value of these characters lies in their sheer reliability. In a Vaporize team, Xingqiu's constant Hydro means your Pyro DPS never has to worry about the aura disappearing mid-combo. In a Melt team, Xiangling's Pyronado ensures every hit of a Cryo character's burst can be amplified. This consistency is what separates functional teams from optimal ones in Genshin Impact's hardest content.
Building around these characters is straightforward: for enablers like Xingqiu or Kokomi, ensure they have enough Energy Recharge to use their skills off-cooldown. For damage-focused triggers like Xiangling or Ganyu, build them with the traditional ATK/Crit stats, plus a healthy amount of Elemental Mastery to boost their reaction damage.
With even one of these no-ICD specialists on your team, you unlock a level of reaction consistency that trivializes aura management and turns your damage output from sporadic bursts into a relentless, predictable torrent.
How to Trigger Amplifying Reactions: Vaporize and Melt
In Genshin Impact, elemental reactions are where your damage truly takes flight, and none soar higher than Amplifying Reactions. While other reactions add new damage instances, Vaporize and Melt multiply the power of your strongest attacks, turning a good hit into a spectacular one-shot. This section breaks down exactly how to trigger these high-damage multipliers and why the order of your elemental application makes all the difference.

Genshin Impact gameplay.
Understanding the Multipliers: Forward vs. Reverse
The core rule is simple: the element that triggers the reaction gets the damage boost. However, the multiplier depends entirely on which element is applied first (the aura) and which triggers the reaction.
- Vaporize (Pyro + Hydro):
- Forward Vaporize occurs when Pyro triggers on a Hydro aura. This yields a 1.5x Multiplier to your Pyro damage.
- Reverse Vaporize occurs when Hydro triggers on a Pyro aura. This yields a much larger 2.0x Multiplier to your Hydro damage.
- Melt (Pyro + Cryo):
- Forward Melt occurs when Cryo triggers on a Pyro aura. This yields a 1.5x Multiplier to your Cryo damage.
- Reverse Melt occurs when Pyro triggers on a Cryo aura. This yields the game's highest single-hit multiplier at 2.0x Multiplier to your Pyro damage.
Think of it as "reverse" being the stronger, 2.0x option. For Vaporize, you want Hydro on the enemy first so your Pyro DPS can trigger the reverse reaction. For Melt, you want Cryo on the enemy first so your Pyro DPS can trigger reverse Melt.
The Hidden Math: Gauge Consumption and Team Building
This is where Elemental Gauge Theory becomes crucial. The multiplier isn't the whole story; how quickly the aura is consumed determines how many amplified hits you can land. The "Reaction Coefficient" dictates this.
- Forward Vaporize (Pyro on Hydro) and Reverse Melt (Pyro on Cryo) both have a high consumes 2.0x trigger gauge. This means the aura depletes rapidly. A strong Cryo aura might only survive one or two Pyro hits before it's gone, requiring constant re-application.
- Conversely, Reverse Vaporize (Hydro on Pyro) and Forward Melt (Cryo on Pyro) have a low consumes 0.5x trigger gauge. The aura lasts much longer, allowing your trigger character to land multiple amplified hits from a single application. This is why a character like Xingqiu can enable a Pyro DPS like Hu Tao to Reverse Vaporize on nearly every hit—his strong Hydro aura depletes slowly.
This is why team construction is vital. You need an off-field character who can apply the aura element strongly and consistently to keep the reaction engine running.
Locking In Your Power: The Snapshotting Strategy
To maximize these multipliers, you need to combine them with powerful buffs. This is where a key combat strategy, Snapshotting, comes into play. Some abilities in Genshin Impact "snapshot" your character's stats at the moment you cast them.
A classic example is using Bennett's Elemental Burst, which creates a large field that massively boosts your ATK. If you switch to Xiangling and use her Pyronado while standing in Bennett's field, the Pyronado's damage—including all its subsequent Vaporize or Melt reactions—will "snapshot" that boosted ATK for its entire duration, even if you leave the field or Bennett's buff expires.
⚠️ Watch out: Not all abilities snapshot. It's a specific property of certain skills. When building a team around amplifying reactions, always check if your main damage-dealing skill can snapshot buffs for maximum effect.
With a clear understanding of forward versus reverse triggers and how to support them with strong auras and smart buffing, you're ready to build teams that don't just hit hard—they hit for exponentially more.
Mastering Transformative Reactions: Swirl, Overload, and Superconduct
This is where things get spicy—while Amplifying Reactions are your high-rollers, Transformative Reactions are the workhorses of Genshin Impact, dealing their own, separate damage that scales independently of your ATK or Crit stats. Instead, they rely on your character’s Level and Elemental Mastery (EM) to turn the tide of battle with potent effects.

Visual effects of elemental reactions in combat.
The Core Transformative Reactions
Think of these as the AoE specialists and utility powerhouses. They can't score critical hits, but their flat damage can clear entire groups, and their secondary effects are often game-changers.
- Swirl (Anemo + Pyro/Hydro/Cryo/Electro): This is the signature move of Anemo supports. When Anemo meets another elemental aura on an enemy, it triggers Swirl, dealing AoE damage of that reacted element and spreading it to nearby enemies. This is why characters like Kaedehara Kazuha, Sucrose, and Venti are so invaluable—they don't just do damage; they turn a single target with an element into a whole group of afflicted targets, setting up massive chain reactions.
- Overloaded (Electro + Pyro): A classic for a reason. This reaction causes a satisfying explosion, dealing AoE Pyro DMG and knocking back lightweight enemies. It's fantastic for crowd control and breaking Geo shields, but be mindful: knocking smaller foes away can scatter them, potentially disrupting your flow. The damage scales with the Electro or Pyro character who triggers the explosion.
- Superconduct (Electro + Cryo): This is the go-to reaction for any Physical damage dealer. It triggers a frosty burst, dealing AoE Cryo DMG and, more importantly, reducing the Physical RES of affected enemies by 40% for 12 seconds. For characters like Eula or Razor, this debuff is essential for maximizing their hard-hitting Physical attacks.
- Electro-Charged (Electro + Hydro): The "Taser" reaction. When these two elements coexist on a target (or multiple targets), they enter a state that deals continuous Electro damage over time. Crucially, both the Electro and Hydro auras persist simultaneously, consuming 0.4U of both elements per tick. This allows other reactions like Vaporize or Overload to occur on the same enemy, making it a fantastic enabler for chaotic, multi-reaction teams.
- Crystallize (Geo + Pyro/Hydro/Cryo/Electro): Geo's primary defensive reaction. When Geo hits an elemental aura, it creates a Crystallize shard of that element on the ground. Picking it up grants your active character a shield effective against damage of the shard's element. While not a primary damage source, these shields provide crucial survivability, and their strength is boosted by the Geo character's Elemental Mastery.
Building Around Transformative Reactions
The golden rule here is to focus Elemental Mastery and character level on the character who triggers the reaction. If your Kuki Shinobu is the one detonating Dendro Cores for Hyperbloom, she's the one who needs to be Level 90 with an EM build.
For Swirl teams, always equip your Anemo character with the 4-piece Viridescent Venerer artifact set. This not only boosts Swirl damage but also shreds enemy resistance to the Swirled element by 40%, massively amplifying your whole team's damage output.
While they might not produce the biggest single numbers, mastering Swirl, Overload, Superconduct, and their kin will give you the consistent, wide-area power and utility needed to handle anything Genshin Impact throws at you. With the right setup, you're ready to dominate the battlefield through sheer elemental force.
How to Use Frozen and Shatter for Crowd Control
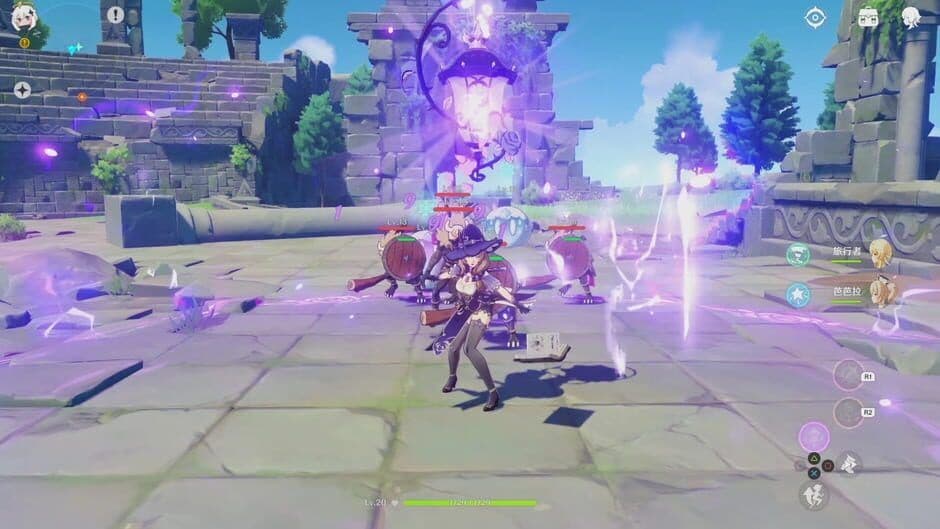
Ever feel like you need a breather in the chaos of a Genshin Impact fight? What if you could just… stop the enemy in their tracks? That’s the power of the Frozen reaction, your ultimate crowd control tool in Teyvat. This mechanic isn't about raw damage—it's about dictating the pace of combat, giving you precious seconds to line up your biggest hits without taking a single scratch.
Combat screenshot featuring elemental application.
Here’s how it works: apply Hydro and Cryo to an enemy in any order. The result is Frozen, a state that completely immobilizes them, halting all attacks and movement. It’s incredibly satisfying and strategic, but there are important limitations. Bosses and certain Cryo-immune enemies are immune to this effect, so it's best used against regular mobs, Fatui agents, and Abyss heralds.
⚠️ Watch out: The Frozen status breaks immediately if you apply Pyro, Electro, or Anemo. This can be a good thing if you want to trigger Melt or Overload, but it ends your crowd control prematurely.
Now, what do you do with a frozen enemy? You have two options. You can leave them locked in place, which is perfect for setting up a big AoE attack or focusing down other targets. Alternatively, you can Shatter them. Shatter is triggered by hitting a Frozen enemy with a strong blunt attack, dealing a burst of Physical DMG. The easiest ways to do this are by using a Claymore character's normal attacks or performing a Plunging Attack from above.
A key piece of Genshin Impact’s underlying Gauge Theory makes Freeze teams exceptionally smooth. When you trigger Frozen, the Hydro and Cryo auras don't just vanish; they can coexist as underlying auras with the Freeze Aura. This means that after a Shatter, there’s a high chance the enemy will still be affected by either Hydro or Cryo, allowing you to immediately re-apply the missing element and freeze them all over again. This is why characters like Ayaka paired with Kokomi or Mona can maintain near-permanent freeze locks.
For the most reliable freeze, use a character with strong, persistent Hydro application like Xingqiu (with his orbiting rain swords) or Kokomi (with her jellyfish). Their ability to maintain the Hydro aura makes it easy for your Cryo DPS to re-freeze enemies with every attack.
While Shatter deals Physical damage, it’s generally not built around as a primary damage source because it scales with Elemental Mastery and ends the freeze. The real power of this duo lies in the control. A well-built Freeze team turns chaotic battles into a methodical, safe dismantling of your enemies. With the enemy locked down, you can focus all your effort on dealing damage, making this one of the most beginner-friendly and effective strategies in Genshin Impact.
So, when the fight gets overwhelming, remember: apply Hydro, follow up with Cryo, and watch the world stand still. You’re in control now.
Mastering the Dendro Reaction System: Bloom, Hyperbloom, and Burgeon
Welcome to the core of Genshin Impact’s modern meta. This is where the game’s combat evolves from elemental combos into a strategic ecosystem of seeds, homing missiles, and explosive blooms. If you’ve mastered the basics of Vaporize and Swirl, the Dendro core reactions—Bloom, Hyperbloom, and Burgeon—are your next frontier. They’re powerful, rewarding, and can feel overwhelming at first. Don’t worry—once you see the logic, you’ll be orchestrating these reactions like a conductor.
Character combat and elemental effects.
Think of it as a two-step dance. First, you create the fuel with Bloom: apply Dendro and Hydro to an enemy to spawn a Dendro Core. These green seeds sit on the ground for about 3 seconds before harmlessly exploding. Their real power is unlocked in step two: you transform them. Hit a core with Electro to trigger Hyperbloom, which turns it into a Sprawling Shot—a fast, homing missile that seeks out the nearest enemy. Hit a core with Pyro to trigger Burgeon, causing a wide AoE Dendro DMG explosion. Your goal is to become the puppet master, setting up cores and choosing how to detonate them for maximum chaos.
The key to mastering this system is managing ownership. The damage from Hyperbloom and Burgeon scales entirely with the Level and Elemental Mastery of the character who triggers the final step—the one who applies the Electro or Pyro to the core. This means you build your Kuki Shinobu or your Thoma with full EM gear, while your Dendro and Hydro applicators can focus on other stats. It’s a beautifully efficient division of labor.
Building Your Core Creation Team
Your team needs three pillars: a consistent Dendro applier, a steady Hydro enabler, and a dedicated Electro or Pyro trigger.
For Dendro application, no one is more reliable than Nahida from the Sanctuary of Surasthana in Sumeru. Her Elemental Skill marks enemies and applies Dendro with a tight 1-second ICD, ensuring a near-constant aura for Bloom creation. For Hydro, off-field legends like Xingqiu or Yelan are perfect, as their rapid attacks guarantee cores will spawn as fast as you can make them.
Now, for the trigger. For Hyperbloom, you want an Electro character who can hit the cores easily and often. Raiden Shogun’s coordinated attacks or Kuki Shinobu’s orbiting ring are ideal because they automatically seek out the cores on the ground. For Burgeon, you need a Pyro character who applies their element in a wide, predictable area. Thoma’s burst or Xiangling’s Pyronado work well, but there’s a catch: Burgeon explosions damage you. A shielder like Thoma himself is almost mandatory to survive your own botanical bombs.
In a Hyperbloom team, your Electro trigger (like Kuki Shinobu) should be leveled to 90 and built with as much Elemental Mastery as possible on Sands, Goblet, and Circlet. Their personal attack stats don’t matter—the homing missile damage scales purely off their EM and level.
The Special Case: Nilou’s Bloom
Some characters bend the rules. Nilou, the star of the Zubayr Theater in Sumeru, specializes in a supercharged version of Bloom. When your team contains only Dendro and Hydro characters, her passive talent transforms standard Dendro Cores into Bountiful Cores. These cores have a larger AoE and higher damage, and they explode almost instantly. While she forgoes the transformative power of Hyperbloom or Burgeon, her pure Bloom teams unleash a devastating garden of explosions that scale beautifully with team-wide EM investment.
Putting It All Together
A classic, accessible Hyperbloom team looks like this: Nahida (Dendro applier), Xingqiu (Hydro applier), Kuki Shinobu (Electro trigger built full EM), and a flex slot like Zhongli for defense. Your rotation is simple: apply Dendro and Hydro to spawn cores, then switch to Kuki and let her skill detonate them all into homing missiles. It’s one of Genshin Impact’s most forgiving and powerful teams.
For Burgeon, you might run Nahida, Xingqiu, Thoma (Pyro trigger/shielder built full EM), and an Anemo grouper like Kazuha. Just be mindful of your positioning—stand back after setting your fiery garden ablaze.
With your core creators in place and your trigger character built to detonate, you’re ready to dominate. This system turns Genshin Impact’s battlefield into your own reactive playground. Let’s grow some chaos.
How to Trigger Catalyze Reactions: Quicken, Aggravate, and Spread
Here’s where Genshin Impact’s combat gets really interesting. Forget about auras being consumed and replaced—the Catalyze system breaks the mold. When you combine Electro and Dendro, you don’t just get a one-off explosion. Instead, you trigger Quicken, a special state that unlocks a powerful new way to scale your damage.
The Quicken Foundation
Think of Quicken as priming an enemy for a sustained assault. When an enemy is affected by both Dendro and Electro, they gain the Quicken Aura, which lasts for 7 seconds. The key here is that this aura isn’t consumed by the reactions it enables. This is the core mechanic that makes the Catalyze system so unique and powerful in Genshin Impact.
Aggravate and Spread: Additive Damage Bonuses
Once an enemy has the Quicken Aura, your Electro and Dendro attacks get a major upgrade. These follow-up reactions are called Aggravate and Spread.
- Aggravate is triggered when an Electro attack hits a Quickened enemy. It adds a flat bonus of Electro damage to that hit.
- Spread is triggered when a Dendro attack hits a Quickened enemy. It adds a flat bonus of Dendro damage to that hit.
This "additive" damage is different from Vaporize or Melt. Instead of multiplying your total damage, it adds a separate chunk of damage that then benefits from your character's Crit, DMG% bonuses, and talents. This makes building for Aggravate/Spread a hybrid approach, where you still want good Crit stats alongside solid Elemental Mastery.
The bonus damage from both Aggravate and Spread scales with the triggering character’s Level and Elemental Mastery. This means leveling your characters to 90 is incredibly valuable for maximizing this damage, and stacking EM on your main trigger pays off handsomely.
The Power of Coexistence
Here’s the trick most guides miss: the Quicken Aura allows both Electro and Dendro to act as triggers simultaneously. Because the aura isn’t consumed, you can have one character repeatedly triggering Aggravate while another is triggering Spread, all from that single Quicken application. This creates a dense web of high-damage reactions that feels incredibly fluid and powerful.
⚠️ Watch out: While the Quicken Aura itself lasts 7 seconds, it can be extended. Applying more Dendro or Electro to a Quickened enemy refreshes the aura’s duration, as long as the underlying elemental gauge hasn’t been fully consumed by other reactions like Burning or Hyperbloom.
This synergy is why teams built around Keqing, Cyno, Alhaitham, or Tighnari feel so explosive. You’re not waiting for one reaction to finish before setting up the next—you’re layering them on top of each other for constant, escalating damage. Once you master the rhythm of applying Quicken and then unleashing a flurry of Electro and Dendro hits, you’ll unlock one of Genshin Impact’s most satisfying and potent playstyles.
Best Team Compositions and Elemental Resonance in Genshin Impact
Now that you understand the mechanics behind each reaction, it’s time to put it all together. In Genshin Impact, a great character becomes unstoppable when placed in the perfect team—a unit that synergizes through elemental reactions and powerful passive buffs. This section will show you how to build those legendary teams.
Understanding Elemental Resonance
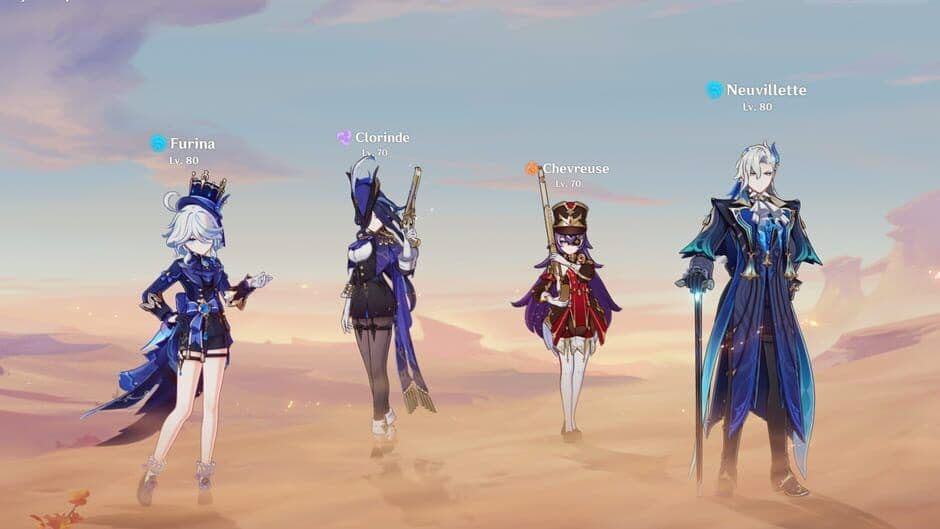
First, let's talk about the free power you get just from your party composition. Elemental Resonance activates when you have two characters of the same element in your party, granting a powerful team-wide passive buff. This isn't just a small bonus; it's a foundational part of team-building. For example, the Pyro Resonance grants a massive +25% ATK for your entire squad, making it a staple for any team that can spare the slots. Other key resonances include Hydro Resonance for more HP (great for characters like Furina or Neuvillette), and the Dendro Resonance, Sprawling Greenery, which provides substantial Elemental Mastery bonuses for reaction-heavy teams. Always check if your core duo can activate a beneficial resonance—it's a huge, effortless boost.
Meta Team Compositions in Action
The most successful teams in Genshin Impact are built around enabling one or two core reactions with incredible consistency. Here are three proven archetypes that dominate the Spiral Abyss.
The International Vaporize Core
This classic powerhouse team, often called the International Team, consists of Bennett, Xiangling, Xingqiu, and Kazuha. The strategy is elegant: Bennett provides healing, a huge ATK buff, and Pyro energy. Xingqiu applies relentless off-field Hydro with his Rain Swords, creating a persistent aura. Xiangling’s Pyronado (which has no ICD) then spins through the battlefield, triggering constant Reverse Vaporize reactions for 2x damage. Kazuha caps it off by grouping enemies, Swirling Pyro or Hydro to spread elements, and—crucially—using the 4-Piece Viridescent Venerer artifact set to reduce enemy Elemental RES by 40%. This team exemplifies perfect synergy between amplification, buffs, and resistance shred.
The Hyperbloom Engine
For a team that scales phenomenally well with investment and is surprisingly easy to build, look no further than Hyperbloom. A top-tier Hyperbloom Team lineup is Nahida, Furina, Kuki Shinobu, and a Flex slot (like Zhongli for defense). Here’s how it works: Nahida applies a strong, lasting Dendro aura to all enemies. Furina provides massive off-field Hydro application, which reacts with Dendro to create Bloom cores on the ground. Then, Kuki Shinobu, built full Elemental Mastery, uses her orbiting Electro ring to instantly trigger every core into Hyperbloom homing missiles. The damage scales entirely from Kuki’s Level and EM, ignoring enemy DEF and the need for Crit stats, making it incredibly efficient.
The Electro-Charged (Taser) Team
When you want chaotic, swirling AoE damage, a Taser Team is your answer. This strategy revolves around Electro + Hydro + Anemo, utilizing Electro-Charged and Swirl to spread damage. A classic F2P-friendly version uses Sucrose (as the on-field driver), Xingqiu, Fischl, and Beidou. Xingqiu and Beidou provide massive off-field Hydro and Electro damage, applying their elements constantly. Sucrose then attacks, triggering chain Electro-Charged reactions while her Swirls spread Hydro and Electro to every enemy in range. She also groups them tightly and, once again with the Viridescent Venerer set, shreds their elemental resistances for even more damage.
In any team with an Anemo support like Kazuha or Sucrose, the 4-Piece Viridescent Venerer set is non-negotiable. That 40% resistance shred is one of the biggest damage multipliers in Genshin Impact. Don’t just build for their personal damage—build to empower your main DPS.
Building Your Own Synergy
When crafting a team, start with this checklist:
- Choose Your Core Reaction: Pick one main reaction to maximize (e.g., Vaporize, Hyperbloom, Aggravate).
- Secure Elemental Application: Ensure you have at least one character who can apply the needed element reliably off-field.
- Add Buffs and Debuffs: Slot in a support who can group enemies, shred resistances, or boost your team's ATK or EM.
- Don’t Forget Sustain: A healer or shielder keeps you alive to execute your rotation. A dead team deals zero damage.
By following these principles and studying the meta examples, you can move beyond random character picks and start building teams that have clear goals and devastating results. Now, go assemble your squad and dominate the battlefield.
Genshin Impact Combat Tips: Common Mistakes and Shield Breaking
You've mastered the elemental reactions, built synergistic teams, and understand the theory. Now, let's translate that knowledge into battle-ready instincts. This final section of our Genshin Impact combat guide tackles the common mistakes that trip up even seasoned players and arms you with the practical knowledge to dismantle the toughest enemy shields.
The Biggest Pitfalls and How to Avoid Them
In Genshin Impact, a powerful team on paper can still struggle in practice due to subtle, overlooked details. Here are the most common errors and how to fix them.
Overlooking Character Level
This one’s easy to miss but has a massive impact. For characters built around transformative reactions—like Hyperbloom, Burgeon, Overloaded, and Swirl—their Level 90 is not a luxury; it's a requirement. These reactions scale their base damage directly with the triggering character's level. A Level 80 Kuki Shinobu will deal significantly less Hyperbloom damage than a Level 90 Kuki Shinobu with the exact same Elemental Mastery. If your off-field trigger isn't dealing the damage you expect, check their level first.
Misunderstanding Reaction Ownership
Always remember: the character who applies the final element gets credit for the reaction. This means their stats—specifically their Level and Elemental Mastery—determine the reaction's power. If your Nahida applies Dendro but your Raiden triggers the Hyperbloom, it's Raiden's EM that matters. Build your stats on the trigger, not the aura applier.
For transformative reaction teams, funnel all your best EM artifacts onto the trigger character. The aura appliers can focus on utility stats like Energy Recharge.
Fixing Inconsistent Reactions (ICD Misalignment)
You have a perfect Vaporize team, but your Pyro DPS only triggers the reaction on every other hit. This is often due to Internal Cooldown (ICD) or gauge mismatch. A reliable fix is adding a second Hydro applier. For example, pairing Yelan with Xingqiu creates such a strong, persistent Hydro aura that even characters with fast Pyro application (and their associated ICDs) can trigger Vaporize consistently. This principle applies to any reaction where your aura is being consumed too quickly.
Breaking Through: Elemental Shield Matchups
Some enemies, like Abyss Mages and Fatui Skirmishers, hide behind elemental shields that drastically reduce damage. Brute force takes forever; the right element breaks them in seconds.
The rule is simple: use Hydro for Pyro shields and Pyro for Cryo shields. Cryo is also highly effective against Hydro and Electro shields. Geo shields require Geo damage, claymore attacks, or the heavy hit from an Overloaded reaction. Memorizing these matchups will save you minutes in timed challenges like the Spiral Abyss.
⚠️ Watch out: Dendro shields (on Wooden Shieldwall Mitachurls) are best handled with—you guessed it—Pyro. Burning makes quick work of them.
If you've been struggling with a specific chamber or overworld enemy, chances are one of these core principles was the key. With your reaction knowledge sharpened and these practical combat tips in hand, you're not just playing Genshin Impact—you're mastering its deepest systems. Go forth and dominate.