How to Upgrade Flasks in Elden Ring
In Elden Ring, your flasks aren't just consumables—they’re your lifeline. Upgrading them is the single most important thing you can do to survive the brutal challenges of the Lands Between. This guide will break down the core mechanics of flask upgrades, explaining the crucial difference between Golden Seeds and Sacred Tears, and showing you exactly how to make your healing and FP restoration more effective.
Selecting a Golden Seed as a starting keepsake provides an immediate flask charge.
To upgrade your flasks, you’ll need to find two key items: Golden Seeds and Sacred Tears. Here’s what each one does:
- Golden Seeds increase the total number of charges your flasks can hold.
- Sacred Tears increase the amount of health or FP restored per flask use.
Think of it this way: Golden Seeds give you more sips, while Sacred Tears make each sip stronger.
How to Upgrade at a Site of Grace
You’ll manage all flask upgrades at any Site of Grace. When you rest, select ‘Flask’ from the menu to see two key options:
- Add charge to flask: This is where you spend your Golden Seeds to permanently increase your total flask uses.
- Increase amount replenished by flasks: This is where you spend your Sacred Tears to permanently boost the potency of each drink.
If you can upgrade, a small white circle will appear next to these menu options. Don’t hoard your seeds and tears—use them as soon as you find them for an immediate power boost.
Understanding Your Three Flasks
You start the game with two sacred flasks, and you’ll find a third early on:
- Flask of Crimson Tears: Your red healing flask. It restores HP and is essential for staying alive.
- Flask of Cerulean Tears: Your blue FP flask. It restores Focus Points for casting spells and using weapon skills.
- Flask of Wondrous Physick: You’ll find this special flask in the Third Church of Marika in eastern Limgrave. It doesn’t use charges like the others; instead, you mix Crystal Tears into it at a Site of Grace to create a single, powerful customizable buff per rest.
Allocating Your Charges
You have full control over how your total flask charges are split. At any Site of Grace, go into the Flask menu and press [A] on either the Crimson or Cerulean flask graphic to move charges between them. If you’re a pure melee warrior, you might want all your charges in Crimson Tears. A spellcaster will want to shift several over to Cerulean Tears. You can redistribute these charges anytime you rest, so feel free to experiment.
With these fundamentals in place, you’re ready to start hunting for Golden Seeds and Sacred Tears to build up your endurance for the epic journey ahead. Let’s go find them.
Golden Seed Upgrade Costs and Max Flask Limits
Planning your Flask upgrades in Elden Ring is key to managing your survival across the punishing Lands Between. Knowing how many resources you need and when you'll need them helps you prioritize your exploration and ensures you're never caught short in a tough fight.
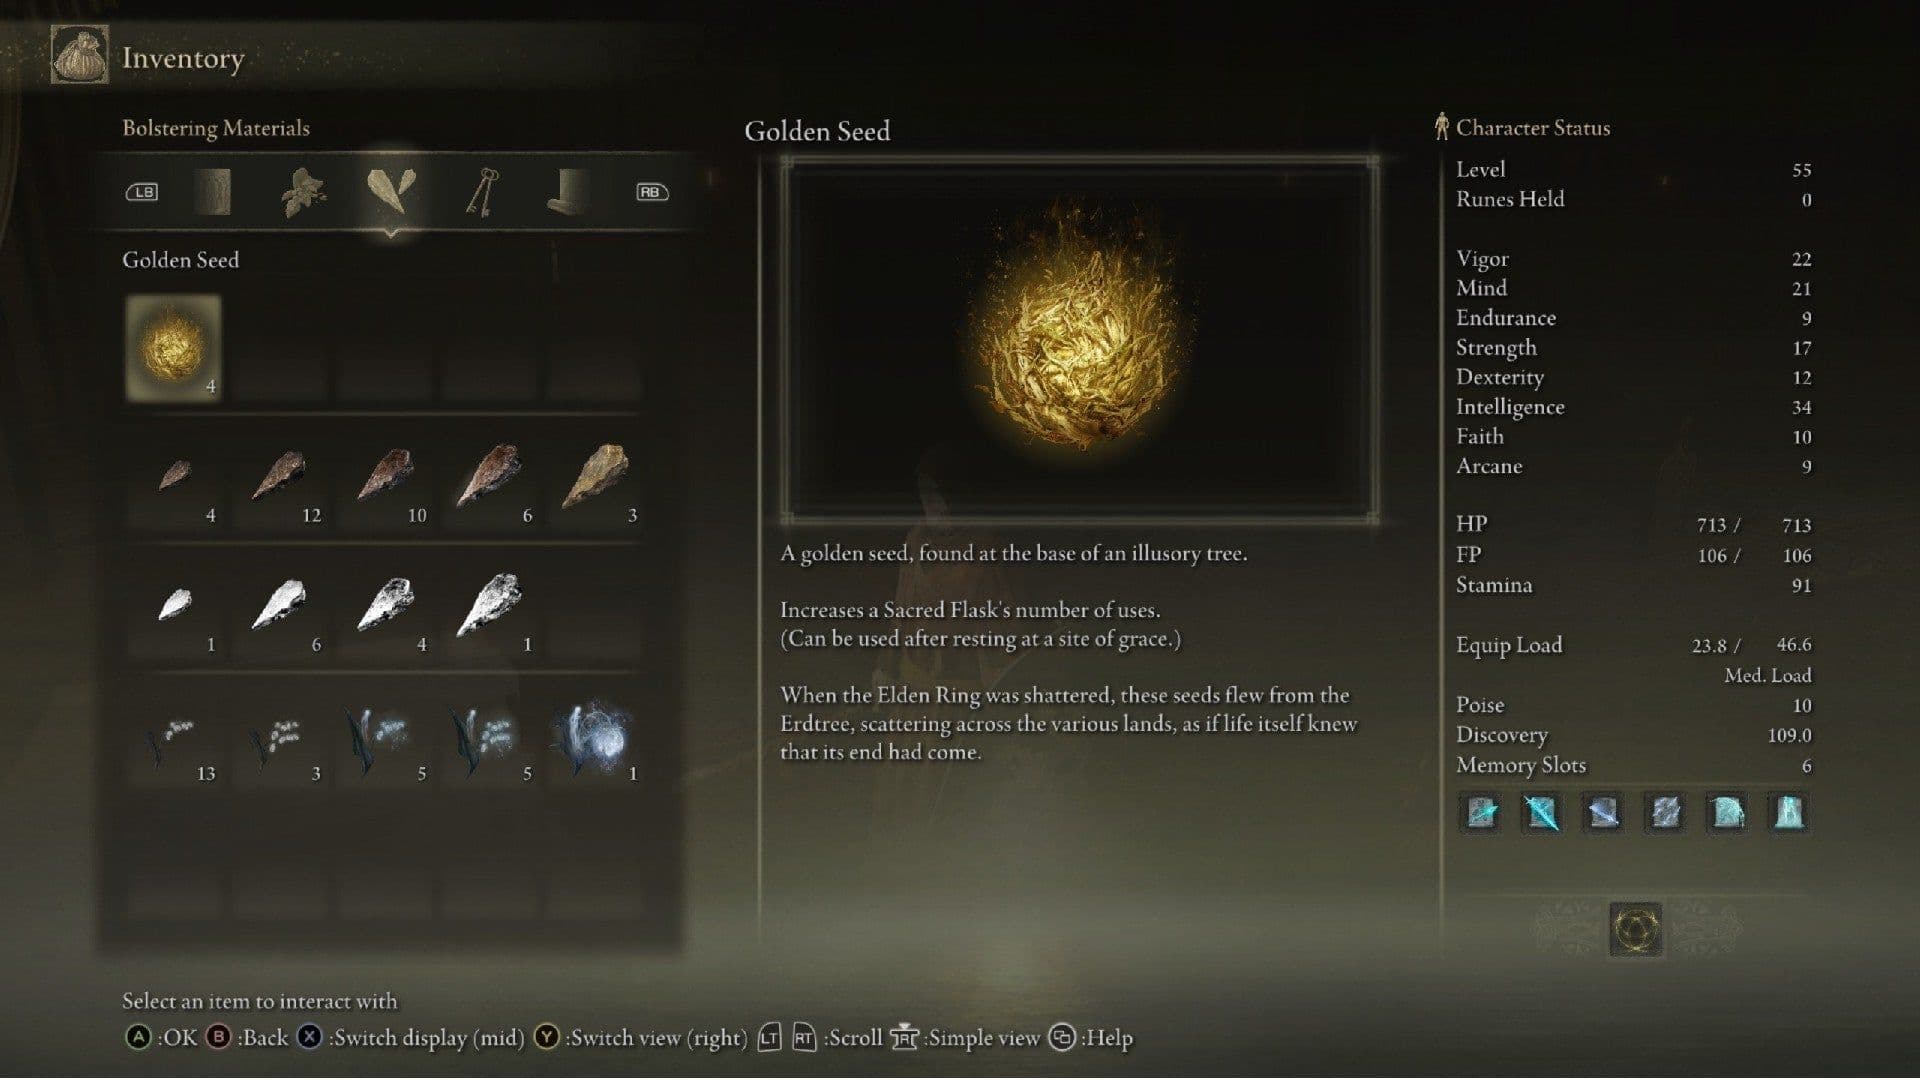
The Golden Seed is the primary item used to increase flask charges in Elden Ring.
To reach the absolute limit of Flask charges, you’ll need a total of 30 Golden Seeds. This will get you to a maximum of 14 total charges that you can split between your Crimson and Cerulean Flasks. The cost isn't linear, though—it escalates as you get stronger. Here’s the full breakdown of what each new charge will cost you:
- Charges 5 & 6: 1 Golden Seed each.
- Charges 7 & 8: 2 Golden Seeds each.
- Charges 9 & 10: 3 Golden Seeds each.
- Charges 11 & 12: 4 Golden Seeds each.
- Charges 13 & 14: 5 Golden Seeds each.
So, those early upgrades in Limgrave feel rewarding and cheap, but by the time you're pushing for the final few charges in the late-game areas, you'll need to hunt down a lot more seeds per upgrade. Don't worry about running out, though—there are well over 30 seeds in the game, so you have some wiggle room.
At character creation, selecting the Golden Seed as your Keepsake gives you an immediate +1 Flask charge advantage. It’s one of the best choices for new players, as that extra sip of health or FP can make all the difference in those first brutal hours.
While Golden Seeds increase how often you can heal, Sacred Tears determine how much you heal per sip. To max out your Flask potency to +12, you need to find all 12 Sacred Tears scattered in churches across the map. Unlike seeds, the cost is simple: one Tear equals one permanent upgrade to the amount of HP or FP restored. Since these are found in specific, often safer locations (like the Third Church of Marika in east Limgrave), it’s worth detouring to grab them when you can.
With this roadmap in mind, you can track your progress. If you have 8 Flask charges, you know your next upgrade will cost 3 seeds. Focus your exploration accordingly, and you'll have a fully powered healing arsenal in no time.
How to Find Limgrave and Weeping Peninsula Golden Seeds
Your journey in Elden Ring begins in the lush but dangerous lands of Limgrave and the Weeping Peninsula. These starting regions are the perfect training grounds, and thankfully, they’re also home to several Golden Seeds to give your flask a much-needed early boost. Let’s track them down.

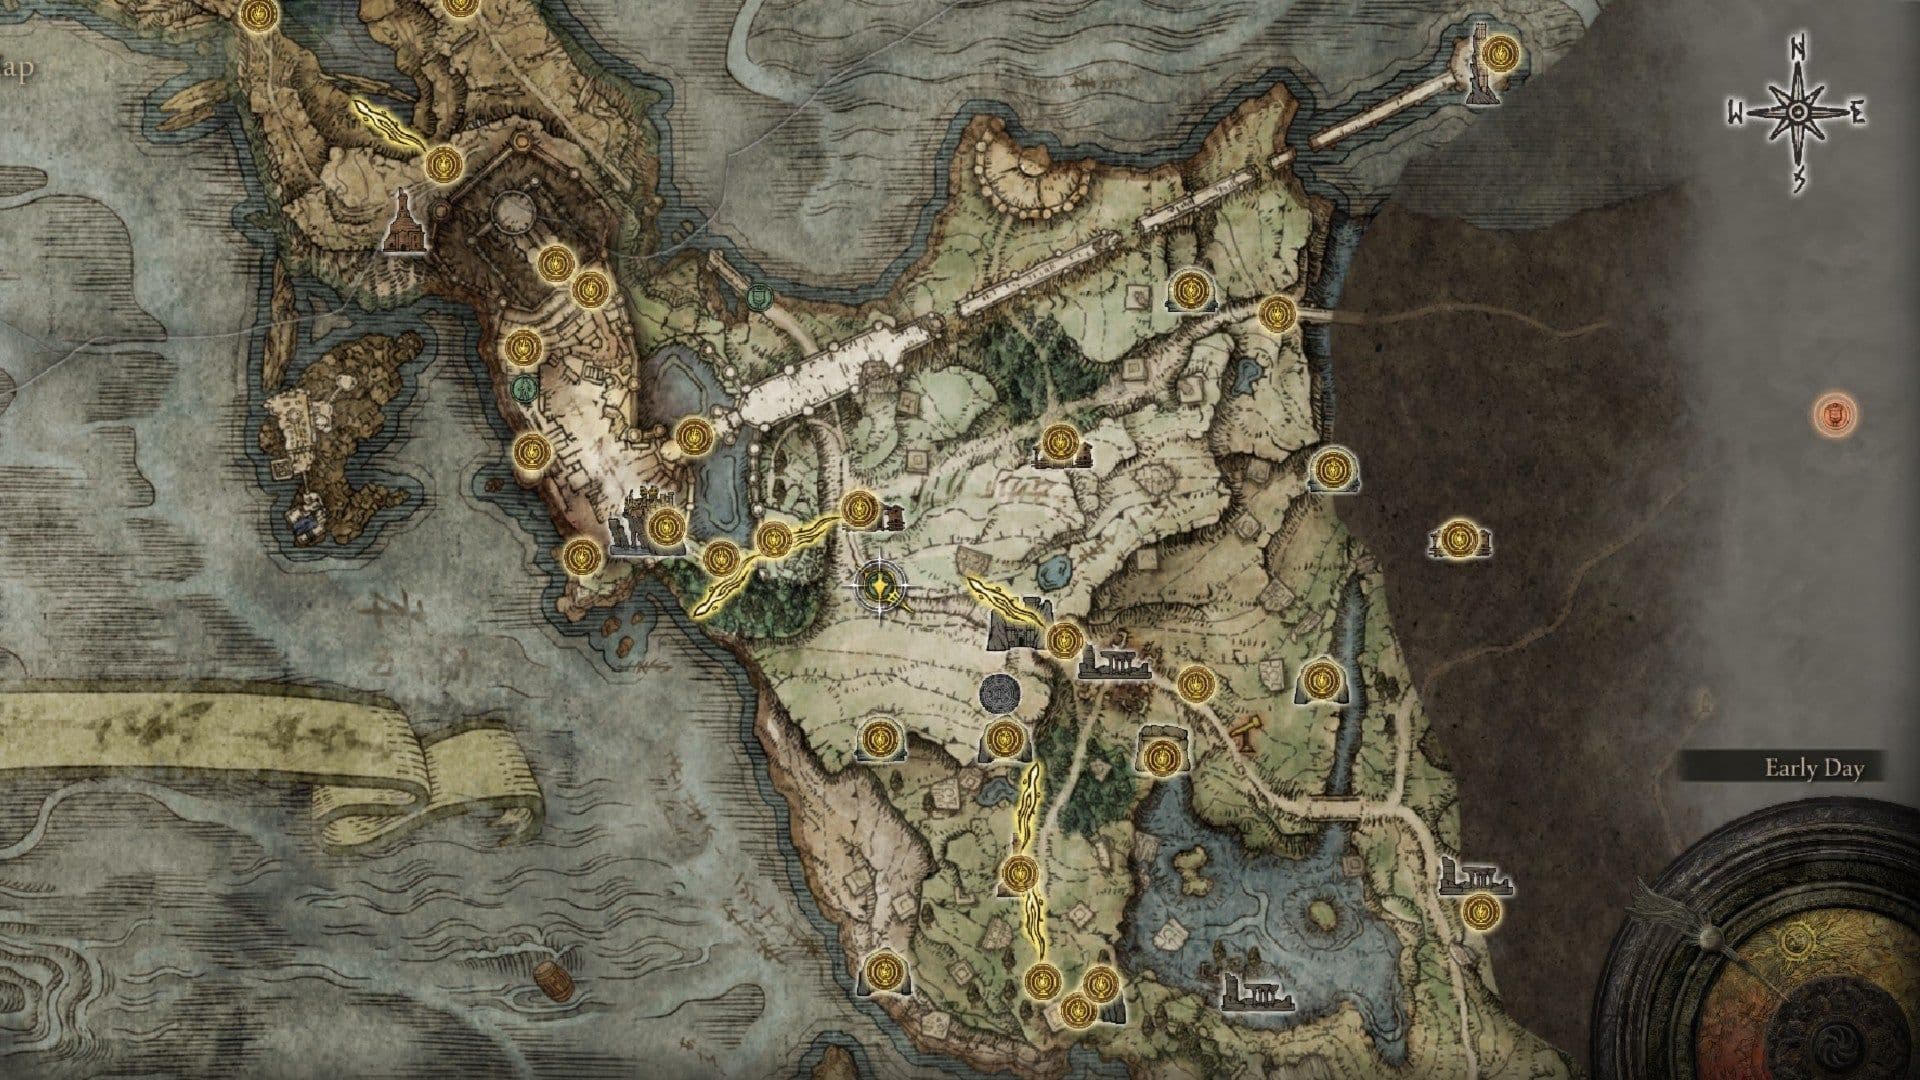
Weeping Peninsula Golden Seed location.
Limgrave's Early Harvest
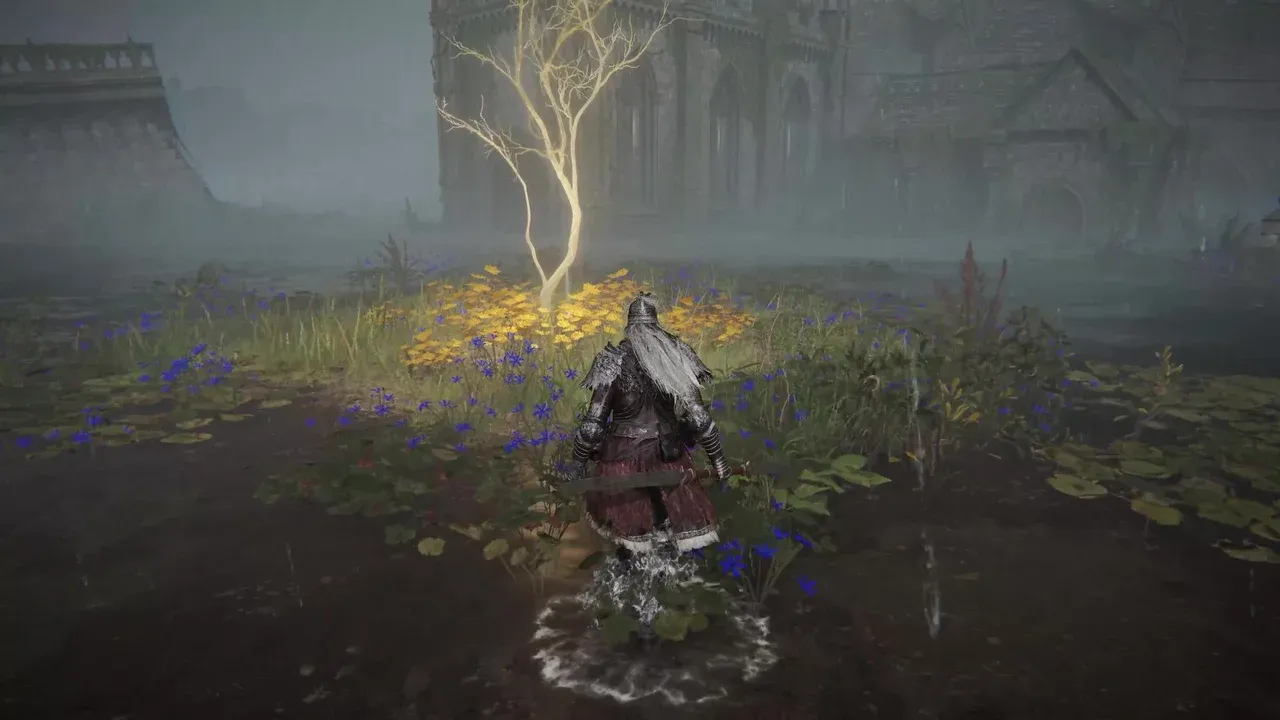
Right out of the gate, you can secure two seeds with minimal effort. The first is on the main road north of the Stormgate. As you head towards Stormhill Shack, look for a small, glowing Erdtree sapling on the right side of the path. It’s impossible to miss.
Your second seed comes from Roderika at the Stormhill Shack. Complete her simple quest by retrieving the Chrysalids' Memento from a corpse pile in Stormveil Castle (guarded by two dogs) and giving it to her. She’ll reward you with a Golden Seed before moving to the Roundtable Hold. If you miss this step, the seed will appear on the floor of her shack once she’s gone.
For a more challenging early-game prize, head to the Stranded Graveyard starting area. Use two Stonesword Keys on the imp statue to unlock Fringefolk Hero's Grave. Survive the gauntlet and defeat the Ulcerated Tree Spirit boss at the end to claim another seed. This is a tough fight, but the extra flask charge is a massive payoff.
Choosing the Golden Seed as your starting Keepsake is one of the best moves a new Tarnished can make. That immediate extra flask charge can be the difference between life and death in your first few hours.
East Limgrave & The Weeping Peninsula
Venture east to find Fort Haight, a small fortress in the misty woods. You don’t need to clear it; a Golden Seed waits for you under a golden sapling just outside its southern walls. Grab it and go.
Speaking of grabbing and going, if you happen upon Kenneth Haight north of Mistwood proclaiming his nobility, know this: if you kill him, he will drop a Golden Seed. It’s a ruthless shortcut, but it’s an option.
Finally, cross the Bridge of Sacrifice to the Weeping Peninsula. From the Castle Morne Site of Grace, head south onto a lower platform overlooking the sea. A Golden Seed sits here, but be ready to dodge—an archer on the castle ramparts above will take shots at you as you collect it.
With these six early Golden Seeds from Limgrave and the Weeping Peninsula, you’ll have a significant head start on upgrading your flasks, giving you the endurance to face the challenges of Stormveil Castle and beyond.
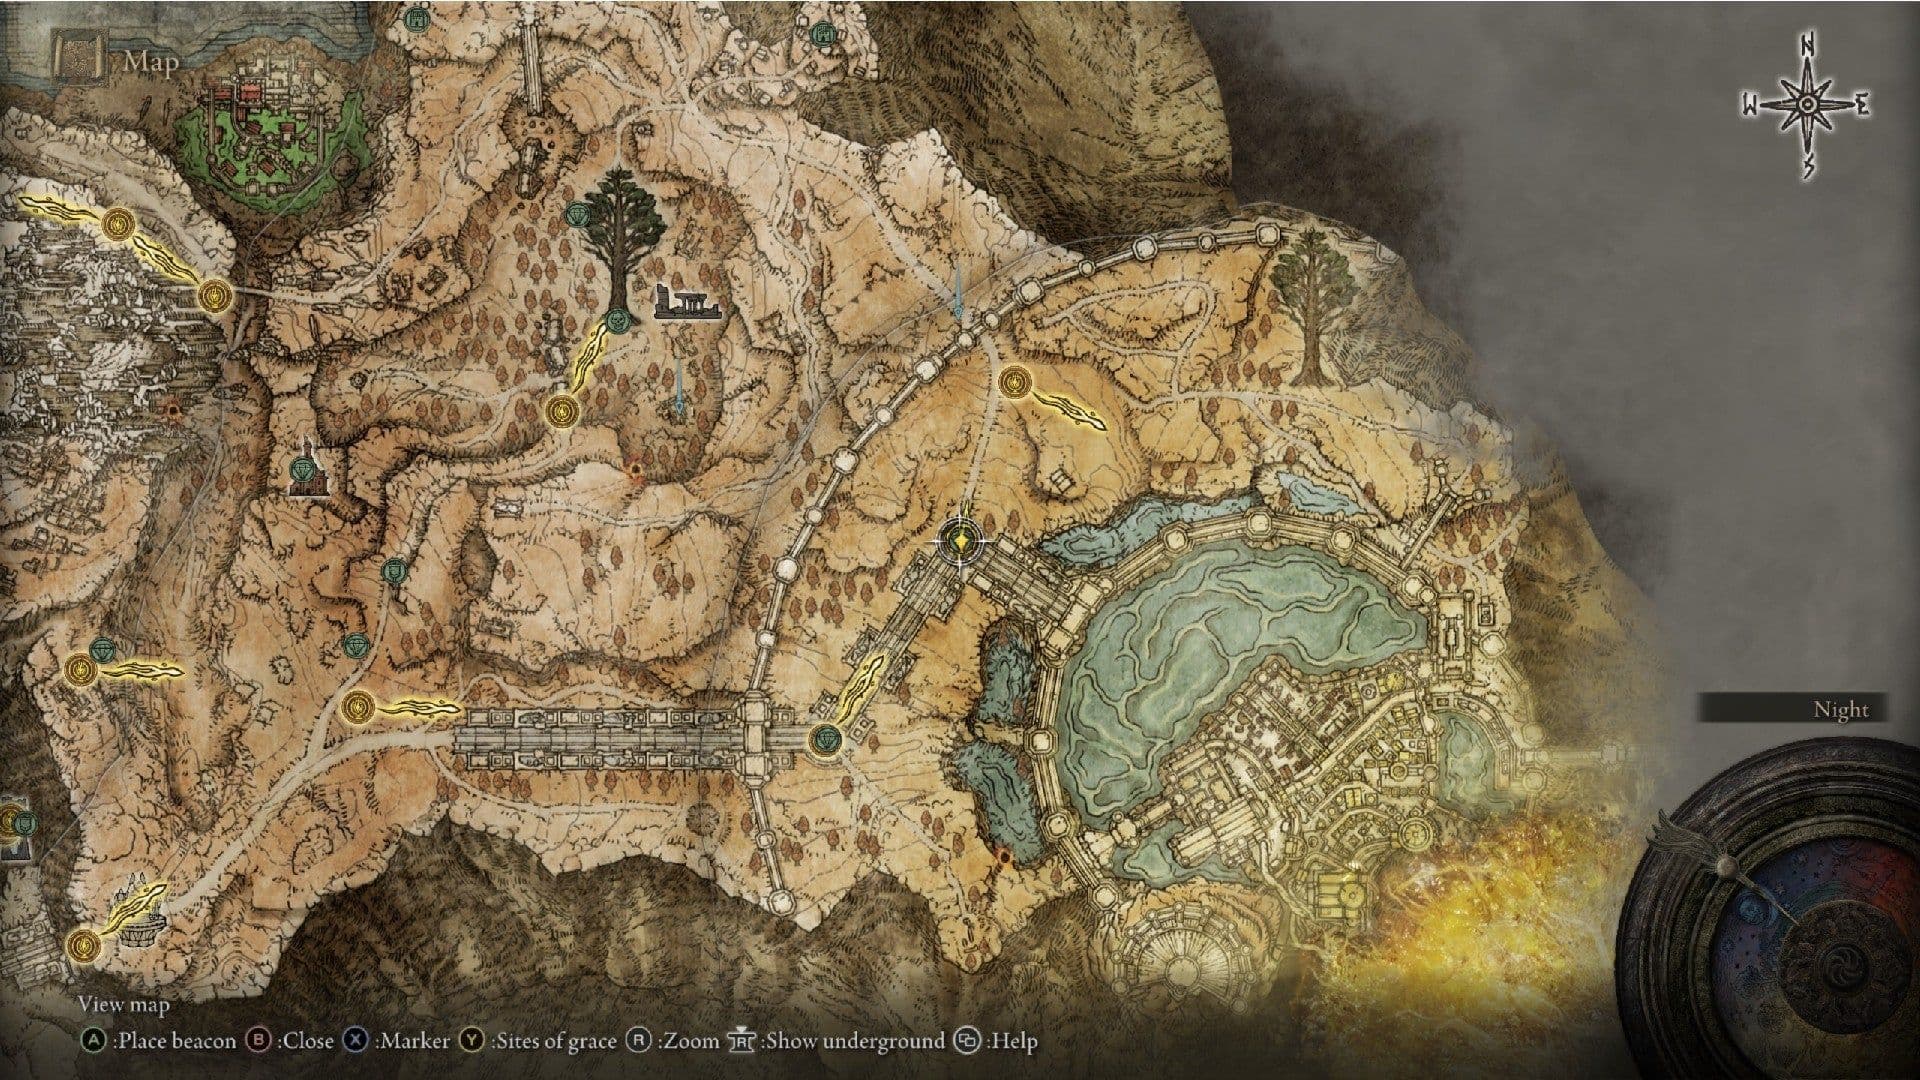
How to Find Stormveil Castle and Liurnia Golden Seeds
Now you’ve left the open fields of Limgrave behind, and the real challenges of Elden Ring begin. Stormveil Castle and the vast, mysterious Liurnia of the Lakes are your next frontiers—and they’re packed with Golden Seeds to bolster your flasks for the battles ahead. Let’s secure those extra charges.
Stormveil Castle Golden Seed location
Stormveil Castle: Two Seeds Within the Walls
Your first major legacy dungeon, Stormveil Castle, hides two Golden Seeds. The first is on the main path to the boss. After navigating the castle ramparts and courtyards, you’ll reach the area just before Godrick the Grafted. Look for a golden sapling on the path near the Secluded Cell Site of Grace, right before the arena with the Troll and the fog wall.
The second is a bit trickier and requires a descent. From the Liftside Chamber Site of Grace, head outside and look for a path that leads downward into the castle’s depths. At the bottom, you’ll face a Lesser Ulcerated Tree Spirit—a nasty, writhing boss. Defeating it rewards you with a Golden Seed.
For the Ulcerated Tree Spirit fight, fire damage is highly effective. Stick to its sides to avoid most of its flailing attacks, and be ready to sprint away when it rears up for its explosive AoE.
Liurnia of the Lakes: The Academy’s Bounty
After conquering Stormveil, the shimmering Liurnia of the Lakes opens up, offering several more seeds as you explore.
- Academy Gate Town Seed: In the center of the flooded Academy Gate Town, look for a small, raised piece of land with a golden sapling. It’s hard to miss as you wade through the ruins.
- Caria Manor Seed: In the northwest, brave the spectral hands and sorcerers of Caria Manor. From the Manor Upper Level Site of Grace, head outside and you’ll find a golden sapling waiting for you on the grounds.
- The Ravine Seed: Head to the far northern end of Liurnia’s main lake, to the area marked The Ravine. Venture into the poison-misted gorge (watch out for the Land Squirts that spew toxic gas) to find a golden sapling at the end.
Raya Lucaria Academy: Seeds of Sorcery
To enter the Academy of Raya Lucaria, you’ll need the Glintstone Key from the dragon on the island. Once inside, two seeds await.
- Academy Main Gate Seed: Before even entering, from the Main Academy Gate Site of Grace, head northeast onto the broken bridge that leads toward Bellum Highway. A golden sapling sits on this bridge wreckage.
- Academy Courtyard Seed: Inside the academy, from the Debate Parlor Site of Grace, head into the next courtyard. Instead of going up the stairs to the Red Wolf boss, hang a left and duck under a stone footbridge. You’ll find the golden sapling here, guarded by a Noble Undead mage.
With these seven new Golden Seeds from Stormveil and Liurnia, you’ll be well on your way to a formidable flask count. Stock up—the challenges ahead in Elden Ring only grow steeper.
How to Find Caelid and Underground Golden Seeds
The crimson rot of Caelid and the echoing depths below await, promising powerful upgrades for those brave enough to explore them. In Elden Ring, this region and the underground rivers hold some of the most valuable—and well-guarded—Golden Seeds on your journey to 14 flask charges.
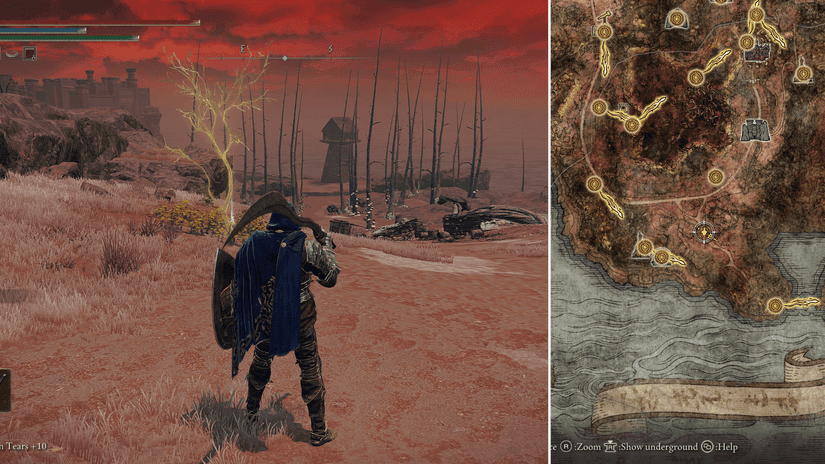
Southern Aeonia Swamp Bank Golden Seed
Caelid's Blighted Lands
The first seeds in this region are found under golden saplings along its treacherous roads. The south road towards Redmane Castle holds one at a fork in the road, a spot you’ll likely pass if you’re heading to the festival. Another is tucked away in Sellia, Town of Sorcery, at the north end of town near a great sealed doorway.
For a more direct but dangerous route, head to Dragonbarrow. On the road south of the Bestial Sanctum, guarded by high-level Vulgar Militia, you’ll find a seed. This is a prime rune-farming area, so you might already be familiar with the risks.
The most challenging seed in Caelid comes from the War-Dead Catacombs, a dungeon located at the north end of Radahn's arena in the Wailing Dunes. Here, you must defeat a Putrid Tree Spirit boss to claim your reward. This fight is tough, but the extra flask charge is a worthy prize.
The Underground Rivers
Beneath the Lands Between, two distinct underground networks hide their own seeds.
In Siofra River, navigate to the Worshipper's Woods. You’ll find the seed on a narrow strip of land leading towards the massive, castle-like structure protruding from the rocks. Watch for ghostly archers taking potshots as you collect it.
The other subterranean seed requires progress in Ranni’s questline. In Nokstella, Eternal City within Ainsel River, look for the seed at the base of stairs near the lift to the Lake of Rot. If you’ve acquired the Moon of Nokstella, you’re in the right chapel area.
Finally, descend into the Lake of Rot itself. At the base of the falls near the Grand Cloister, an Ulcerated Tree Spirit lurks. Defeat it to earn one last, well-hidden seed.
The Vulgar Militia near the Bestial Sanctum hit hard and swarm quickly. It’s often safer to sprint past them on Torrent, grab the seed, and teleport out rather than engaging.
With these seeds from the rot-scarred surface and the silent depths secured, your flasks are significantly stronger. You’re now ready to venture into the golden plains of the Altus Plateau.
How to Find Altus Plateau and Leyndell Golden Seeds
Welcome to the capital—the Altus Plateau and the royal city of Leyndell, Royal Capital. This region is Elden Ring's crown jewel, both in splendor and in the sheer density of Golden Seeds waiting for you. It’s a high-level area, but the payoff for exploration here is immense, with multiple seeds often clustered together.
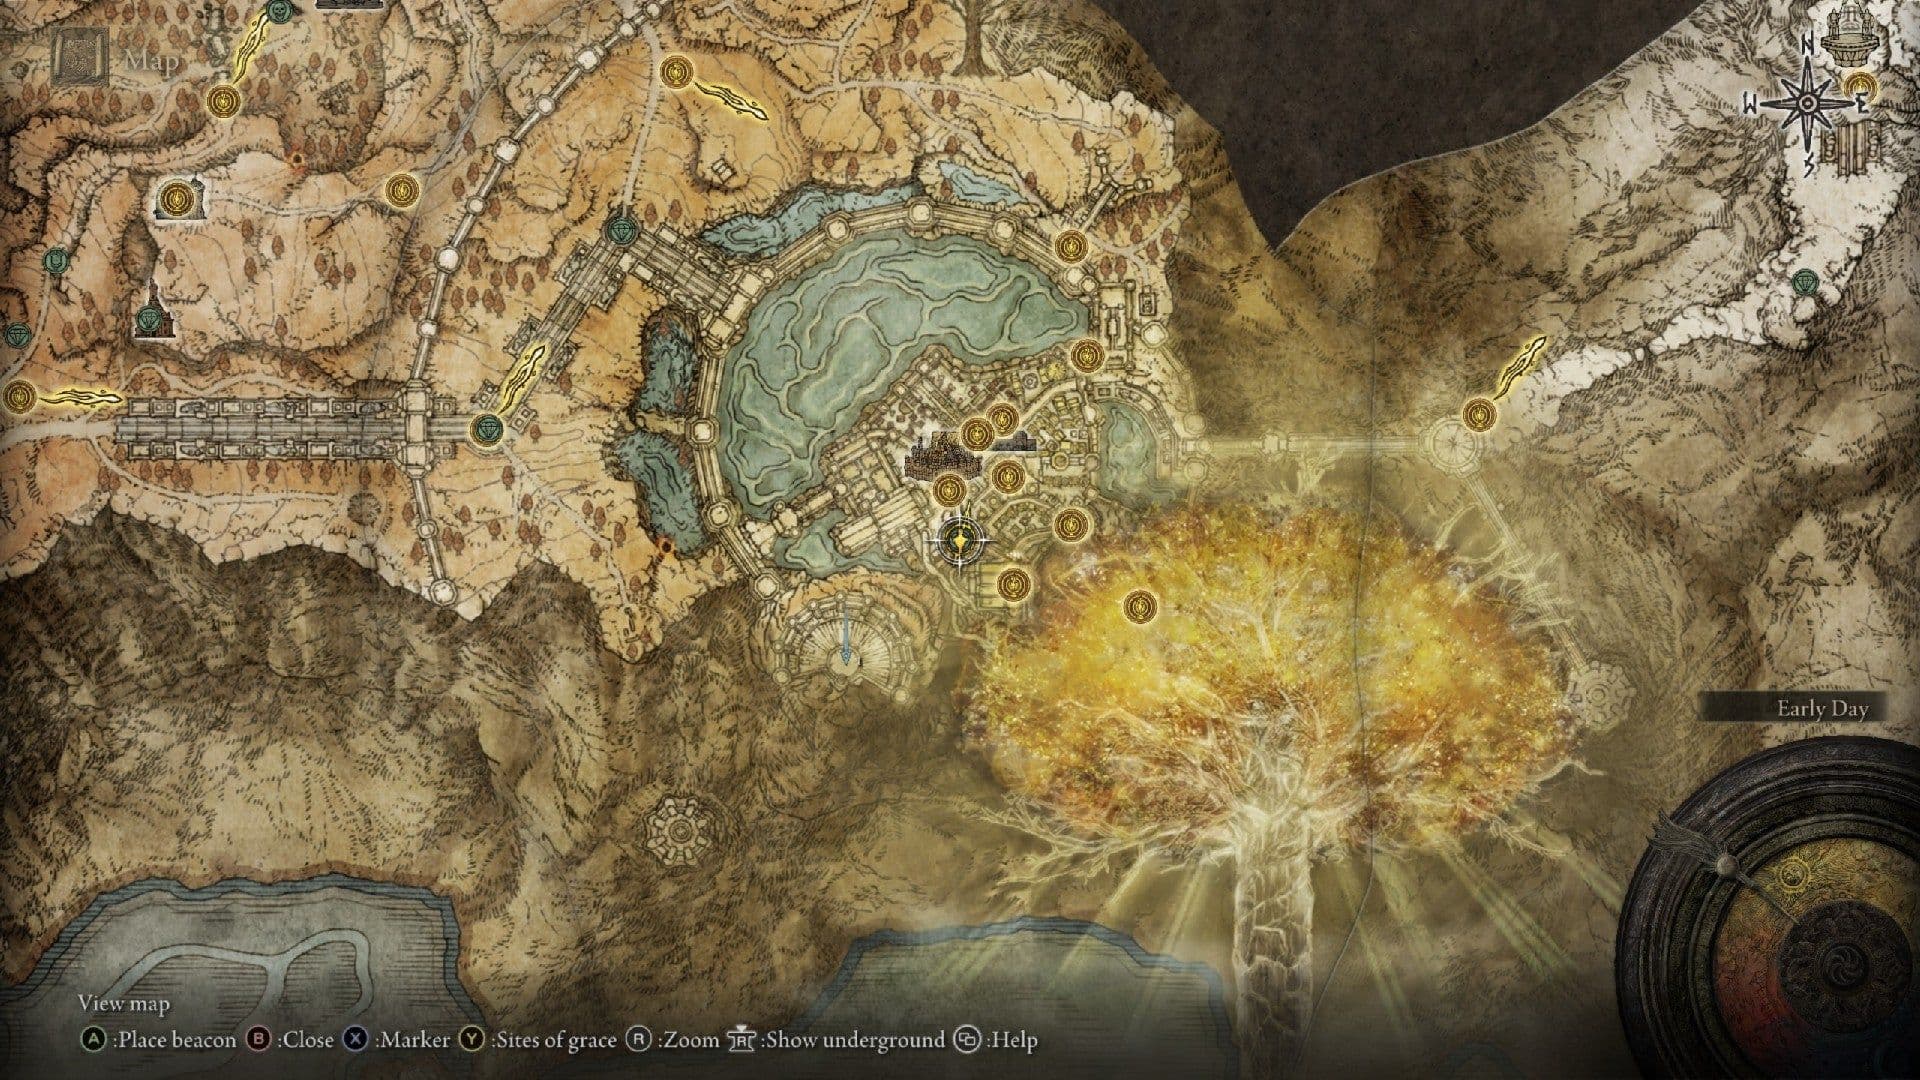
The West Capital Rampart Golden Seed location.
Golden Seeds of the Altus Plateau
Your first stop after scaling the Ruin-Strewn Precipice or riding the Grand Lift of Dectus is the Erdtree-Gazing Hill. The Site of Grace here is your first landmark, and a Golden Seed is literally right next to it, under a glowing sapling. It’s a freebie for making the climb.
If you came up via the Ruin-Strewn Precipice, you’ll be low on resources. Grab this seed immediately to bolster your flasks before tackling the tougher enemies on the plateau.
Head north from there to the main crossroads, the Altus Highway Junction. Just north of the junction near the Map Stele, you’ll find another golden sapling with a seed. It's a straightforward grab, though watch for the patrolling guards.
Two more seeds await in the foggy woods east of the broken great bridge, home to the region's Minor Erdtree. Navigate to the north side of the woods, being careful of the aggressive Wormfaces that roam here. The seed is at the base of a sapling among the trees.
On the volcanic slopes of Mt. Gelmir, you’ll find two more seeds. One is along the Seethewater River, north of the Site of Grace. Your main challenge here is dodging the explosive fire geysers that dot the landscape. The other is on the road leading down from the Fallingstar Beast peak towards Volcano Manor—a welcome find on a treacherous path.
The Bounty of Leyndell's Outskirts
The gates to the royal capital are guarded, but the surrounding outskirts are incredibly generous. The Outer Wall Phantom Tree Site of Grace is a major hub. Right next to it, you’ll find a golden sapling that yields 2 Golden Seeds. Yes, two from one tree—a rare and fantastic find.
Just a short ride north of the Phantom Tree Site of Grace, in a round plaza, is another large golden sapling. This one also gives you 2 Golden Seeds. If you’ve wiped here before to the Tree Sentinel duo, you’re not alone—but sprinting in to grab these seeds and retreating is a valid strategy.
South of that same Outer Wall Phantom Tree grace, tucked in a lower area, an Ulcerated Tree Spirit lurks. Defeating this erratic boss is a tough fight, but it drops a Golden Seed. Consider using the terrain to your advantage.
Within the Royal Capital
Once you’ve bested the Draconic Tree Sentinel and passed through the colossal gates, you’re in Leyndell, Royal Capital. One of the more perilous seeds is on the western ramparts. From the West Capital Rampart Site of Grace, head onto the rooftops and beams until you find a platform guarded by a Gargoyle miniboss. Defeat it to claim the seed.
Finally, in the lower section of the city near the Avenue Balcony, another Ulcerated Tree Spirit prowls a ruined courtyard. This is a late-game version of the boss, so come prepared with high damage and patience. Its defeat nets you one last capital seed.
With this haul from the Altus Plateau and Leyndell, you'll have secured a massive boost to your flask charges, fueling your push toward the endgame of Elden Ring. Stock up now—you'll thank yourself when facing the challenges ahead.
How to Find Mountaintops and Farum Azula Golden Seeds
The endgame regions of Elden Ring hold the final Golden Seeds you’ll need to push your flask charges to the absolute maximum. The frozen wastes of the Mountaintops of the Giants and the timeless, crumbling spires of Crumbling Farum Azula are home to some of the most well-hidden—and heavily guarded—seeds in the Lands Between. If you've made it this far, you're ready for the challenge.
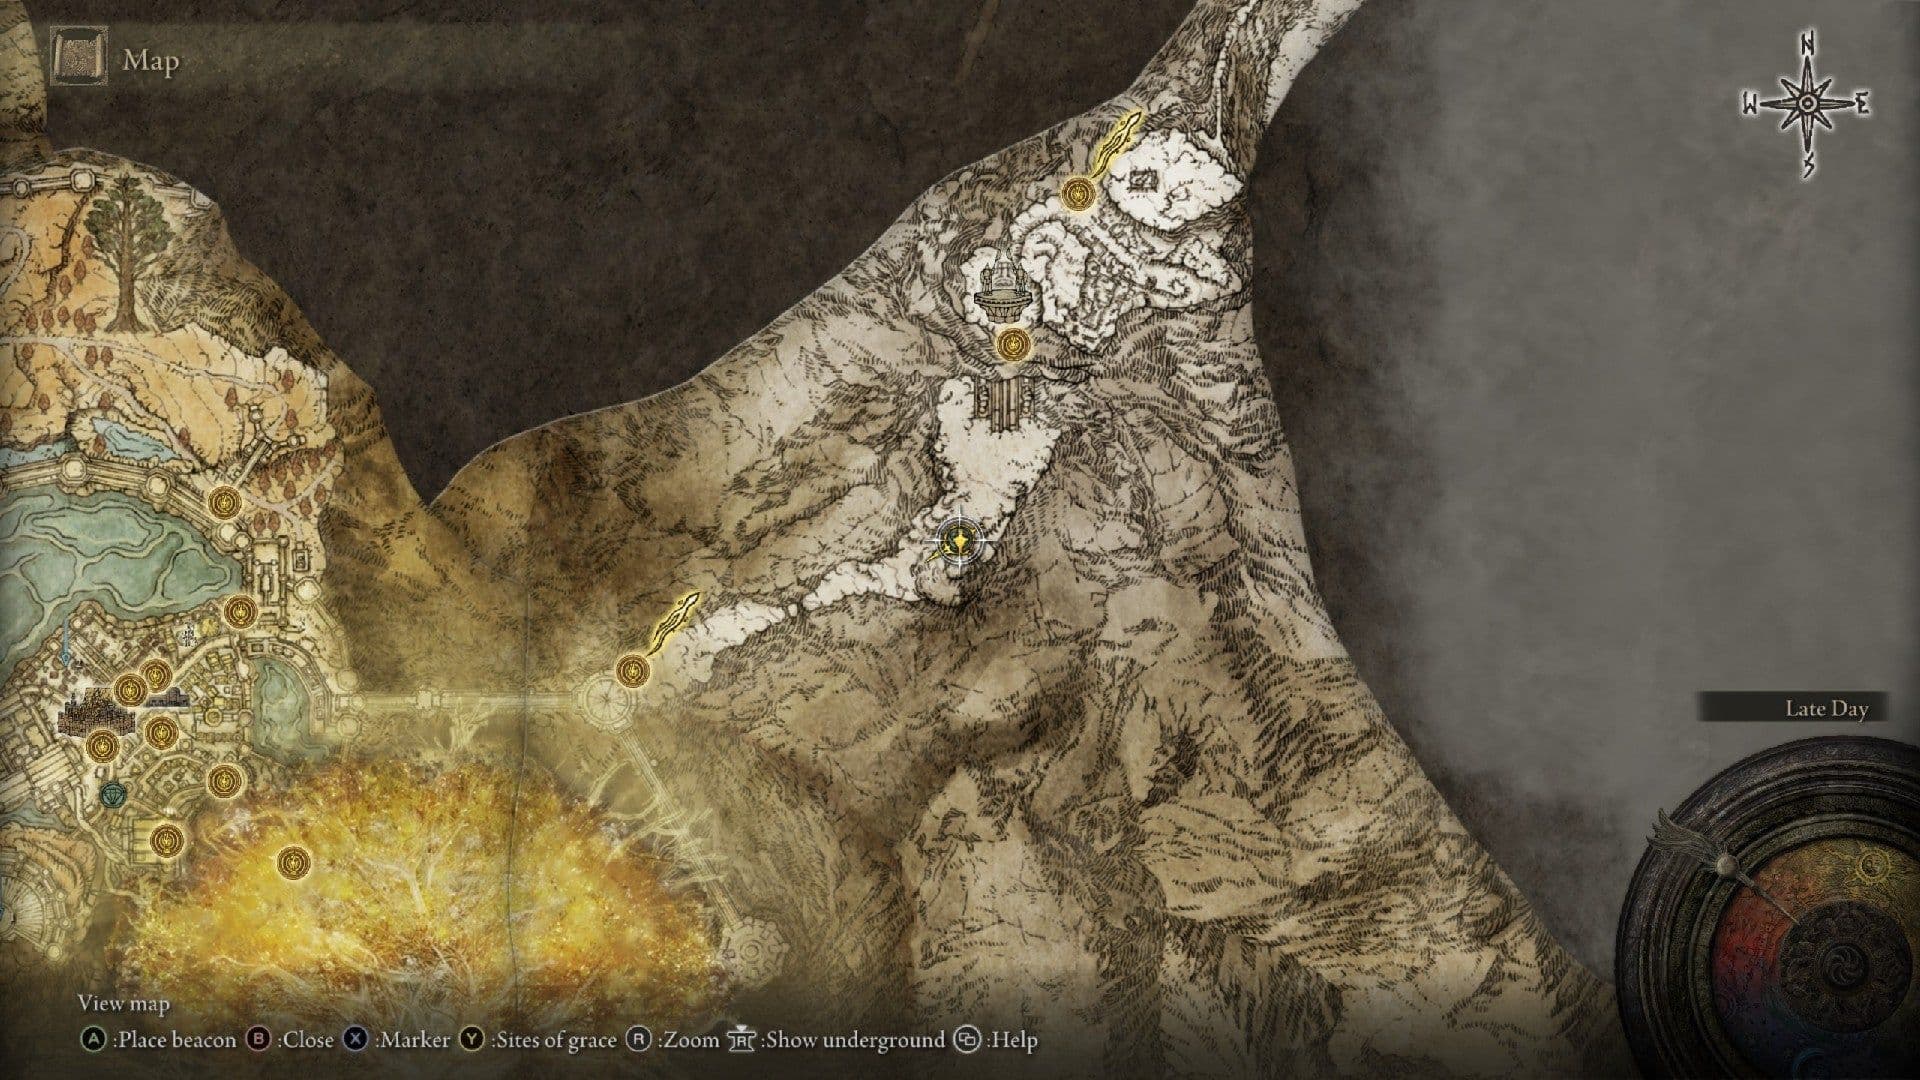
The Forbidden Lands Golden Seed is found on the path to the Mountaintops of the Giants.
Mountaintops of the Giants Golden Seeds
Your journey into the Mountaintops of the Giants begins in the Forbidden Lands. After activating the Grand Lift of Rold, you’ll emerge into a dense fog. Follow the path forward, and just before you reach the intimidating Black Blade Kindred boss, you’ll spot your first seed here at a golden sapling on the right.
The main path through the Mountaintops yields several more. Head to the Foot of the Forge Site of Grace. From there, go northeast toward the massive, frozen giant corpse; the golden sapling sits at its feet, guarded by a few Trolls.
The Giants' Mountaintop Catacombs dungeon is easy to miss. It's tucked away in the cliffs southeast of the Zamor Ruins. Clear it to face another Ulcerated Tree Spirit, which drops a Golden Seed.
To reach the most remote seeds, you’ll need both halves of the Secret Medallion to access the Consecrated Snowfield. As soon as you arrive, head north from the Site of Grace into the blizzard. You’ll find a Golden Seed at the base of a large, solitary tree trunk. For another, travel to the Consecrated Snowfield Site of Grace, then head west toward Ordina, Liturgical Town. Before reaching the town, look for a ridge overlooking the frozen river to the south; the seed is up on this ridge.
Crumbling Farum Azula Golden Seeds
After the events at the Mountaintops of the Giants, you’ll awaken in Crumbling Farum Azula. This legacy dungeon has two seeds. The first is on the rooftop of the Dragon Temple. From the Dragon Temple Altar Site of Grace, look for a Spiritspring jump or an Imp Seal statue that activates a lift. Take it up to the rooftops, where you’ll need to dispatch some Skeletal Beastmen to claim the seed from a golden sapling.
The second seed is found later, as you approach the area’s greatbridge. After passing a stationary dragon and dealing with the enemies beyond, you’ll enter some ruins populated by Stormhawk birds. Carefully explore this area near the Farum Greatbridge to find the final Golden Seed among the stone pillars.
With these last seeds collected from Elden Ring's most punishing regions, you’ll have everything you need to achieve the maximum 14 flask charges. You’ve braved the blizzards and weathered the storm—your flasks are now as powerful as they can be.
All Sacred Tear Locations in Elden Ring
Your flask’s potency is just as crucial as its number of charges. In Elden Ring, Sacred Tears are the key to that power, permanently boosting how much HP or FP each swig restores. While Golden Seeds give you more chances to heal, these Tears make every chance count for more. You’ll find all 12 of them in churches across the Lands Between, often at the base of a statue. This is your complete checklist.

Official game artwork
Limgrave & Weeping Peninsula (4 Tears)
Start your collection in the southern regions. These early Tears can dramatically improve your survivability against the game's first major challenges.
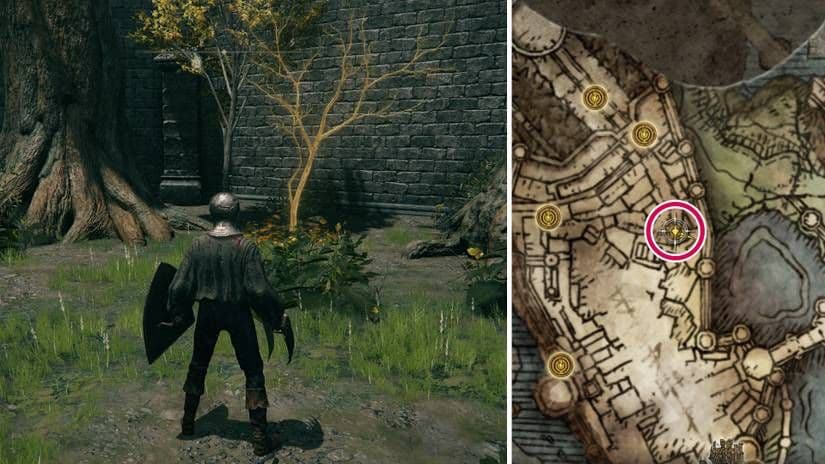
- Third Church of Marika: Located in East Limgrave near the border with Caelid. The Sacred Tear is at the base of the statue inside; this church also contains the Flask of Wondrous Physick, making it a critical early stop.
- Fourth Church of Marika: Found on a western hill in the Weeping Peninsula. Look for the Tear at the base of the statue inside this isolated chapel.
- Church of Pilgrimage: Situated on the northern peak of the Weeping Peninsula, across the Bridge of Sacrifice. Grab the Tear from the statue’s base.
- Callu Baptismal Church: This one is south of Ailing Village in the peninsula. Head inside, but beware—an army of rats calls this place home. The Tear waits at the altar.
Liurnia of the Lakes (3 Tears)
As you explore the vast lake, keep an eye out for these three churches, with one requiring a dangerous detour.
- Church of Irith: Accessible southwest of the Lake-Facing Cliffs Site of Grace after you’ve defeated Godrick the Grafted and exited Stormveil Castle. The Tear is inside.
- Bellum Church: You’ll find this on the main road north of the Academy of Raya Lucaria, on the way to the Grand Lift of Dectus. It’s straightforward to spot and collect.
- Church of Inhibition: Perched on the cliffside above Frenzied Flame Village. Reaching it is the tricky part—you must navigate past the Frenzy-Flaming Tower and through the hostile village to find the path up.
Caelid (1 Tear)
The rot-ridden region of Caelid holds only one Sacred Tear, but it’s in a memorable location.
- Church of the Plague: Travel south of the Bestial Sanctum. If you spot the large, sleeping dragon (a popular rune farming spot), you’re in the right area. Descend to find the church and its Tear.
Altus Plateau (2 Tears)
The golden grasslands hold two Tears, with one requiring a specific approach due to the surrounding terrain.
- Second Church of Marika: In the northwest area of the Altus Plateau. Take the path north from the Altus Highway Junction Site of Grace to find it.
- Stormcaller Church: Located northeast of the Altus Highway Junction. You can’t approach it directly from the south due to cliffs. Instead, use the Outer Wall Battleground Site of Grace and follow the path from the north to reach the entrance.
Mountaintops of the Giants (2 Tears)
The frozen endgame region contains the final two Sacred Tears, both guarded by significant threats.
- First Church of Marika: Find this church behind the area where the Borealis the Freezing Fog boss dwells at the end of the frozen lake. Defeat or bypass the dragon to claim the Tear.
- Church of Repose: This is directly west of the Foot of the Forge Site of Grace. Exercise caution when approaching—a powerful NPC invader often guards the entrance.
Unlike Golden Seeds, you only need one Sacred Tear per potency upgrade. There are exactly 12 in Elden Ring, enough to max out your flask’s healing power to +12. Grab them as you explore; even one or two early on makes a huge difference.
With this list, you can systematically strengthen your flask throughout your journey. Pair these Sacred Tears with the Golden Seeds from other guides, and you’ll be fully equipped to face anything the Lands Between throws at you.
Tips for Refilling Flasks and Survival
Your flasks are your lifeline in the Lands Between, but you’re not always near a Site of Grace. The good news? Elden Ring has a few clever systems to help you refill those precious charges on the go, ensuring you can push deeper into a dungeon or survive that next brutal boss attempt.
Resting at Sites of Grace is the primary way to replenish your Flask of Crimson Tears.
Here’s the trick most guides miss: your flasks can be refilled without resting. The first method is through Teardrop Scarabs, those glowing beetles you see scurrying around. Defeating a Crimson Teardrop Scarab will refill your Flask of Crimson Tears, while a Cerulean Teardrop Scarab refills your Flask of Cerulean Tears. They’re a lifesaver when you’re low and exploring a dangerous area—just be quick, as they tend to scuttle away.
The second, more passive method comes from combat. Defeating a group of standard enemies or, more reliably, a powerful foe like a field boss or a mini-boss, will occasionally refill some of your flask charges. It’s the game’s way of rewarding aggressive exploration and encouraging you to clear out areas before moving on.
Always chase down those Teardrop Scarabs when you see them. They don’t just refill your flasks; some drop valuable Ashes of War or other items, making them worth the detour.
There are two critical situational tips to keep in mind. First, be aware of Multiplayer Scaling. When you join another player's world as a cooperative phantom or invade as an adversary, your total flask charges are halved. If you have 12 charges normally, you'll enter their world with only 6. Plan your build and playstyle accordingly—aggression needs to be more calculated.
Second, a specific warning for the endgame area of Moghwyn Palace. Two Golden Seeds here—one in the blood lake below the Palace Approach Ledge-Road and another near the Dynasty Mausoleum Midpoint Site of Grace—have a unique quirk. If you collect one and then rest at a Site of Grace or reload the area, the second seed may disappear. To secure both, you must collect them in one continuous run without reloading.
Mastering these refill methods transforms how you explore Elden Ring. You’ll spend less time backtracking to graces and more time conquering the challenges ahead, fully prepared for whatever comes next.