How to Enter Stormveil Castle in Elden Ring
The massive walls of Stormveil Castle loom before you—Elden Ring’s first major legacy dungeon and a formidable test for any Tarnished. Your journey here begins with a trial by fire: defeating the gatekeeper, Margit the Fell Omen, at the Castle Entrance on Stormhill. This mandatory boss guards the path forward, and overcoming him is your ticket inside. Your reward for victory is the Talisman Pouch, which permanently increases your number of equipable Talisman slots by 1—a crucial power boost for the challenges ahead.
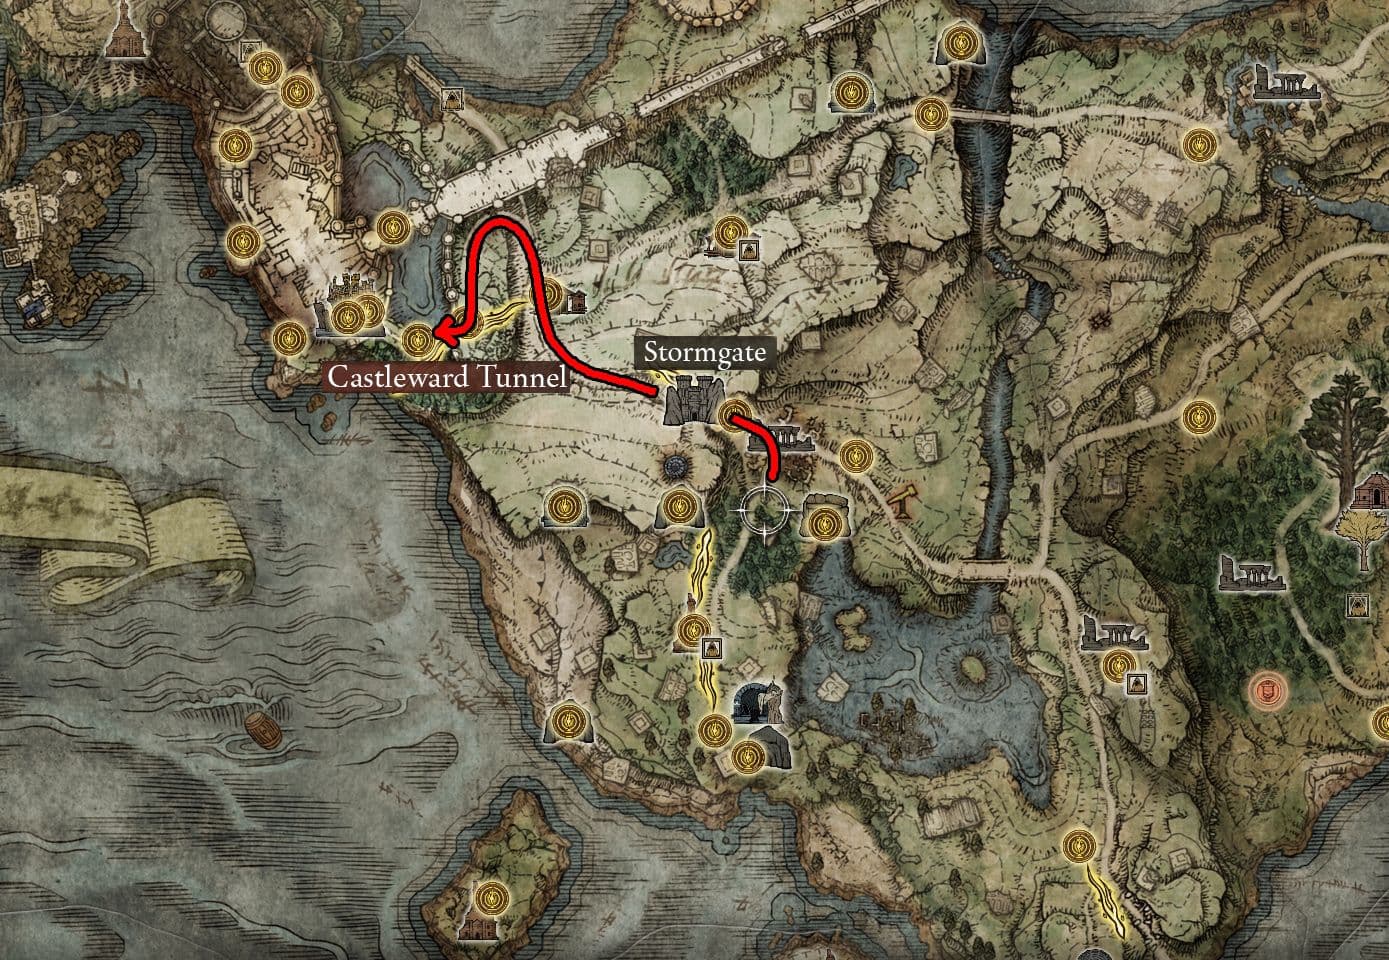
The route leading to the Stormveil Castle side entrance.
Once Margit falls, the castle's towering main gate will open. Rest at the Stormveil Main Gate Site of Grace, and you’ll meet a lanky, suspicious figure named Gatekeeper Gostoc. He’s the castle’s self-appointed lookout, and he’ll immediately offer you a choice for how to proceed. This is a pivotal moment that shapes your entire approach to the castle.
You have two options, and your first instinct is probably the wrong one.
The Main Gate is a direct Frontal Assault. It’s a wide, imposing path leading straight into the castle's defenses, which are manned by numerous Exile soldiers and, most dangerously, ballistae. This route is a brutal choke point designed to punish a head-on charge, draining your healing flasks before you even get a proper look inside.
⚠️ Pro tip: Almost every guide and veteran player will tell you the same thing: do not take the main gate on your first attempt. It's a trap that funnels you into a killing field.
The Side Path, which Gostoc suggests, is the Clandestine Route. He’ll point you toward a hole in the wall along the castle's western cliffs. This sneaky path lets you bypass the front-line carnage entirely, offering a much safer entry for thorough exploration. There’s a catch, though: if you take his advice and later die within the castle, Gostoc will stalk you and steal a portion of your dropped Runes. It’s a tax for the safer passage, but one that’s almost always worth paying on a first run.
So, which path should you take? For a first-time explorer in Elden Ring, the Side Path is overwhelmingly the better choice. It allows you to enter the castle at your own pace, discover its secrets, and tackle enemies on your own terms rather than theirs. The main gate is best saved for a later, more powerful return visit when you can storm the ramparts for fun. Your adventure into the heart of Stormveil starts with this simple, smart choice—let’s take the back door.
Best Route Through the Stormveil Cliffside
You’ve bypassed the main gate and chosen the smarter path—now the real adventure begins. Stormveil Castle in Elden Ring is a vertical maze of treachery, and your first task is navigating the perilous Stormveil Cliffside. This section of the castle’s western cliffs is a gauntlet of narrow walls and rickety wooden scaffoldings, where a single misstep means a long fall back to the start. Let’s get you through it and to your first safe haven.
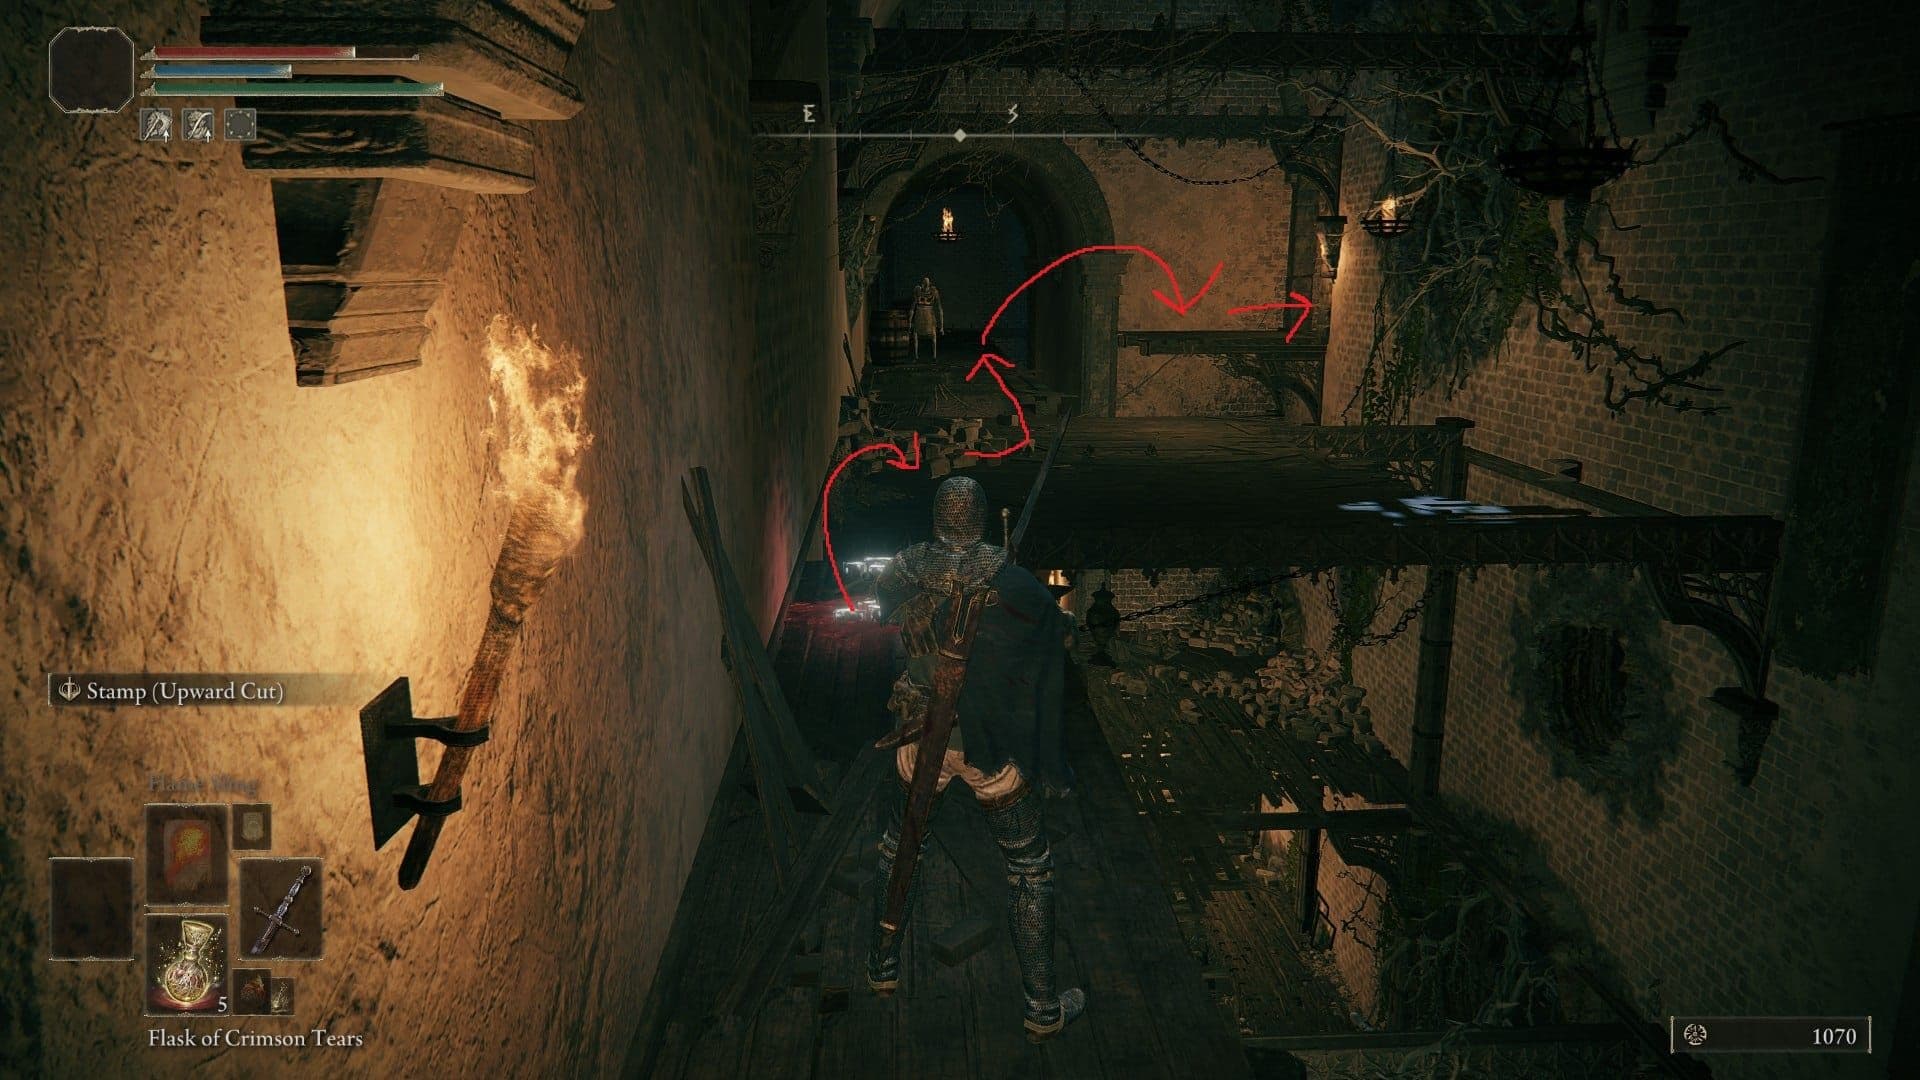
Navigating the narrow wooden walkways on the Stormveil cliffside.
From the cliffside entry, follow the winding path upward, dealing with the basic guards and peasants who love to shove. Your goal is to get inside the castle proper. Once you’re through a doorway, you’ll find yourself in the initial interior rooms. Head up the stairs—you’re looking for a specific dark room on the third floor. This is where things get tense.
The Rusty Key Ambush
Inside that dark third-floor room, you’ll spot the Rusty Key on a corpse in the corner—press [A] to loot it. But here’s the catch: the moment you enter, Gatekeeper Gostoc (who you met outside) slams the door shut, trapping you inside with a Banished Knight. This is the Banished Knight Ambush, and it’s a brutal early skill check.
This knight hits hard and fast. If you’re below Level 30, fighting him head-on is extremely risky. Your best options are to [L3] click to crouch and sneak past him to grab the key from the corner, or to lure him out and flee the room if you can. If you choose to fight, use the pillars for cover and punish his slow recovery after his combos.
Before rushing for the key, enter the room slowly. You can sometimes aggro the knight, draw him away from the corpse, then sprint in for a quick grab before disengaging.
With the Rusty Key secured, don’t leave just yet. In the same room, opposite the entrance, is a chest containing the Curved Sword Talisman. This item boosts your guard counter damage by 20%—a fantastic tool for shield users that makes dealing with standard soldiers much easier.
Reaching Safety at Rampart Tower
Unlock the nearby door with your new key to escape the ambush room. You’ll emerge onto a higher walkway, with another Banished Knight patrolling ahead. It’s often safer to ignore him, slip past, and head through the next doorway.
Just beyond, you’ll find the Rampart Tower Site of Grace on an upper interior landing. This is your first major checkpoint inside the castle and a crucial respite. Activate it immediately.
From this Site of Grace, you have a moment to breathe and plan. The path forward leads to the rooftops (covered in the next section), but for now, you’ve successfully navigated the cliffside’s most dangerous trap. If you’ve wiped here before, you’re not alone—that ambush room is a classic Elden Ring “welcome” moment.
With the Rampart Tower Site of Grace lit, you’re officially inside the belly of the beast and ready to explore upward. Let’s keep moving.
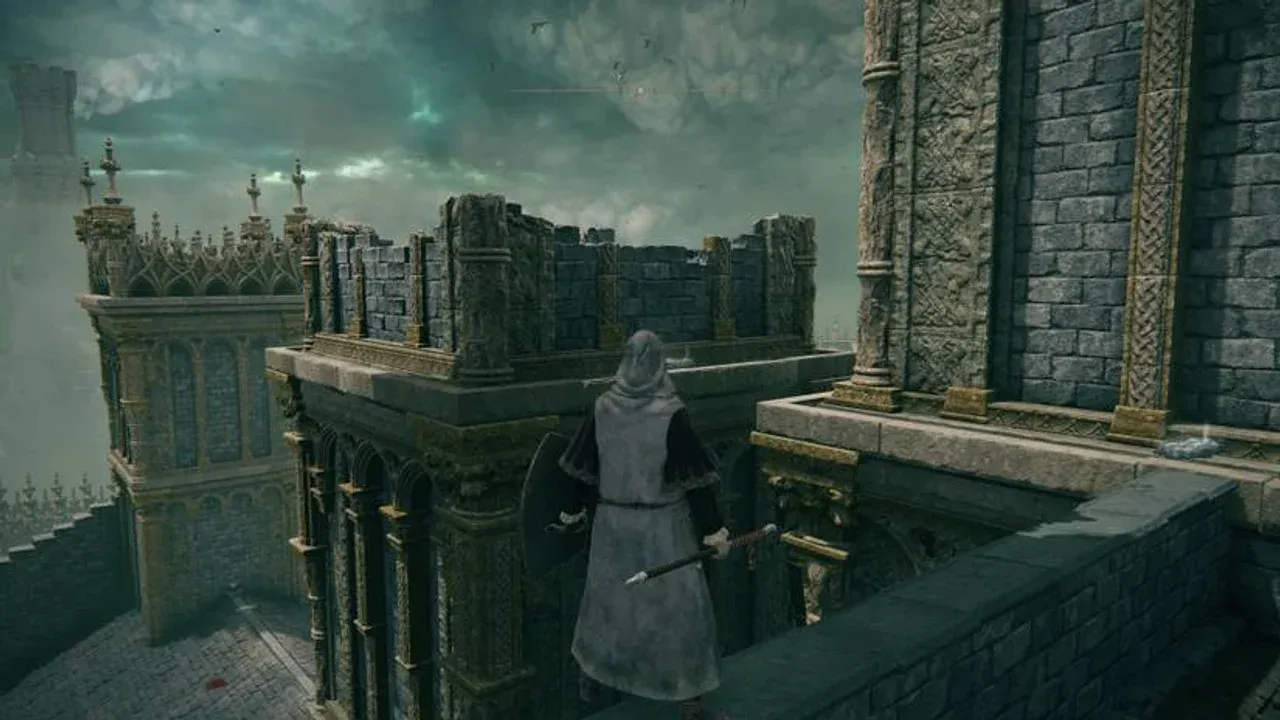
Navigating the Stormveil Castle Rooftops and Secret Items
This is it—the rooftop gauntlet. In Elden Ring, after navigating the cramped hallways of Stormveil Castle, you'll find yourself at the Rampart Tower Site of Grace. From here, a path opens up to the dizzying heights of the castle's rooftops, a treacherous parkour course that hides two of the area's most valuable secrets: the Brick Hammer and the Claw Talisman.
Exploring the outer walls of the castle.
Finding the Claw Talisman and a Stonesword Key
From the Rampart Tower Site of Grace, head out the northern door and deal with the explosive Warhawks—those birds carrying barrels that detonate on impact. Your goal is to reach the high watchtower in the distance. Here’s the tricky route:
- After clearing the birds, head to the pile of sandbags against the wall on the left. Jump onto them, then onto the wall ledge.
- Look southeast and drop down onto a wooden roof below, then drop again onto a narrow ledge.
- Follow this ledge around the tower, jumping onto a series of step-like stones. At the top, drop down to your right to find a corpse with a Smithing Stone [2].
- Head back and drop onto the adjacent rooftop where you fought a fire-breathing hawk. Loot the corpse there for the Dozing Cross-Legged gesture.
- Use the broken pillar on this roof to jump up to a higher ledge, then follow it around to find an open area with a ladder in the center. Clear out the Exile Soldiers guarding it (watch for crossbowmen).
- Climb the ladder to the top of the watchtower to find a corpse holding the Claw Talisman. This talisman enhances your jump attacks, a fantastic tool for staggering enemies.
Before you leave, there's more loot here. From the rooftop with the central ladder, look for a way to drop down into the ruins of a crumbling adjacent tower. Jump inside and you'll find a corpse holding Stonesword Key #1.
Navigating to the Brick Hammer
To find the Brick Hammer, you need to backtrack to an earlier area. Fast travel back to the Stormveil Cliffside Site of Grace. From there, head back inside the castle and up to the room where you fought the Banished Knight for the Rusty Key.
Remember the locked door you opened with that key? Return to that room and climb the ladder again. This time, instead of going straight, turn left and head outside onto a precarious wooden walkway. Follow it to a doorway leading to the castle's exterior ramparts.
The soldiers on these narrow stairs can easily knock you off. Draw them back into the wider interior hallway for a safer fight.
Defeat the guards, then follow the stairs down and enter a small circular room. On a corpse in this room, you'll find the Brick Hammer, a heavy Strength weapon perfect for crushing armor. You can then drop down from this corpse's location to return to the area below, creating a shortcut.
Meeting Sorcerer Rogier
One of the rooftop paths leads to an important NPC. From the area where you found the Claw Talisman, you can work your way across wooden bridges and platforms (defeating more Exile Soldiers and knights along the way) until you find a ladder descending into a chapel.
At the bottom, you'll meet Sorcerer Rogier in the Stormveil Castle chapel. He sells useful Ashes of War and begins a questline that continues later at the Roundtable Hold. Speaking to him here is the only way to advance his story.
Rooftop Parkour Essentials
This entire section is a test of your platforming nerve. Go slow, watch your footing, and use ranged attacks to clear birds and soldiers from a distance whenever possible. The explosive Warhawks are the biggest threat; a well-aimed fire arrow can detonate their barrels before they even get close.
With the Claw Talisman boosting your jump attacks and the Brick Hammer adding a powerful blunt option to your arsenal, you're more than ready to descend back into the castle's heart and face the chaos of the main courtyard.
Exploring the Stormveil Courtyard and Liftside Chamber
The tension in Elden Ring’s first legacy dungeon ratchets up as you emerge from the rooftops into the Main Courtyard, a sprawling central area where flamethrower turrets sweep the battlefield and Exile soldiers patrol in force. This is the final gauntlet before reaching Godrick’s inner sanctum.

Stormveil's dark fantasy atmosphere.
Your first goal is crossing the courtyard. Hug the left wall and use the wooden barricades for cover. The turret operators are passive unless you attack them, so your real threats are the roaming soldiers and the large Omen with its guard dog near the far side. A stealthy approach works well: sneak past the Omen to backstab a halberd-wielding guard by a doorway. Before you slip inside, don’t miss the Golden Seed under a small golden sapling near the Omen enemy—it’s a vital resource for upgrading your Sacred Flasks.
You can lure the patrolling soldiers back to the turret fire. Aggro them, then duck behind cover; the turret’s flames will often hit them instead of you.
The doorway you unlocked leads to the Liftside Chamber Site of Grace, a critical checkpoint in a side room off the courtyard. This is your last major rest stop. Activate the lift here—it’s the main path forward to Godrick’s upper levels and a crucial shortcut for any future attempts. If you’ve spoken to Roderika at the Stormhill Shack earlier, you’ll find her here, ready to advance her questline.
Just before you reach the Liftside Chamber, look for a glowing stone statue. Your attacks won’t break it, but a Giant Troll can. From the courtyard, you can lure one of the slow-moving Trolls from the area near Godrick’s boss room. Have it [Run] over the glowing statue to smash it, revealing a stash of Smithing Stones inside.
For one last essential find, seek out the Iron Whetblade. It’s hidden in an Armory behind an Imp Statue seal, which requires a Stonesword Key to dispel. This whetblade is a game-changer, allowing you to apply Heavy, Keen, or Quality affinities to your weapons when using Ashes of War, dramatically increasing your build flexibility.
With the courtyard cleared, the lift activated, and key tools secured, you’ve successfully unlocked the main path to the demigod. Take a breath at the Liftside Chamber—the throne room is just ahead.
How to Find Secret Underground Items in Elden Ring
Beneath the main halls and the clatter of Godrick's soldiers lies the true, rotting heart of Stormveil Castle. While most players in Elden Ring rush to the throne room, the most valuable secrets—and one of its toughest fights—are hidden in the dark, wet tunnels below. This is where the castle's curse festers, and where you'll find gear that can define a build.

The intricate design of Elden Ring's castles.
Your descent into the Underground Crypt begins from the Liftside Chamber Site of Grace. Instead of taking the elevator up to Godrick, head back outside and look over the edge of the battlement to the west. You’ll see a series of broken stone ledges you can safely drop down onto. Follow this path down into a dank, torch-lit tunnel swarming with rats. Push through them, and you’ll enter a larger cavern—the boss arena.
The Root Monster and Its Rewards
Here, you’ll face the Lesser Ulcerated Tree Spirit, a writhing root monster that fills the cramped space. This is a brutal fight due to the tight quarters; its thrashing attacks are hard to avoid. The key is to stay close to its midsection and dodge into its swipes rather than away. Defeating it rewards you with a Golden Seed, a crucial item for upgrading your Sacred Flasks.
⚠️ Watch out: This boss is highly aggressive in the small arena. If you’re struggling, consider using a Spirit Ash summon to draw its attention so you can attack from behind.
Before engaging the boss, scour the lower tunnels of the Underground Crypt. In a side passage, you’ll find a Teardrop Scarab. Kill it to obtain the Rancorcall spell, a powerful Death Sorcery that summons homing skulls. It requires both Intelligence and Faith to cast, making it a great find for hybrid casters.
Finally, don’t miss the grotesque Prince of Death's Pustule. This face-like growth is on the wall in the same chamber as the Tree Spirit, near where its tail rests when idle. Looting it grants a permanent, slight boost to your Immunity and Vitality stats—a small but permanent advantage for the rest of your Elden Ring journey.
Trust me, taking this detour is worth the challenge. The Golden Seed is always needed, the Rancorcall spell is unique, and that stat boost from the Pustule stays with you forever. With these dark treasures secured, you can return to the light—fully prepared for whatever awaits above.
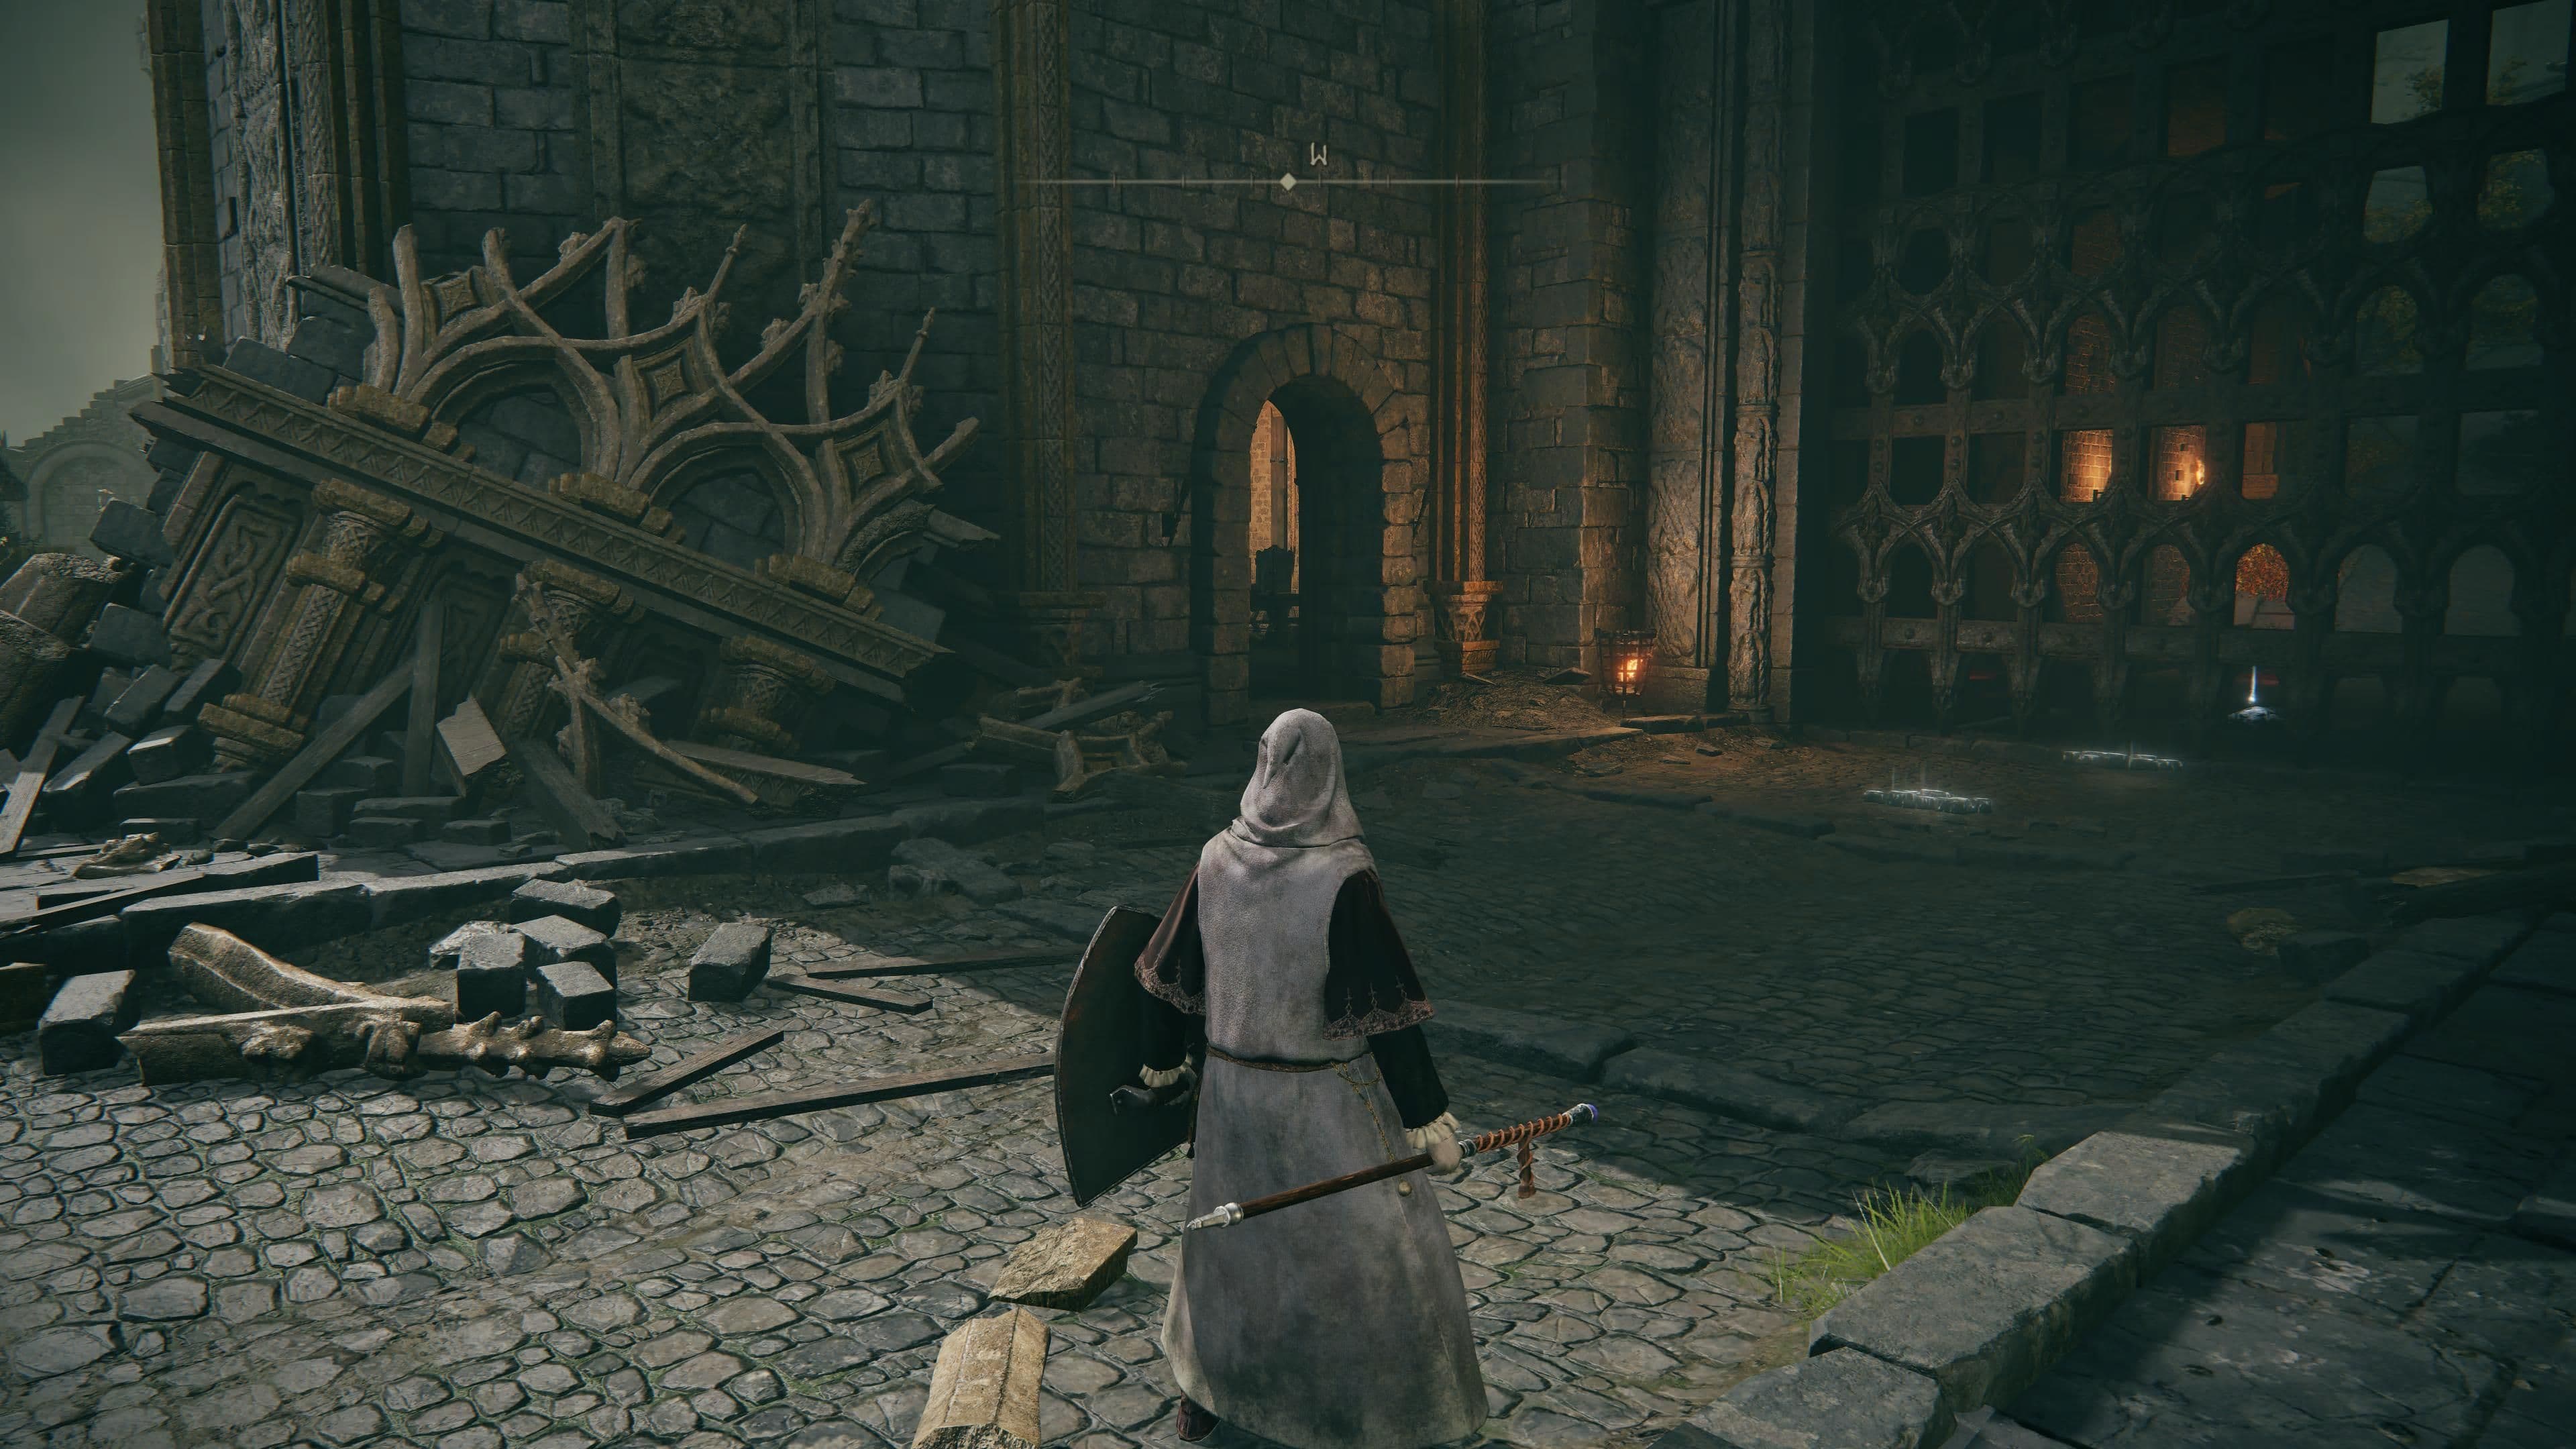
Preparing for Godrick the Grafted in Stormveil Castle
This is your last chance to gear up, level up, and rally allies before facing the Lord of Stormveil. The final stretch of Elden Ring’s first major dungeon is a tense gauntlet, but with the right preparations, you can turn the tide before the fog gate.

Exploring the depths of Stormveil.
Your first priority is to find the Secluded Cell Site of Grace, the final checkpoint before the boss fog gate. From the Liftside Chamber Site of Grace, head outside past the giant trolls. You’ll find the Secluded Cell Site of Grace tucked in a small, quiet room just before the open arena where two more giant trolls patrol. Rest here. This is your staging ground.
Rally Your Allies
Just outside this grace room, in a small alcove to the right before the trolls, you’ll find Nepheli Loux, a fierce warrior. Speak to her to exhaust her dialogue. Doing this unlocks her golden summon sign right outside Godrick the Grafted’s boss arena, giving you a powerful ally for the fight. She’s a fantastic distraction.
Now, for a crucial quest step: backtrack to the main hall area (the large room with a banquet table, accessed from the Rampart Tower elevator). On the second floor of this hall, in a side room patrolled by a Banished Knight, you’ll find a chest containing the Mimic’s Veil. This fun item lets you transform into nearby objects, perfect for sneaking past enemies on your way back.
If you’ve wiped here before, you’re not alone. Stock up on any consumables you need now—fire pots, grease, and preserving boluses are all solid picks. You’ll thank yourself later.
Secure Your Spirit Tuner
Remember Roderika from the Stormhill Shack? If you spoke to her and then again at the Liftside Chamber, her quest is almost complete. You need to find the Chrysalids’ Memento. From the main hall, head towards the Grafted Scion room (the one with the painting). Just before that chamber, look for a gruesome pile of bodies near where a giant hangs from the ceiling. The Chrysalids’ Memento is among them. Take this back to Roderika at the Liftside Chamber Site of Grace to complete her quest. After you defeat Godrick, she’ll move to the Roundtable Hold and become your Spirit Tuner, allowing you to upgrade your Spirit Ashes.
Grab a Powerful Ash of War
Before you charge into the boss, there’s one more powerful tool nearby. From the Secluded Cell Site of Grace, head outside towards the two giant trolls. Instead of going straight to the fog gate, look along the path on the left. You’ll spot a Teardrop Scarab. Kill it to obtain the Stormcaller Ash of War, a fantastic skill that creates a damaging whirlwind around you, perfect for crowd control or breaking an enemy’s posture.
With the Secluded Cell Site of Grace activated, Nepheli Loux ready to summon, and key items like the Mimic’s Veil and Stormcaller Ash of War in your pocket, you’re fully prepared. Take a deep breath at the grace, equip your best gear, and step forward. You’re ready for Godrick.
Godrick the Grafted Phase 1: Axe and Earthquakes
Alright, Tarnished—you’ve navigated the treacherous halls, stocked up on gear, and spoken to your allies. Now, you stand before the fog wall, the final barrier to Godrick the Grafted. In Elden Ring, this is your first real test against a Shardbearer. Don't let the title intimidate you; with the right strategy, you can dismantle his first phase.

Godrick the Grafted at the start of the battle.
Before you step through, make sure you’ve spoken to Nepheli Loux, the warrior you found in the room near the Secluded Cell Site of Grace. Her golden summon sign will appear right at the fog gate entrance. Press [Y] to summon her—she’s an incredible tank who will draw his aggro and give you the breathing room you need to learn his patterns.
Once inside, Godrick’s first phase is all about patience and punishing his heavy, slow attacks. His primary weapon is a massive axe, and he loves to use Delayed Axe Swings. The trick is to watch the wind-up and press [B] to dodge at the very last second of the swing. If you roll too early, you’ll get caught in the follow-through. This is the core rhythm of the fight: bait an attack, wait, then dodge.
He has a few key moves to watch for:
- Storm Stomp: He’ll stomp the ground, creating a damaging wind aura around him. When you see him lift his foot, press [B] to dodge away to avoid the knockback. This is your cue to create distance.
- The Ground Slam Combo: Often, he’ll finish a string of swings with a powerful two-handed slam into the earth. This is your biggest opening. As soon as he slams down, jump with [LS] + [A], then follow up with a [RT] heavy attack. This Jump Attack deals high poise damage and is your best chance to stagger him for a critical hit.
Let Nepheli engage first. While Godrick is focused on her, circle to his side or back. This is the safest time to land your heaviest attacks or apply status effects like Bleed.
The arena is large, so use the space. If you need to heal, put a pillar between you and Godrick—it can block some of his axe swipes. His health pool is substantial, but every time you successfully dodge his delayed swings and counter with a jump attack, you’re chipping away at his posture and his will.
If you’ve struggled with timing-heavy bosses before, you’re not alone. Godrick is designed to punish panic rolling. Stay calm, watch his axe, and your moment will come. Master this dance of dodge and punish, and you’ll break through his first phase ready for whatever grafted horror comes next.
Godrick the Grafted Phase 2: Dragon Fire and Grapples
This is it—the final phase of Elden Ring’s first major demigod fight. As Godrick’s health dips below 60%, he’ll roar and sever his own arm to graft a massive, fire-breathing dragon head in its place. This is where the real challenge begins, but with the right strategy, you can turn his most terrifying power against him.

Timing dodges against boss attacks in Elden Ring.
Surviving the Dragon Fire
The transition is dramatic. Godrick will immediately begin his Fire Breath attack, a devastating area-of-effect stream of flame. Don’t panic and run away—this is a common mistake that often gets you caught in the lingering fire. Instead, the moment you see him raise the dragon head, [LS] tilt forward to sprint directly behind him. He’s stationary and slow to turn during this attack, creating a perfect blind spot for you to unleash your heaviest blows. If you’re using the NPC summon Nepheli Loux, she’ll often draw his aggro, making this sprint to his back even easier.
The audio cue for the fire breath is a loud, guttural roar followed by a whoosh of flame. Start sprinting on the roar, and you’ll be safe every time.
Countering the Grabs and Punishing Slowdowns
Phase 2 introduces new, deadly moves. The most dangerous is his Dragon Head Grab, an unblockable attack where he lunges forward. The timing is tricky, but the tell is clear: he’ll rear the dragon head back before thrusting it at you. As the head lunges forward, [B] press to dodge left. Dodging to the side, rather than backwards, is key to avoiding the wide hitbox.
While his attacks are more powerful, they’re also slower and more telegraphed. His walking flamethrower attack, in particular, leaves him wide open. This is your prime window to apply pressure. Godrick is notably weak to Bleed and Poison damage in Elden Ring. Use fast weapons like katanas, curved swords, or daggers, or apply Blood Grease or Poison Grease to your weapon. You can trigger these status effects during his long recovery animations, chunking his health bar significantly.
⚠️ Watch out: After his big combo finishers, he’ll often follow up with a quick, sweeping fire attack from the dragon head. Don’t get greedy—land a few hits, then reset.
Securing Your Victory and Reward
Once you finally deplete his 6,080 HP, the fight is over. You’ll immediately receive Godrick’s Great Rune, a key item that must be activated at the Divine Tower of Limgrave to unlock its powerful stat-boosting effect. This is your trophy for conquering Stormveil Castle and your first major step toward mending the Elden Ring.
With these tactics—exploiting the blind spot during Fire Breath, mastering the dodge on the Dragon Head Grab, and punishing his slow phases with Bleed or Poison—you’ve not only beaten a Shardbearer, you’ve mastered one of the game’s most iconic fights. Claim your Great Rune, Tarnished. The Lands Between await.
Stormveil Castle Rewards and Next Steps in Elden Ring
The dust settles in the throne room, the echo of Godrick's final roar fading. You've conquered Elden Ring's first Shardbearer and claimed Stormveil Castle. Your reward isn't just a cleared dungeon—it's a suite of powerful tools that will define your path forward.

Journeying to the next objective
First and foremost, you'll automatically receive two key items: Godrick’s Great Rune and the Remembrance of the Grafted. The Great Rune needs to be activated at the Divine Tower of Limgrave to unlock its stat-boosting power. The Remembrance is your trophy—head to the Roundtable Hold and speak with Finger Reader Enia to exchange it for 20,000 Runes, the Axe of Godrick, or the Grafted Dragon arm weapon. This choice is permanent per playthrough, so pick the weapon that fits your build.
The Grafted Dragon is a unique fist weapon that scales with Strength and Faith, letting you unleash fiery punches. It's a fantastic choice for hybrid builds looking for something different.
Before you rush north, take a moment to explore the throne room's exit. Head through the archway behind Godrick's seat and follow the path outside. On the floor near a praying spirit, you'll find the Shabriri Grape. This bizarre item is crucial for Hyetta's questline, which you can start by meeting her at the Lake-Facing Cliffs Site of Grace in the next region. Trust me, grabbing this now saves a lot of backtracking later.
Speaking of the next region, your victory has unlocked the path to Liurnia of the Lakes. Exit the throne room area to the north, and you'll emerge onto a scenic cliffside overlooking a vast, misty lake dotted with ruins and the towering spires of the Academy of Raya Lucaria. This is your next major destination in Elden Ring, packed with new challenges, NPCs, and secrets. The recommended level for Liurnia is generally 40-60, so if you tackled Stormveil around level 30-40, you're right on track.
Finally, consider the fate of Gatekeeper Gostoc. If you spared him throughout the castle, you'll find him stomping on Godrick's head in the boss arena after the fight. Exhaust his dialogue, and he'll eventually set up shop as a merchant at the Stormveil Castle Throne Room. While his early stock is basic, his most valuable item is a Ancient Dragon Smithing Stone he sells later in the game—a top-tier upgrade material that's otherwise extremely rare. Keeping him alive pays off massively in the endgame.
With Godrick defeated, his Great Rune in hand, and the vast expanse of Liurnia awaiting, you've officially graduated from Elden Ring's introductory chapter. The lessons learned in Stormveil's claustrophobic halls—caution, exploration, and mastering the dance of combat—will serve you well across the entire Lands Between. Your journey to become Elden Lord is just beginning.