How to Diagnose Elden Ring PC Stuttering and Lag
You’ve arrived in the Lands Between, ready for adventure, only to be met with jarring hitches, choppy frame pacing, and sudden slideshows. Before you start tweaking every setting, let’s diagnose the real culprit. In Elden Ring, PC performance issues usually boil down to a few specific engine quirks and hardware bottlenecks. Pinpointing which one is plaguing your journey is the first step to a buttery-smooth 60 FPS.
Optimizing Elden Ring performance via the NVIDIA Control Panel
The most notorious offender is Shader Compilation Stutter. This is an engine-level issue where the game briefly pauses to compile rendering instructions for new effects, enemies, or areas on the fly. You’ll feel it as a micro-freeze the first time you see a new spell or enter a new zone. The good news? This stutter often lessens on repeat visits as the cache builds.
To pre-populate the shader cache and reduce these hitches, take a deliberate first run through each major area, like Limgrave or Stormveil Castle, before diving into serious combat.
Closely related is the DirectX 12 Frame Pacing problem. Even if your FPS counter reads a steady 60, the game can feel choppy because frames are being delivered unevenly. This is a separate issue from raw stuttering and often requires external tools to smooth out.
The next step is to check for hardware bottlenecks. Fire up a monitoring tool like MSI Afterburner and head to a demanding area like the entrance to Raya Lucaria. If you see your CPU usage pinned at 95-100% while your GPU usage sits around 70-80%, you’ve identified a CPU Bottleneck. This is common in crowded areas where the game’s AI and draw calls overwhelm your processor. If lowering your resolution doesn’t improve framerates, your CPU is almost certainly the limiting factor.
Conversely, a GPU/VRAM Bottleneck occurs when your graphics card’s memory is maxed out. When the game’s textures exceed your available VRAM, it has to swap data to your slower system RAM, causing severe stuttering. If you’re on a card with 6GB or less VRAM, this is a likely cause, especially with textures set to Maximum. The fix is straightforward: lower your Texture Quality setting.
Finally, don’t overlook Thermal Throttling. If your CPU or GPU is consistently hitting 85-90°C or higher, it will protect itself by downclocking, leading to sudden performance dips. This often manifests as smooth gameplay that turns into a stuttery mess after 20-30 minutes. If your fans are screaming, it’s time to check your cooling—dust out your PC and consider replacing old thermal paste.
If you’ve been fighting these stutters, you’re not alone—they’re the most common complaints in the PC port. But now you know what to look for. Once you’ve identified your primary bottleneck, the targeted fixes in the next sections will feel much more powerful.
Best Windows and System Settings for Elden Ring Stability
Alright, Tarnished—you've diagnosed your stutters, but now it's time to stop them at the source. Your operating system is the foundation of your entire Elden Ring experience, and a few key tweaks can stop Windows from fighting your game for precious resources. Think of this as tuning your PC's engine before a race through the Lands Between.

Elden Ring's demanding visual effects require optimized settings.
Windows Power & Priority Settings
First, let's make sure Windows is playing ball, not working against you. Head to Control Panel > Power Options. Here, you'll select the High Performance power plan. This simple change is huge—it prevents your CPU from downclocking aggressively during intense gameplay, ensuring Elden Ring gets the consistent power it needs.
Next, open Windows Settings > Gaming > Game Mode and toggle it ON. This tells Windows to prioritize CPU and GPU resources for Elden Ring, temporarily quieting background tasks that can cause hitches.
The "Ultimate Performance" plan is an even more aggressive hidden option. To enable it, open Command Prompt as Admin and type powercfg -duplicatescheme e9a42b02-d5df-448d-aa00-03f14749eb61. It will then appear in your Power Options list.
Now, let's ensure Elden Ring is always using your dedicated graphics card. Navigate to Windows Settings > Graphics (or Graphics Settings). Click Browse, find your eldenring.exe (usually in Steam\steamapps\common\ELDEN RING\Game\), add it, select Options, and choose High Performance. This is crucial for laptops or systems with integrated graphics, but desktop users report gains too.
Disabling System-Level Interrupts
Some of the most notorious stutters in Elden Ring come from Windows itself. A common fix, adapted from the Sekiro days, involves the Device Manager. Open it (right-click Start Menu > Device Manager), expand Software Devices, right-click on Microsoft Device Association Root Enumerator, and select Disable. This device can cause rhythmic DPC latency spikes by polling hardware in the background. You likely won't miss it unless you use specific MIDI controllers or printers.
For modern hybrid CPUs like Intel Core Ultra, which mix Performance and Efficiency cores, you might need to go a step further. The Windows scheduler can sometimes park cores mid-game, causing latency spikes. Disabling CPU Core Parking via a utility like ParkControl or a registry tweak keeps all cores active and responsive, smoothing out frame delivery.
Silencing Background Noise
Finally, let's mute the digital chatter. In your Steam Library, right-click Elden Ring, go to Properties > General, and uncheck Enable Steam Overlay. This overlay, along with others from Discord or GPU software, can introduce micro-stutters and conflict with Elden Ring's anti-cheat, especially during hectic moments.
With these system-level optimizations in place, you've built a stable foundation. Windows is now your ally, dedicating its full attention to your journey. Next, we'll fine-tune the graphics drivers themselves to squeeze out every last drop of performance.
How to Optimize NVIDIA and AMD Control Panels for Elden Ring
Now that you've tuned up Windows, it's time to get your hands dirty with the graphics driver control panels. This is where you fine-tune how your GPU talks to Elden Ring, smoothing out frame delivery and managing the notorious shader compilation process. Trust me, these settings are the secret sauce for a rock-solid 60 FPS.

Visual effects that benefit from driver optimization.
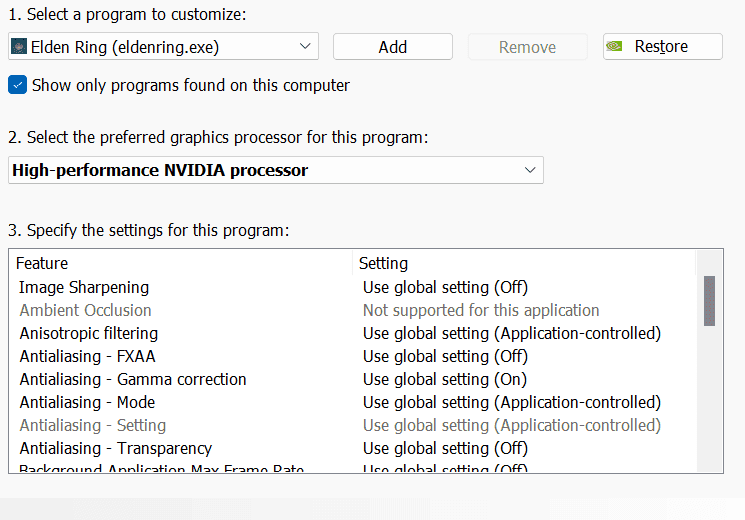
NVIDIA Control Panel Tweaks
Open the NVIDIA Control Panel and navigate to Manage 3D Settings. Here, you’ll find three critical changes that can make a world of difference.
First, find Shader Cache Size. By default, it's often set to "Driver Default" or a low value. Change this to either 10 GB or Unlimited. This gives your GPU plenty of room to store compiled shaders, drastically reducing those micro-pauses as you enter new areas or see new spell effects for the first time.
Next, scroll down to Power Management Mode. Set this to Prefer Maximum Performance. This tells your GPU to stay awake and run at its higher clock speeds while Elden Ring is active, preventing sudden downclocking that can cause stutters mid-fight.
Finally, locate Low Latency Mode. For Elden Ring, set this to Ultra. This setting, combined with the game’s internal limiter, helps reduce the render queue, cutting down on input lag and making your dodges feel more responsive.
⚠️ Pro tip: After changing these settings, always click "Apply" at the bottom right. It sounds obvious, but it’s the step everyone forgets!
AMD Software: Adrenalin Edition
For AMD users, open AMD Software (formerly Radeon Software). Head to the Gaming tab, find Elden Ring in your game list, and open its profile.
Here, you’ll want to ensure Radeon Anti-Lag is toggled to Enabled. This is AMD's equivalent to NVIDIA's low-latency tech, and it serves the same purpose: reducing the time between your input and the action on screen, which is crucial for Elden Ring's precise combat.
Another powerful feature to enable is Smart Access Memory (SAM). This isn't always in the game profile; you may need to enable it in your motherboard's BIOS/UEFI first, and it should then show as available in the AMD Software under the "Performance" or "Tuning" tabs. SAM improves CPU-to-GPU memory access, which can boost performance, especially if you have a modern AMD CPU and GPU combo.
The Crucial Clean Install
Whether you're on Team Green or Red, one of the most impactful steps is a clean driver installation. When you run the installer for the latest NVIDIA or AMD driver, select Custom Installation. In the options that appear, make sure to check the box for Perform a clean installation. This wipes away old driver files and, importantly, clears out stale shader cache data that might be corrupted and causing hitches. If you've been chasing stutters for a while, this fresh start often works wonders.
With your control panels dialed in, you’ve removed a huge layer of potential instability. Your GPU is now primed to deliver Elden Ring’s world as smoothly as possible. Let’s lock in those gains by dialing in the perfect in-game settings next.
Best In-Game Graphics Settings for Elden Ring PC
With your system primed for peak performance, the final layer of optimization happens inside Elden Ring itself. Tweaking these in-game graphics settings is where you’ll see the biggest immediate payoff for your frame rate—letting you explore the Lands Between without the distracting stutter of a struggling GPU.

Draw distance and geometry impact performance.
Head to System > Graphics to begin. Your first and most impactful change is to set Screen Mode to Fullscreen. This gives the game exclusive control over your display, reducing input lag and system overhead that can cause stuttering in borderless windowed mode. Trust me, this single toggle can smooth out hitches you didn't even realize were there.
Key Settings to Tweak for Performance
Now, let's dial in the visual options that have the biggest performance cost. Follow these priorities:
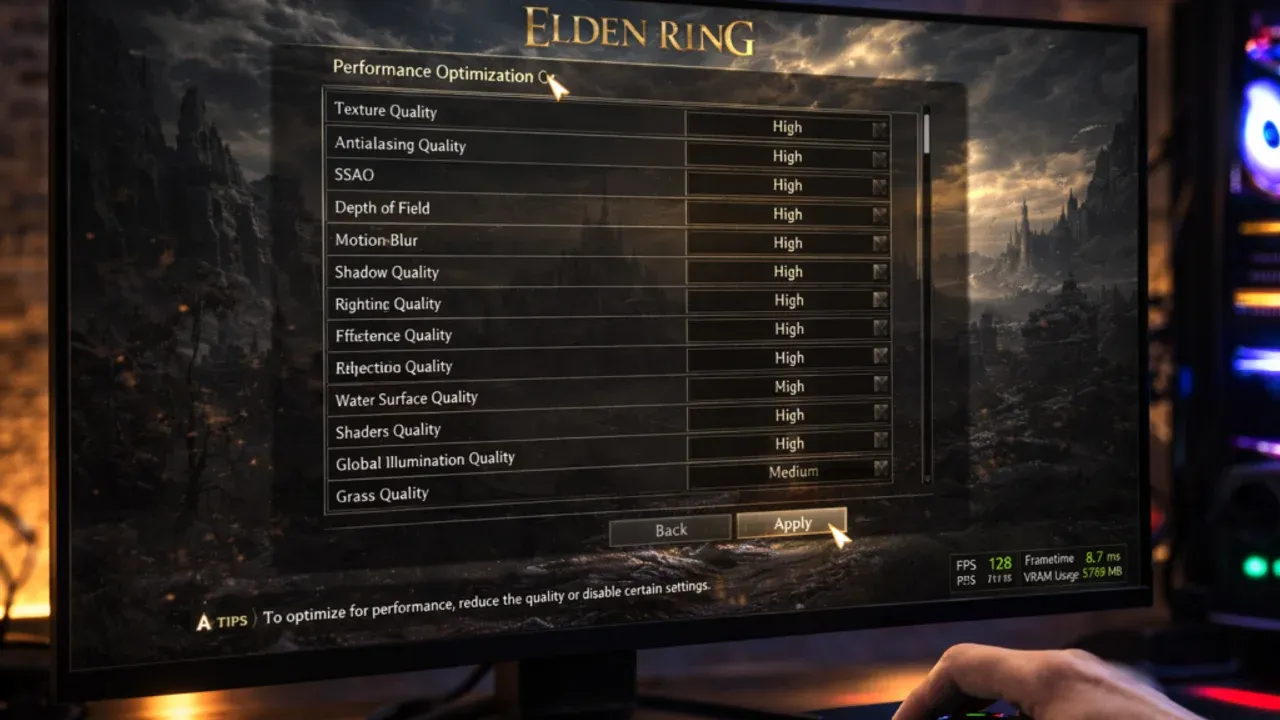
- Shadow Quality: This is a notorious resource hog. Dropping from Maximum down to High or even Medium can net you a solid 5-8 FPS gain with a minimal visual difference in most areas. It's the easiest performance win in Elden Ring.
- Texture Quality: This setting is all about your VRAM. If you have 8GB+ VRAM, you can safely set this to Maximum. For cards with 6GB, stick with High. If you're on <6GB, you'll need to use Medium or even Low to avoid severe stuttering from VRAM overflow.
- Ray Tracing: Simply set this to Off. Unless you have a top-tier modern rig to spare, this feature is a massive FPS drain in Elden Ring for questionable visual gain.
- Volumetric Effect Quality: The fog, mist, and god rays look beautiful but are computationally expensive. Setting this to Medium or Low lightens the load significantly, especially in areas like the Weeping Peninsula or mountaintops.
- Motion Blur & Depth of Field: For the cleanest, most responsive feel, set both of these to Off. This improves visual clarity during fast combat and eliminates potential frame pacing issues caused by post-processing effects.
After changing any setting, restart Elden Ring completely. The game's engine doesn't always apply changes correctly on the fly, and a fresh launch ensures your new configuration is active.
Finding Your Personal Balance
The "best" settings depend on your hardware. For a powerful modern card, you can likely set most things to High, with Shadows and Volumetrics at Medium. On a mid-range or older GPU, a mix of Medium and Low will be necessary to hold a steady 60 FPS. Remember, the goal in Elden Ring isn't maxed-out visuals—it's a consistent, stutter-free journey.
With these in-game adjustments locked in, you’ve built a stable foundation from the ground up. Your system is tuned, your drivers are optimized, and now Elden Ring itself is configured to run as smoothly as possible. You're ready to face the Lands Between on your own terms.
Advanced Technical Fixes and Hardware Recommendations
If you've tweaked every setting and driver but Elden Ring still hitches and stutters, it's time to look deeper. This section tackles the advanced system-level fixes and hardware considerations that can finally deliver the stable 60 FPS experience you deserve.

Elden Ring's demanding environments require optimized hardware
Deep System Tweaks for Smooth Frame Pacing
Sometimes, the game's internal frame limiter isn't enough. For rock-solid consistency, install RivaTuner Statistics Server (RTSS), which comes bundled with MSI Afterburner. Set a Framerate Limit to 60 within RTSS. This external limiter often provides smoother frame pacing than the in-game option, ironing out those last micro-stutters that make combat feel choppy.
Next, let Windows itself handle timing more efficiently. The HPET (High Precision Event Timer) can sometimes cause scheduling conflicts. To test if disabling it helps, open Command Prompt as Administrator and type:bcdedit /deletevalue useplatformclock
Then restart your PC. This isn't a guaranteed fix for everyone, but on some systems, it can reduce background latency that contributes to hitches. You can always revert the change by typing bcdedit /set useplatformclock true if you encounter issues.
⚠️ Watch out: Always run a single frame limiter. If you use RTSS, disable any in-game or driver-level FPS caps to avoid conflicts.
The Hardware Reality Check
Software can only do so much. If you're running Elden Ring from a traditional hard drive (HDD), you're fighting an uphill battle. The game constantly streams assets from the open world, and an HDD simply can't keep up, causing noticeable hitches when entering new areas or during complex effects. The single most impactful hardware upgrade for Elden Ring stability is moving your game installation to an SSD—whether it's a fast internal NVMe or a SATA SSD. The difference in asset streaming is night and day.
Your RAM Capacity is another critical pillar. While 16GB is the stated minimum, it's often not enough for a smooth experience, especially if you have other applications open. Upgrading to 32GB provides ample headroom. If you're on an AMD Ryzen system, pairing that with RAM running at 3600MHz or higher can significantly improve core communication speeds, giving you better minimum frame rates in CPU-heavy zones like Leyndell.
Final Cleanup and Verification
Before you consider more drastic measures, perform a thorough system cleanse. Open Task Manager with [Ctrl+Shift+Esc] and End Task for any non-essential background processes. Pay special attention to resource hogs like Chrome with dozens of tabs, Discord (especially with hardware acceleration on), and notoriously problematic RGB software (look for processes like LightingService.exe). These applications steal CPU cycles and memory bandwidth that Elden Ring desperately needs.
Finally, corruption can creep in. Navigate to your Steam Library, right-click Elden Ring, go to Properties > Installed Files, and click Verify integrity of game files. Let Steam scan and replace any corrupted or missing assets. This is a simple, often-overlooked step that can resolve inexplicable crashes or stuttering that appears after an update.
If you've implemented all the fixes from this guide—from driver settings to these advanced tweaks—and still can't maintain a stable framerate, your hardware may genuinely be struggling with Elden Ring's demands. At that point, an upgrade is the true path to becoming Elden Lord without the technical frustration. You've done all you can; your journey is now as smooth as the game's creators intended.