How to Identify Animal Quality in Red Dead Redemption 2
Your adventure in Red Dead Redemption 2’s vast wilderness begins with a crucial skill: spotting the right prey. Before you even raise a weapon, you need to know which animal is worth your time and which one will leave you with a disappointing haul. This guide will show you how to use the game's built-in tools to identify perfect pelts in the field, turning you from a wandering hunter into a precise tracker.
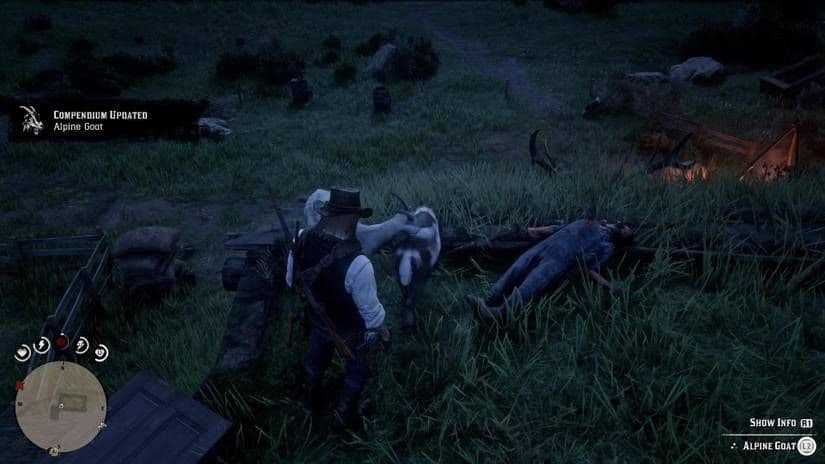
Eagle Eye reveals animal trails and quality ratings.
First, understand the Three-Star Rating System that governs all wildlife. Every animal you encounter has a base quality of one to three stars, shown as ★ (Poor), ★★ (Good), or ★★★ (Pristine). This rating is fixed—you cannot turn a one-star rabbit into a three-star prize. Only a Pristine (★★★) animal can yield a perfect pelt, which is essential for crafting the best gear and fetching top dollar. So, your first rule of hunting in Red Dead Redemption 2 is simple: if it’s not three stars, leave it be and keep searching.
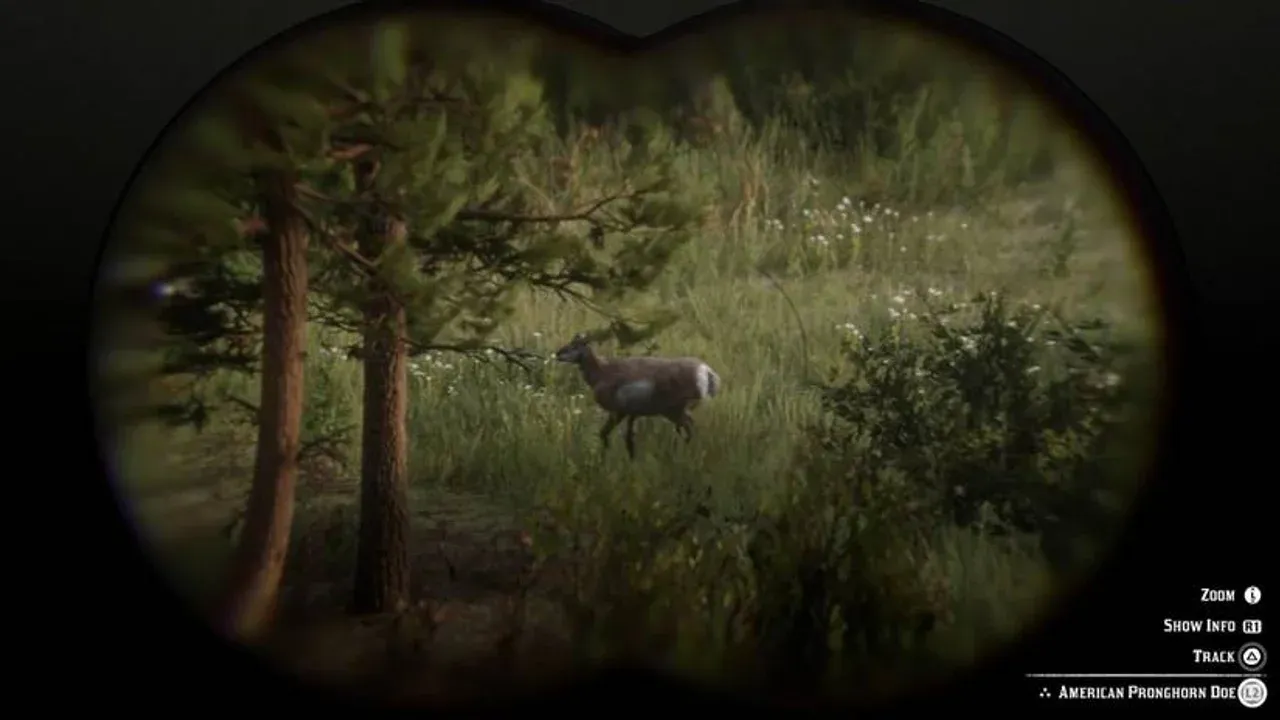
To check this rating without spooking your target, you’ll rely on two key tools. Pull out your Binoculars from the Weapon Wheel under Tools. Zoom in on an animal and hold [R1/RB] to Study it. This action does two vital things: it permanently adds the species to your Compendium in the Pause Menu under Progress, and it instantly reveals the animal’s star rating right on your screen. Once studied, you can even see this rating just by aiming a weapon at the animal. Trust me, this habit saves countless wasted bullets on lower-quality game.
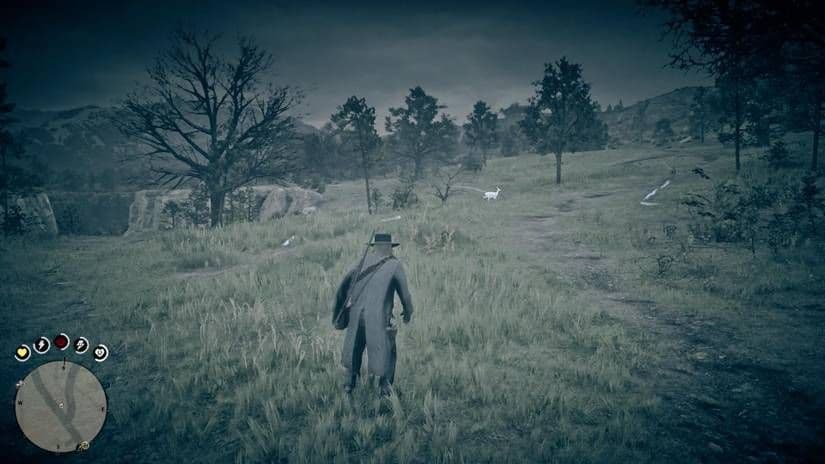
After studying a species, activate Eagle Eye by pressing [L3] + [R3]. Not only will it highlight animals and tracks in gold, but the scent trails you see will also now display the species name and its star rating, making it effortless to track down only the pristine ones.
Your Compendium is your hunting bible. Every animal you study logs crucial data here, most importantly the recommended weapon for a clean kill. While this suggestion isn’t always perfect (we’ll tackle weapon choice in detail later), it’s your starting point for planning any hunt. Combined with using Binoculars to scout from a ridge and Eagle Eye to follow a Pristine trail through dense brush, you have everything you need to locate top-tier game.
With these tools mastered, you’ll never waste a shot on a subpar animal again. You’re now ready to move from scout to hunter, equipped with the knowledge to find only the best the wilderness has to offer. Let’s go bag that perfect pelt.
Best Hunting Tools and Consumables for Perfect Pelts
You’ve found your perfect three-star buck—now comes the real test. In Red Dead Redemption 2, a pristine animal alone won’t guarantee a perfect pelt; you need the right gear and tactics to get close without spooking your prey. This is where your toolkit makes all the difference between a ruined hide and a legendary craft.

Crafting cover scent lotion is essential for getting close to skittish prey.
Essential Hunting Consumables
Before you even raise your rifle, consider your approach. Animals can smell you coming, especially when you’re downwind. Activate Eagle Eye to see a visual guide: blueish ‘stink lines’ flow from Arthur, indicating wind direction. If those lines are blowing toward the animal, it’s only a matter of time before it bolts.
That’s where Cover Scent Lotion comes in. You can buy it at any General Store or craft it at a campfire. Applying it masks your scent for a limited time, letting you close the distance on wary animals from angles that would normally give you away. It doesn’t make you invisible, so move slowly and use cover, but it’s a game-changer for stalking skittish prey like deer or cougars.
For a more active approach, you can use bait. Herbivore Bait and Predator Bait, also available at General Stores or through crafting, can be placed on the ground to attract specific animals. They’re useful if you’re setting up an ambush in a known spawn area, but be patient—you can’t control exactly what shows up or its quality.
Cover Scent Lotion is your best friend for consistent success, while bait is more situational. Always check the wind first with Eagle Eye—if it’s in your favor, you might not even need the lotion.
Maintaining Your Edge for the Perfect Shot
Once you’re in position for the kill, your aim needs to be flawless. This is where Dead Eye Tonics are invaluable. You’ll find them in your Satchel under Consumables—items like Chewing Tobacco and Snake Oil refill your Dead Eye meter. A full Dead Eye, especially the higher levels unlocked later, lets you slow time and paint critical shots on an animal’s vital organs, ensuring that single, clean kill you need.
Remember, even with the right weapon, a shaky or rushed shot can ruin everything. If your Dead Eye is low, pop a tonic before you take the shot to steady your nerves and guarantee accuracy.
Putting It All Together
Think of your hunt in three phases: approach, aim, and execute. Use Eagle Eye to scout the wind and your target’s quality, apply Cover Scent Lotion if needed for your approach, and have a Dead Eye Tonic ready for the moment of truth. With these tools in your satchel, you’re not just hunting—you’re mastering the art of the perfect pelt in Red Dead Redemption 2. Now you’re ready to talk about the perfect tool for the job: your weapon.
How to Choose the Right Weapon for Every Animal Size
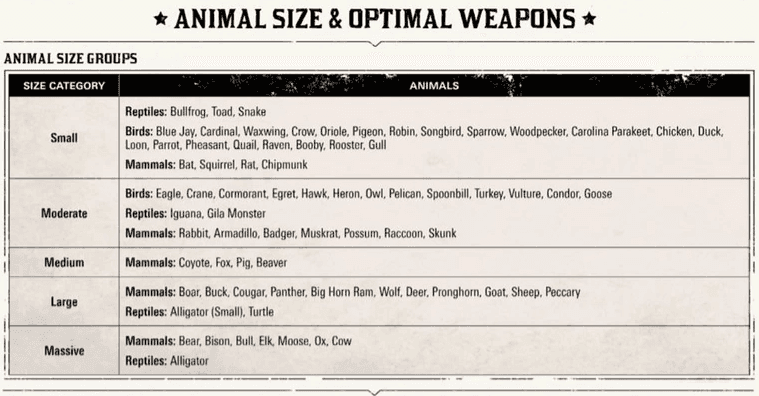
You’ve studied your prey and gathered your tools—now comes the moment of truth. In Red Dead Redemption 2, the single most important factor for securing a perfect pelt isn’t just your aim, but the weapon in your hands. Using the wrong gun on a three-star animal will ruin your trophy every time. Here’s the definitive guide to matching your weapon to the game’s five animal size categories.
Ideal weapons and pelt types for each animal size group.
The system is built around five distinct size groups: Small, Moderate, Medium, Large, and Massive. Your goal is to use a weapon that’s powerful enough for a clean, one-shot kill, but not so overpowered that it damages the hide.
Small Animals (Squirrels, Rats, Snakes, Songbirds)
These tiny critters fit in your satchel. For a perfect pelt, you must use a Bow with Small Game Arrows. These arrows are crafted at a campfire using Arrow x1 and Flight Feather x1. No firearm, not even the Varmint Rifle, will work here—it’s the bow or bust.
Moderate Animals (Rabbits, Raccoons, Skunks, Iguanas)
This is where most hunters make their first costly mistake. For animals like rabbits, the in-game compendium might suggest a bow, but that’s misleading. To preserve a perfect pelt, you must use the Varmint Rifle. Purchase this .22 caliber rifle from any Gunsmith. Its low-impact rounds are designed to kill without destroying the hide.
If you’ve wiped here before, you’re not alone—the rabbit is a classic trap. Always ignore the compendium suggestion and reach for the Varmint Rifle.
Medium Animals (Coyotes, Foxes, Pigs, Beavers)
Step up to a Repeater, available from a Gunsmith. Weapons like the Lancaster Repeater using Regular or Express ammunition are ideal. These guns provide the stopping power needed for a clean headshot without the excessive force of a rifle. For a stealthier approach, a standard Bow with Arrows is also effective.
Large Animals (Deer, Boars, Cougars, Wolves)
This category requires more punch. Equip a Rifle, such as the Bolt-Action or Springfield, again purchased from a Gunsmith. Its higher-caliber rounds are necessary to penetrate thicker hides and bone. A Sniper Rifle like the Rolling Block is also a valid choice, especially for taking down wary prey from a distance.
Here’s the trick most guides miss: you can also use your Lasso for a guaranteed clean kill on many Large (and some Medium) animals. From the Weapon Wheel, equip the lasso, aim with [L2], and throw with [R2]. Once the animal is roped, slowly approach and press [O/B] for a prompt to kill it cleanly with your knife—this never damages the pelt.
Massive Animals (Bears, Bison, Elk, Moose, Alligators)
For the biggest game, you need your heaviest artillery. A Sniper Rifle—the Rolling Block Rifle or later the Carcano Rifle—is your best bet. Purchase it from a Gunsmith and use high-penetration rounds like Express ammo to ensure a single, fatal shot to the brain or heart. A powerful Rifle can also work, but the sniper’s scope and damage make it the more reliable choice.
With this chart committed to memory, you’re armed with the knowledge to turn any pristine animal into a perfect pelt. Let’s go hunting.
How to Execute a Perfect Kill in Red Dead Redemption 2
You’ve found your pristine three-star target and you’re locked in with the perfect weapon. This is the moment of truth in Red Dead Redemption 2—one wrong move and that perfect pelt is gone. A clean kill isn't just about landing a shot; it’s about surgical precision to preserve that flawless quality.
Using Dead Eye for precise shots
The Anatomy of a Perfect Kill
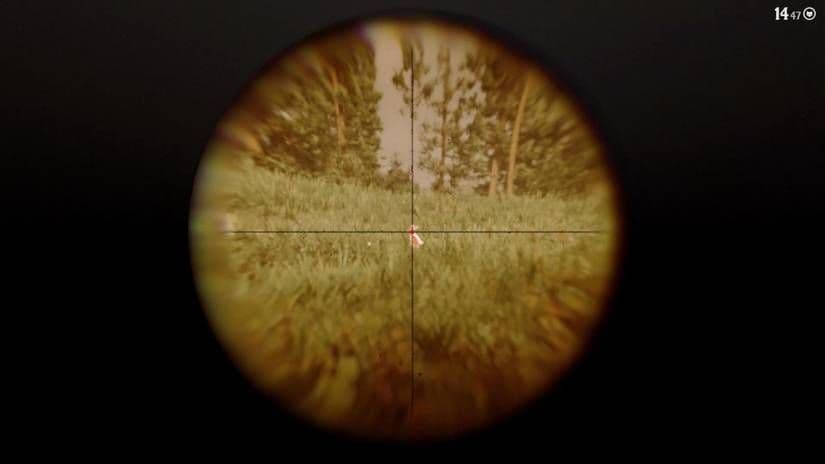
It all comes down to your shot placement. The game recognizes two types of lethal hits: Fatal Hits and Critical Hits.
A Fatal Hit is your golden ticket. This is a one-shot kill that targets the brain or the heart. Landing a Fatal Hit on a three-star animal is the only guaranteed way to walk away with a perfect pelt. Aim for the brain—specifically, the spot just behind and slightly below the eyes—for the most consistent results.
If an animal’s head is down while grazing, use the Call Out ability. While aiming, press [Square/X] to make it lift its head for a split second, giving you the clean headshot you need.
A Critical Hit, which targets the lungs or stomach, will down the animal but not kill it instantly. While this can still secure a kill, it often damages the pelt internally, potentially downgrading your prize from perfect to good. For the best pelts, you always want the immediate, clean stop of a Fatal Hit.
Executing the Shot
Your strategy should be a clean, three-step process: Select a 3-star animal -> Use the recommended weapon -> Aim for the Brain -> Fire a single shot.
This is where Dead Eye Level 4, unlocked in Chapter 5, becomes your best friend. When activated, it will highlight an animal’s weak points in glowing red, taking the guesswork out of finding the brain or heart. If you’ve wiped here before—frustrated by a “good” pelt from a “pristine” animal—you’re not alone. This phase trips up everyone until they master the combination of weapon choice and pinpoint accuracy.
Trust me, once you internalize this rhythm—study, approach, aim, fire—you’ll start bagging perfect pelts consistently. With the right weapon in hand and your crosshair steady on that vital point, you’re ready to make every shot count.
Best Upgrades to Improve Pelt Quality Automatically
You’ve mastered the art of the perfect kill, but in Red Dead Redemption 2, there’s a way to stack the deck permanently in your favor. This is where hunting evolves from a skill into a science, with permanent upgrades that can turn a frustrating hunt into a reliable haul.
Studying animals reveals the best weapon to use for a clean kill.
The single most important item for any hunter is the Buck Antler Trinket. This isn’t just another trinket; it’s a game-changer. When equipped, it applies a permanent buff that can, on occasion, upgrade a Good (★★) pelt to a Perfect (★★★) when you skin the animal. It doesn’t work every time, but when it does, it forgives a less-than-perfect shot or lets you make the most of a high-quality animal you couldn’t get a clean kill on. To craft it, you need to hunt the Legendary Buck in the western peaks of Mount Shan in West Elizabeth. Once you have its antler, take it to any Fence—like the ones in Saint Denis, Emerald Ranch, or Van Horn—who crafts Trinkets from legendary animal parts.
The Buck Antler Trinket is especially useful for “Master Hunter Challenge 2,” which requires three perfect rabbit pelts. Even if you botch a shot on a three-star rabbit, the trinket gives you a second chance at that perfect pelt when you skin it.
To complement this, max out your Dead Eye ability. While Dead Eye Level 4 (unlocked in Chapter 5) is great, the final Dead Eye Level 6 is a hunter’s ultimate tool. You unlock it by completing the mission “Goodbye, Old Friend” in Chapter 6. At this level, Dead Eye doesn’t just slow time—it highlights all vital organs (brain, heart, lungs) in bright red when you aim. This takes the guesswork out of shot placement, letting you consistently land the fatal hits needed to preserve that pristine pelt quality.
With the Buck Antler Trinket smoothing out luck and max Dead Eye guaranteeing your aim, you’re no longer just reacting to the wilderness—you’re mastering it. These upgrades work silently in the background, turning every hunt into a more profitable venture.
Where to Sell and Use Perfect Pelts in Red Dead Redemption 2
You’ve hunted the pristine animal, landed the perfect kill, and now you’re holding that flawless three-star pelt. In Red Dead Redemption 2, the real reward isn’t just the hunt—it’s knowing exactly what to do with your prize to get the best gear, camp upgrades, and cash. Here’s where to take your hard-earned perfect pelts.
Finding specific animals to sell or craft.
The Two Key NPCs for Your Perfect Pelts
Your perfect pelts have two primary destinations, each serving a different purpose for Arthur Morgan’s journey.
First, head back to your Van der Linde gang camp and seek out Mr. Pearson, the camp’s cook and craftsman. He’s the man who handles all satchel and camp upgrades. Donating perfect pelts to him is essential if you want to craft the ultimate inventory item: the Legend of the East Satchel. This satchel maxes out your capacity for everything from tonics to ammunition, but it requires a long list of perfect pelts from animals like deer, cougars, and panthers. Pearson also uses pelts for cosmetic camp upgrades, so if you want a more homely hideout, he’s your guy.
Your second and most versatile destination is the Trapper. You’ll find his stalls at various wilderness locations and in the city of Saint Denis. The Trapper is the exclusive vendor for a huge array of unique clothing, outfits, and gear. He buys Perfect Pelts to unlock these unique items for crafting. Want a fancy vest, a warm coat, or special saddles? You’ll be trading pelts with him. He’s also the only vendor who accepts Legendary Pelts, the unique drops from Legendary Animals that always drop top quality regardless of weapon used.
Sell your perfect pelts to the Trapper even if you aren’t ready to craft something yet. The game remembers your sale, and those pelts will be in his inventory for crafting later. You don’t need to physically carry them.
What Not to Do: Avoiding Common Mistakes
With valuable pelts on your horse, a couple of wrong turns can cost you everything. Remember the carcass decay mechanic: unskinned carcasses rot in one day. Always skin your kill immediately in the field to preserve the pelt quality; a skinned pelt on your horse won’t spoil. If you’re carrying a whole carcass for Pearson, get it to camp fast.
Also, be selective about where you sell. General stores and butchers will buy pelts, but for a much lower price than the Trapper offers. Most importantly, never sell perfect pelts to a Fence. Fences deal in trinkets and valuables, not pelts—they have no use for them and won’t give you a good deal.
Putting It All Together: Your Pelt Economy Strategy
So, what’s the best move for your perfect pelt? Here’s a simple flow:
- For Satchel Upgrades & Camp Decor: Take it to Mr. Pearson at the gang camp.
- For Unique Clothing & Gear: Sell it to the Trapper at his stall.
- For Legendary Pelts: Go directly to the Trapper—he’s the only one who can use them.
- For Quick Cash (Last Resort): A general store or butcher will do, but you’ll get less.
Trust me, once you start delivering pelts to the right hands, you’ll see your efforts pay off in stronger gear and a more capable Arthur. With this knowledge, you’re not just a hunter—you’re a craftsman. Now get out there and finish what you started.
