Understanding the Economy in War of the Three Kingdoms
Your conquest of ancient China in War of the Three Kingdoms isn't just won on the battlefield—it’s funded from the Treasury panel. This is where your empire’s financial health is laid bare, and understanding its math is the difference between a thriving kingdom and a bankrupt rebellion.
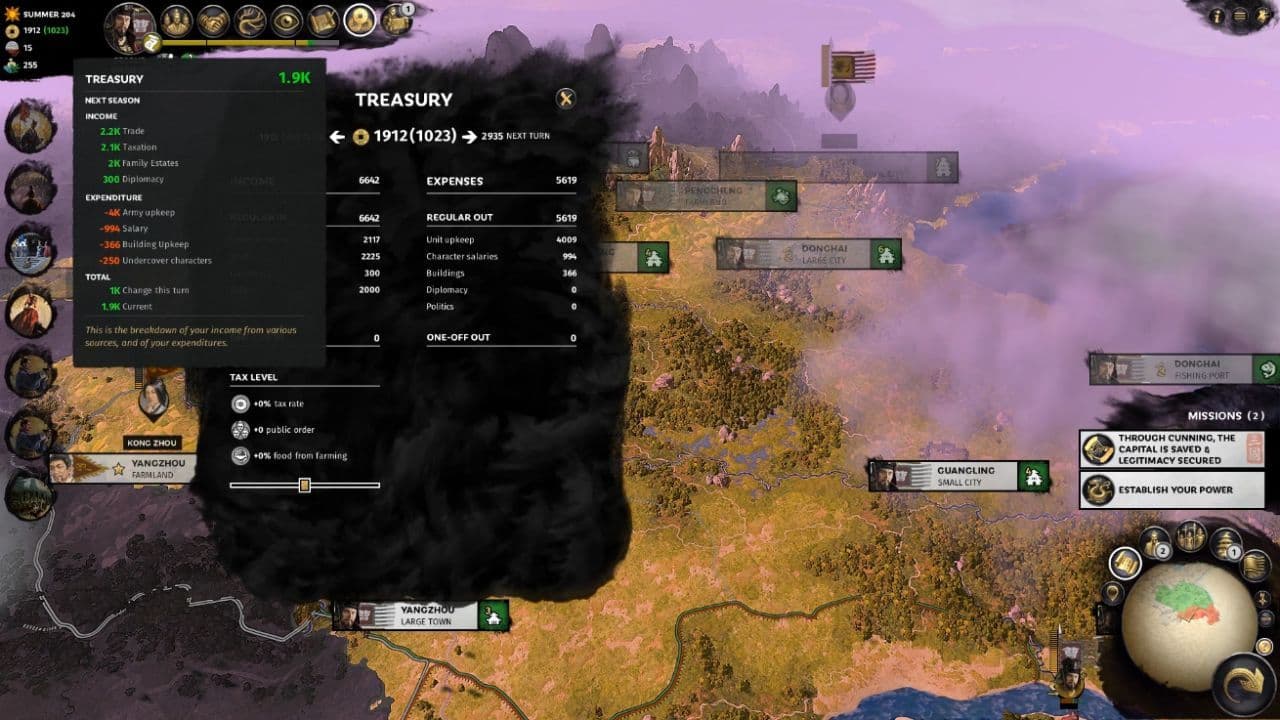
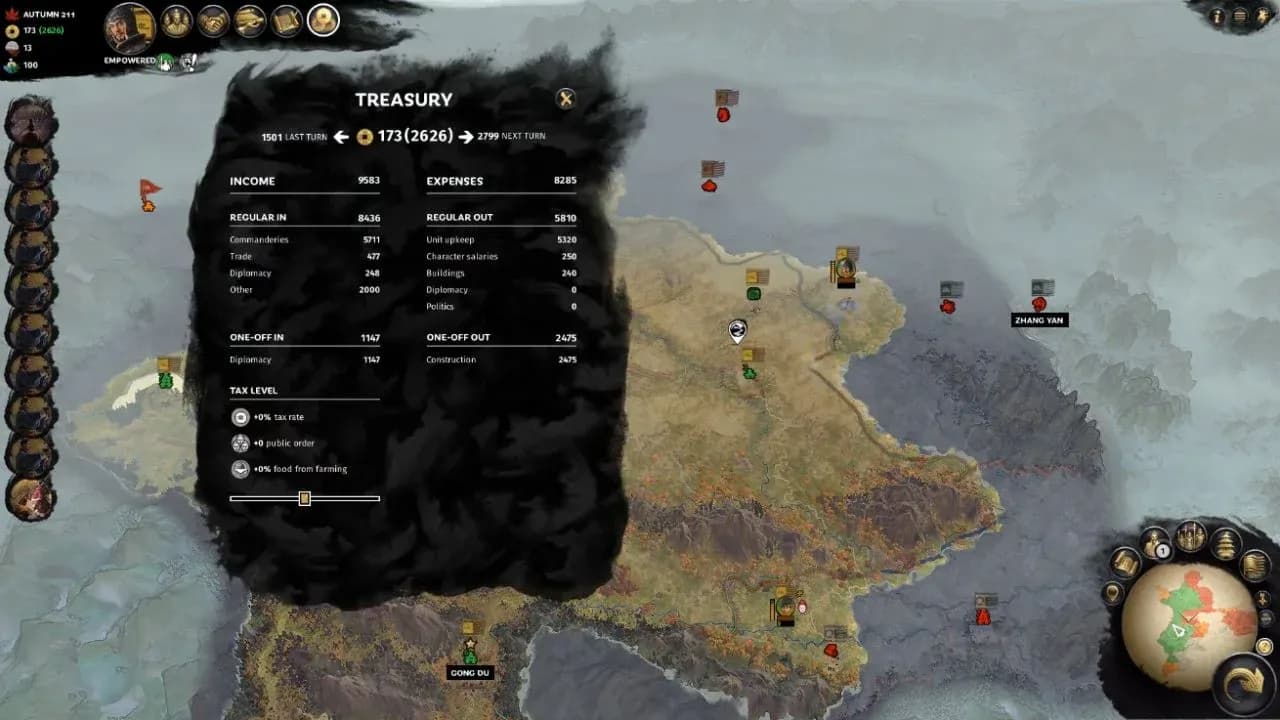
The treasury window displays annual income and expense data.
Every turn, your faction’s income and expenses are tallied here. To see the full breakdown, head to the main campaign screen and click the Treasury button. This panel is your economic command center, showing every gold piece flowing in and out. Your income starts with a fixed base: Family Estates. This is a faction-wide stipend, defaulting to a steady 2000 gold per turn, influenced by your leader’s historical background. Think of it as your starting capital and family wealth—it’s reliable, but it won’t fund a massive army on its own.
The real engine of your economy is tax income, collected from every commandery you own. This is broken down into Peasantry (scaling with population), Commerce (from ports and markets), and Industry (from mines and workshops). As your realm grows, so does the temptation to tax it heavily. Once you reach the Faction Rank of Marquis, a powerful tool unlocks in the Treasury panel: the tax slider. You can drag this slider to adjust your tax rate across all commanderies, balancing the need for gold against the risk of public unrest. Higher taxes fill your coffers faster but can spark rebellions.
If a specific commandery is on the brink of revolt, you don't have to lower taxes for your entire empire. In that commandery’s panel, simply click the tax exemption checkbox. This removes its tax burden to boost public order immediately, a lifesaver for newly conquered or unstable regions.
Managing this flow of gold is the core strategic loop of War of the Three Kingdoms. It’s a constant dance of investment, income, and stability. Master the fundamentals here, and you’ll build an economic foundation that can support any ambition.
How to Build the Best Industry Commandery Specialization
In War of the Three Kingdoms, a vast empire is built on the back of its economy, and nothing funds your ambitions faster than a well-oiled industrial machine. While commerce offers flashy multipliers, industry provides the reliable, high-base income that forms the bedrock of your treasury. This is your blueprint for building the ultimate industrial powerhouse.

Campaign map and settlement management
The Foundational Blueprint
Your industrial commandery’s heart is the State Workshop, which you should rush to upgrade into the Grand Treasury Mint. This isn't just about the raw gold—though the flat income is substantial. The real prize is its -15% adjacent corruption reduction aura. Building this early in a central province creates a clean zone for your core territories to flourish, dramatically accelerating their growth and protecting your income from the empire-wide drain of corruption.
The perfect industrial hub isn't built on one chain alone. To maximize output, pair your Grand Treasury Mint with the Private Workshop line, culminating in the Master Lacquerware Artisans. This building is a powerhouse that amplifies both Industry and Commerce, making it a perfect companion in mixed-income provinces. It turns a good industrial commandery into a great one by boosting all economic outputs.
Identifying and Developing Industrial Hubs
Not every commandery is created equal for this role. You need to seek out the mines and toolmaker counties. These are your primary sources for high base industrial tax. Provinces with iron, copper, or toolmaker resources are your golden geese; they provide the raw, high-value base income that all your percentage bonuses will later multiply.
When scouting new territory, prioritize capturing commanderies with these industrial resources. A single toolmaker county can out-produce several basic farmlands in pure gold generation.
The key to industrial scaling is understanding how bonuses work. Prioritize flat-income buildings early. Constructing your State Workshops, Private Workshops, and resource-specific buildings (like the Iron Craftwork Town or Copper Coin Mint) first gives you a large base number. Then, you layer on percentage increases from reforms, administrators, and high-level administrative buildings. Building in this order—base first, multipliers second—ensures your late-game economy scales exponentially, not linearly.
Fitting Into the Grand Strategy
A dedicated industrial commandery should follow a core template. Alongside your State Workshop > Grand Treasury Mint and Private Workshop > Master Lacquerware Artisans, include an Administration Office (often leading to the Office for Archives and Seals for further corruption control) and a Confucian Temple for essential public order. Your final slots can flex based on the province's unique resources—adding a Marketplace for commerce synergy or a school for additional reforms.
Remember, industry is about brute-force income. With this blueprint, you transform raw resources into a river of gold that can fund endless armies and monumental projects. Secure your mines, build smartly, and watch your treasury—and your faction's power—soar.
Best Commerce and Trade Specialization Blueprints
Welcome to the financial heart of your empire. While industry provides the raw gold, it’s commerce and trade in War of the Three Kingdoms that truly unlock exponential wealth. This is where smart building synergy turns a simple market into an economic powerhouse, fueling your late-game ambitions.

City infrastructure and regional overview.
Your commandery’s commerce income comes from the game’s ‘blue’ buildings. The key is understanding the two-part engine: you need a high base commerce value to feed into powerful percentage multipliers. Get this blueprint right, and your coastal cities will become your faction’s golden geese.
First, establish your Commerce Base. Construct an Inn and upgrade it to a Grand Tea House. This building chain provides the crucial high base commerce value that all your future multipliers will work on. Think of it as laying a broad, solid foundation—the bigger this number, the more spectacular your final income will be after bonuses.
Next, layer on the Trade Multiplier. This is where the Market Wharf building chain comes in. Here’s the trick most guides miss: these buildings often provide zero base income themselves. Instead, they grant massive percentage multipliers to the existing commerce in their commandery. You build the Market Wharf not for what it gives, but for how it magnifies everything else you’ve built.
Always build your base-value buildings (like the Grand Tea House) before your multiplier buildings (like the Market Wharf). Percentage bonuses scale off the base number, so a higher foundation means a much bigger payoff.
For coastal commanderies, you have a game-changing option. Prioritize the Port chain and steer it toward the Spice Trading Port. This isn't just about local income; constructing this port grants a formidable +50% Spice Income faction-wide bonus. If you control multiple spice-producing regions, this single building can supercharge your entire economy.
When you secure a commandery with the Jade resource, you face a strategic choice. While you could build for industry, the Jade Trading Town is often the superior path for a commerce-focused playthrough. It provides excellent commerce multipliers and a significant boost to Trade Influence, which can lead to more lucrative trade agreements. This synergy between local wealth and diplomatic clout is usually worth more than the alternative industrial output.
With these chains working together—a strong base, layered multipliers, and strategic port bonuses—your commerce commanderies will out-earn all others. This setup transforms vulnerable coastal territories into indispensable economic engines that can bankroll your march to unification.
Maximizing Agriculture and Food Production in War of the Three Kingdoms
In the grand campaign of War of the Three Kingdoms, your armies march on their stomachs. While industrial and commercial provinces build your treasury, it’s your green-resource provinces—the breadbaskets of your empire—that fuel your expansion and provide a surprisingly potent economic engine of their own.

Turning a commandery into a dedicated Food Engine is a straightforward but powerful blueprint. The core of this setup is the Land Development building chain, which you should upgrade all the way to Magnate Estates. This path provides the maximum food production from your farmland. Pair this with the Government Support chain, upgrading it to Winnowing and Machine Workshop. This building doesn't just produce food; it's the key to boosting the Peasantry tax income from your farming population, ensuring your food provinces contribute gold as well as grain.
While it's tempting to upgrade your main city building for more slots, keep the city tier in check. Higher city levels dramatically increase food upkeep. It's often better to have a slightly smaller city with a massive food surplus than a large city that consumes its own output.
Here’s where the real magic happens. A mature, well-built food province can reliably produce a surplus of 40-60 food. This isn't just for feeding your people—it's a powerful diplomatic currency. Head to the Diplomacy Screen, find a faction struggling with food (often one embroiled in war), and negotiate a trade. Selling your surplus food for a flat gold income each turn is one of the most reliable and scalable income streams in War of the Three Kingdoms. This Food-for-Gold Diplomacy can fund entire armies without you ever raising taxes.
The long-term power of these provinces is driven by a core mechanic: Peasantry Scaling. As your commandery's population grows—which happens automatically in stable, well-fed settlements—it directly increases your peasantry tax income. Crucially, the 1.5 update made population growth a universal booster, increasing the base value of all your income types, including the commerce and industry from any side buildings you construct. This makes a populous, happy farming province a foundation that strengthens your entire economic structure.
Don't neglect stability in your breadbaskets. A Confucian Temple is an excellent addition here, providing the public order you need to support that growing population and a little extra income on the side. If the province is coastal, consider building Jetties into a Spice Trading Port; the faction-wide spice income bonus is worth it, and it adds another layer of commerce to your agrarian powerhouse.
With this blueprint, your green-resource provinces transform from simple support regions into economic pillars that feed your people, fund your ambitions, and solidify your empire's foundation.
How to Combat Corruption in War of the Three Kingdoms

Regional terrain and borders.
How to Combat Corruption in War of the Three Kingdoms
This is the silent enemy that can cripple even the mightiest empire—corruption. As your commanderies in War of the Three Kingdoms grow rich and powerful, a portion of their tax wealth mysteriously vanishes, siphoned away by administrative bloat. If you’ve felt the sting of expanding your territory only to see your treasury shrink, you’re not alone. This section breaks down exactly how to fight back and reclaim your hard-earned gold.
Corruption isn't a flat penalty; it's a calculated drain. The game uses a specific formula: Base Corruption * (1 - sum of all reductions), and it caps at a devastating 90% income loss. This means every percentage point of reduction you stack is directly saving your tax income. Your goal is to build a web of overlapping anti-corruption auras that blanket your empire.
The cornerstone of your defense is the Administration Office building chain. This versatile structure offers two powerful, late-game corruption-fighting branches. The Grand Judiciary (Level 5B) provides a massive -20% corruption reduction within its local commandery. Alternatively, the Office for Archives and Seals (Level 5C) offers the same -20% corruption reduction, but its effect radiates to all adjacent commanderies. Choosing between them depends on your empire's geography—use the Grand Judiciary to protect your richest economic hubs, and the Office for Archives and Seals to create regional shields around clusters of commanderies.
Corruption reduction auras stack additively. Placing a Grand Judiciary in your capital and an Office for Archives and Seals in a neighboring province can give that neighbor a combined -40% reduction, making it an incredibly efficient economic fortress.
These high-level buildings are your anchors, but you must support them with a network of mid-game structures. This is where the Grand Treasury Mint (from the State Workshop chain) becomes essential, providing a -15% adjacent corruption reduction. The trick is placement. Don’t cluster these buildings in one city. Instead, build your Grand Treasury Mints and Office for Archives and Seals on the corners of your commanderies to maximize their area of effect, creating overlapping auras that cover as much territory as possible.
Beyond buildings, utilize every tool at your disposal. Assign Administrators with high administrative skill to your most valuable provinces—their presence directly combats local corruption. Research key Reforms in the yellow administrative tree that unlock advanced anti-corruption buildings and provide faction-wide bonuses. Finally, use the Assignments menu to dispatch capable characters on anti-corruption missions in troubled regions for a temporary but significant boost.
By understanding the formula and strategically layering reductions from buildings, characters, and reforms, you can effectively neutralize corruption. This turns your developed, high-population cities from financial liabilities back into the powerful assets they were meant to be. With this defensive web in place, your empire’s income is secure, ready to fund the armies that will unite China.
Best Faction-Specific Economic Strategies
In War of the Three Kingdoms, mastering your chosen warlord's unique economic identity is the difference between a stable empire and a bankrupt one. While a generic building template works, true dominance comes from leaning into your faction's built-in strengths, turning their signature bonuses into an unstoppable financial engine.

Campaign map navigation.
Sun Jian: The Coastal Trade King
For the Tiger of Jiangdong, the sea is your treasury. Sun Jian’s faction bonus grants a massive +25% Commerce Income per Port bonus. This isn't just a small boost—it fundamentally changes your blueprint. You don't just build ports; you build empires around them. Prioritize the Port chain in every coastal commandery, aiming for the Spice Trading Port. Combine this with other commerce-boosting buildings like the Grand Tea House and Market Wharf to create multiplicative income explosions. A single high-level port province under Sun Jian can out-earn two inland provinces under another warlord.
With Sun Jian, the Grand Trading Port branch becomes a top-tier choice, not just a situational one. The synergy between its bonuses and your faction trait makes coastal cities your economic powerhouses.
Cao Cao & Ma Teng: The Food-for-Gold Specialists
Some warlords profit not just from taxes, but from what they can sell. Both Cao Cao and Ma Teng have access to unique red-chain buildings that provide Food. Cao Cao’s Tuntian System gives a flat +15% food and tax income from these military structures, while Ma Teng’s Xiliang Supply Lines offer similar benefits. This lets you run a dual-purpose economy: maintain a strong military presence while producing a lucrative food surplus. The strategy is simple—build these unique buildings, stockpile food, and then head to the Diplomacy screen to sell your surplus to hungry neighbors for massive flat gold payments. It’s a reliable, diplomacy-driven income stream that funds your early wars.
Yuan Shu: The Public Order Advantage
Playing as the arrogant Yuan Shu comes with unique administrative challenges, but also a powerful tool for stability. His Unique Administration building provides a substantial boost, offering up to +9 Public Order alongside Legitimacy. This is a game-changer for newly conquered or high-population cities where public order penalties threaten rebellion. By slotting this building, you can often avoid constructing dedicated order buildings like the Confucian Temple, freeing up that building slot for more income-generating structures. It allows you to sustain higher tax rates or faster growth without the usual unrest, making your core territories more financially efficient.
While these are standout examples, every faction has a twist. Kong Rong thrives with Schools, Liu Biao gets a free School effect from Inns, and the Yellow Turbans can run surprisingly profitable green food provinces. The key is to read your faction description, identify that core bonus, and build every commandery to amplify it. Forget a one-size-fits-all approach; in the Three Kingdoms, your warlord’s vision is your roadmap to riches.
Advanced Late-Game Blueprints: The Imperial Palace
The endgame is in sight—your empire stretches across the map, but to fund the final push to become Emperor, you need the ultimate economic engine. In War of the Three Kingdoms, that engine is the Imperial Palace, the crowning achievement of the Administration Office building chain. This isn't just another upgrade; it's a monumental investment that redefines your faction's financial and defensive power.

To even begin construction, you must navigate a demanding path of reforms. First, you must unlock the Regular Palace Attendants reform to build the Directorate of the Commandery (Level 4A). Only after that can you research the Mandate of Heaven reform, which finally unlocks the ability to construct the Imperial Palace itself. This building is unique—you can only build it once per faction, so its location is a critical strategic decision.
Why the Imperial Palace is Worth the Grind
The benefits are staggering and justify the long-term planning. Once built, the Imperial Palace provides two game-changing economic bonuses:
- A massive +500 income boost from peasantry.
- A jaw-dropping -50% construction cost reduction for economic buildings across the entire commandery.
This cost reduction alone can save you thousands of gold when constructing the high-tier Industry and Commerce buildings discussed in earlier sections, accelerating your economic snowball exponentially.
An Unbreakable Capital
Beyond its economic might, the Imperial Palace transforms your chosen capital into an impregnable fortress. It automatically upgrades the local garrison to elite Palace Guards, described as some of the deadliest troops in War of the Three Kingdoms. When combined with other high-level garrison buildings, this makes the city nearly unconquerable, especially if you station a full army inside it. You're not just building a bank; you're creating an ultimate safe haven for your faction leader and treasury.
Build your Imperial Palace in a wealthy, centrally located commandery that already has a strong economic base. The -50% building cost reduction will have the biggest impact here, and the elite garrison will best protect your most valuable region.
Choosing the Imperial Palace means forgoing the alternative late-game Administration Office paths that focus on corruption reduction (like the Grand Judiciary). This trade-off means you must be doubly vigilant about managing corruption in your other provinces through administrators, assignments, and the anti-corruption buildings covered in Section 5. But for pure economic and defensive supremacy, there is no equal.
With the Imperial Palace securing your heartland and flooding your treasury with gold, you solidify the foundation needed to claim the Mandate of Heaven for yourself. The final throne awaits.
Managing Vassals and Diplomacy for Passive Income
This is where your conquest shifts from a military campaign to an empire. In War of the Three Kingdoms, your armies may win battles, but it's your vassals and diplomacy that build a sustainable treasury, funding your final push for the throne.
Think of vassals as your most lucrative long-term investment. Once you've subjugated a faction, they become a Vassal State. The core of this relationship is financial: every turn, your vassal pays 20% of their total income to you, their master. This is pure, passive gold that flows directly into your Treasury without you lifting a finger to manage their commanderies. It’s the ultimate return on your military victories.
Target wealthy, trade-focused factions like Kong Rong or Liu Biao for vassalage. Their robust economies mean a much larger 20% tribute, turning their commercial hubs into your personal ATMs.
Managing these relationships is key. A happy vassal is a paying vassal. In the Diplomacy screen, you can Guarantee Autonomy to a vassal. This action significantly boosts your diplomatic relations with them and makes them far less likely to seek independence. It’s an insurance policy on your income stream. If a vassal does get rebellious, you have a nuclear option: Annexation. From the Vassal Menu, you can Annex them, absorbing all their settlements, armies, and characters into your faction instantly.
⚠️ Watch out: Annexation comes at a steep cost. It incurs a major diplomatic attitude penalty with all your other vassals, often triggering a cascade of independence declarations and wars. Only use it as a last resort or when you're ready to fight everyone.
Strategic Vassal Management
Here’s where advanced strategy comes in. Instead of annexing every territory you conquer, consider creating Puppet Buffers. Grant independence to newly conquered, non-essential regions on your borders and then immediately vassalize the new faction. This keeps your direct territory count lower, which helps manage the Corruption and Public Order penalties that scale with empire size, while still securing tribute and a friendly buffer state.
The ultimate late-game move is liberation diplomacy. Granting a vassal their independence and then inviting them into your alliance is seen as a hugely honorable act, skyrocketing your diplomatic standing across the land. This turns former subjects into powerful, grateful allies who will fight for you without any management overhead.
With a network of loyal vassals paying tribute and guarding your flanks, your core provinces can focus entirely on maximizing income. You’ve moved from conquering land to cultivating power. Now, the gold to fuel your final war for unification flows in effortlessly.