How to Choose the Best Starting Faction in War of the Three Kingdoms
Your first choice in War of the Three Kingdoms is the most important one you’ll make. Picking the right leader isn't just about a color on the map—it's about choosing the playstyle that will define your entire campaign, from your opening moves to the final unification.

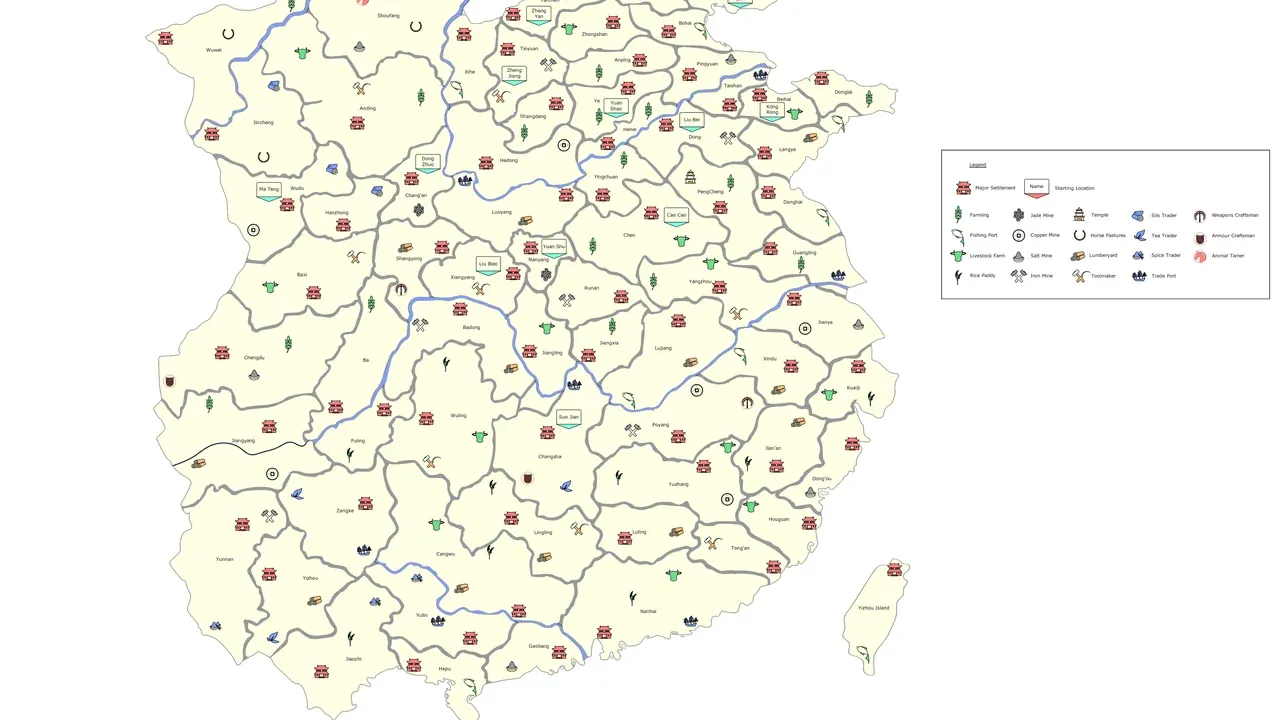
Comprehensive faction tier list for War of the Three Kingdoms.
Think of it like this: do you want a safe, reliable path to learn the ropes? Or do you want to master the art of political chaos? Your faction leader’s unique mechanics and starting location will answer that question for you. Let's break down the best options for different strategic appetites.
The Safe Bet for New Warlords
If you're new to the game or just want a stable foundation, Sun Jian in Jing Province is your best bet. His starting location is a strategic gift—somewhat removed from the brutal power struggles of the northern Central Plains. This gives you breathing room to expand south and east, securing a rich economic base before the major conflicts begin. His campaign is also forgiving thanks to reliable officer progression, especially as his children mature into formidable generals who help maintain stability. You’ll learn core mechanics like expansion and economy here without constant existential threats.
The Master of Manipulation
For players who believe the pen (and a well-placed rumor) is mightier than the sword, Cao Cao is your champion. Starting in the volatile Central Plains, he can’t just rely on brute force. Instead, he uses his unique Credibility mechanic to manipulate the political landscape. You’ll spend Credibility to sabotage rivals, tank their public order, and most importantly, instigate proxy wars between other factions. This lets you control the campaign's tempo, weakening your enemies while they fight each other, making Cao Cao one of the most versatile and powerful leaders in the game.
The Narrative Leader
Some players want to feel like they're living the classic Romance of the Three Kingdoms novel. For that epic, character-driven experience, choose Liu Bei. His campaign, particularly in later start dates, is a narrative-driven journey focusing on leadership and virtue. Through specific event chains like "Solace in Jing," you’ll recruit legendary strategists such as Zhuge Liang and Pang Tong, guiding your faction toward the Riverlands to found the kingdom of Shu-Han. Playing as Liu Bei is less about raw conquest and more about building a legacy through loyalty and key historical moments.
The Ultimate Survival Challenge
Ready for a brutal test of your strategic mettle? Then take control of Dong Zhuo. Starting in the capital region of Luoyang/Chang'an, you begin surrounded by enemies who rightly despise you. His campaign is pure survival-focused gameplay. You must leverage overpowered characters like Lü Bu and Zhang Liao to defend your territory while managing your unique Intimidation resource. This resource lets you force diplomatic concessions—like peace treaties or tribute—even from factions stronger than you, purely through fear. It’s a tense, high-risk campaign that rewards aggressive defense and cunning diplomacy.
No matter who you choose, stick to 3-4 core cities at the start. Secure your home region and make sure every new city can pay for itself within 10 turns before expanding further. Rushing to grab territory is the fastest way to overextend and collapse.
Your choice here sets the tone for everything to come. Whether you build steadily with Sun Jian, weave webs of intrigue with Cao Cao, follow the heroic legend with Liu Bei, or embrace the tyranny of Dong Zhuo, you’re now ready to make your mark on ancient China. Let’s begin.
Understanding the Core Resource Loop in War of the Three Kingdoms
Your empire in War of the Three Kingdoms isn’t just built on conquest—it’s built on a foundation of five vital resources. Mastering their flow is what separates a fleeting warlord from a stable, enduring kingdom. This isn't just about having enough gold; it's about balancing a complex economy where a food shortage can cripple your armies and a lack of influence can leave you diplomatically isolated. Let’s break down each pillar and how they work together to keep your faction thriving.

The game interface tracks your primary resources and faction stability.
The Five Pillars of Your Economy
Food is the lifeblood of your campaign. Produced via Land Development buildings like farms and fisheries, it’s essential for army effectiveness and city upkeep. A starving army fights at half strength, and cities without sufficient food will see their growth and public order plummet. Your first priority in any fertile commandery should be securing a steady food surplus.
Gold/Income is your faction’s treasury, funding everything from recruitment to construction. It’s generated through a mix of Industry (purple) and Commerce (blue) buildings. Industry offers high, stable base income, while Commerce scales powerfully with bonuses from adjacent structures and trade agreements. A healthy gold flow lets you field more armies and develop your cities faster.
Wood and Iron are the strategic materials required for advanced building tiers and military equipment. While not a direct income source like gold, these resources are often tied to specific buildings (like the Iron Craftwork Town) that enhance your economic or military output. Controlling regions rich in these materials is key to technological and military superiority.
Influence/Reputation is your diplomatic currency. A high reputation fosters trust, leading to favorable trade terms and stronger alliances. In negotiations, it can be the difference between securing a crucial non-aggression pact or being dragged into a war on two fronts. Every diplomatic action, from gifts to marriages, builds or spends this intangible—but critical—resource.
Check your food and gold balance every single turn. If your monthly income dips below 500, halt all recruitment immediately. A broke faction can’t reinforce, and a starving army can’t win.
Balancing the Scales and Avoiding Scarcity
The real challenge is that these resources are interdependent. Pouring all your effort into gold might leave you food-poor. Focusing solely on military buildings (red) drains your economy. The goal is a balanced, self-sustaining loop where each new city pays for itself within 10 turns.
When Resource Scarcity hits—and it will—you have tools to mitigate it. The most effective are trade routes and joint military campaigns. Establishing trade agreements lets you exchange surplus materials (like selling extra food for gold) with other factions. Coordinating military efforts with an ally can help you secure resource-rich territories that would be too costly to take alone, sharing the spoils and strengthening your collective position.
This is where your early choices compound. A commandery with high fertility should become your Food engine. A coastal region with a Port should focus on Commerce. An area with mines should maximize Industry. Trying to make every province do everything is a recipe for mediocrity and collapse.
Building a Stable Foundation
Your first 50 turns are about defining this core resource loop. Secure a ‘heartland’ of 4-6 fully developed commanderies, each specializing according to its strengths. Use your surplus Food to fuel growth, your Gold to fund development, and your Influence to secure the diplomatic space you need to focus inward.
Remember, in War of the Three Kingdoms, a powerful economy wins the long war. It allows you to outlast rivals, rebuild armies faster, and bribe your way out of trouble. With a firm grasp on these five resources, you’re not just surviving—you’re building an empire that can weather any storm.
Best Building Strategies for Commandery Management
Think of your commanderies not as generic city slots, but as specialized engines for your empire. In War of the Three Kingdoms, the difference between a thriving kingdom and a bankrupt one is how you build. This section is your blueprint for turning any province into a powerhouse by matching construction to its inherent strengths.

Overview of regional commandery development.
Build to Your Commanderies’ Strengths
Every commandery has a personality. Some are fertile breadbaskets, others are bustling trade hubs, and a few are rich in mines. Your first job is to assess what you’re working with. Check the commandery details for fertility levels and any special resources—these are your cheat codes for maximizing output. High fertility means a 25% bonus to food and peasant income, while low fertility penalizes peasantry but leaves food untouched.
For a Commerce or Industry Hub, you’re looking to amplify its natural money-making potential. Start by building the Inn chain up to the Grand Guest House to boost commerce and tourism. Pair this with the Marketplace chain, specifically the Silk Expedition Trading Post, to solidify your trade networks. To keep the gold flowing cleanly, you must suppress corruption here. Construct an Office for Archives and Seals from the Administration Office chain and a Grand State Workshop from the State Workshop chain. Complete the industrial powerhouse with Master Lacquerware Artisans from the Private Workshop chain. This combo creates a stable, high-yield environment that scales beautifully into the late game.
For an Agricultural Engine, your goal is food security and surplus. Focus on the green chains: upgrade Land Development into Magnate Estates and Government Support into the Winnowing Machine Workshop. This setup prioritizes massive food output. If you’d rather have more gold at the cost of some food, you can pivot to the Livestock Market Of The Commandery Capital and Grand Irrigation Canals instead. Regardless of your choice, support this peasant economy by adding an Office For Archives And Seals, a Province Administration Of Han Empire from Tax Collection, and a Grand Temple Of Confucius.
If early-game reform restrictions block you from building an Office for Archives and Seals, don’t panic. Build a Grand Treasury Mint from the State Workshop chain as a temporary stand-in. It provides that crucial -15% adjacent corruption reduction to keep your economy healthy until you can upgrade.
The Essential Support Framework
Specialization is key, but every province needs a foundation of stability. Two buildings are non-negotiable across your empire. First, the Confucian Temple from the yellow chain. As your cities grow and public order dips, this building provides critical stability and a nice income bump, preventing costly rebellions. Second, you must actively manage corruption, which can silently cripple your income. The formula is base corruption multiplied by (1 - the sum of all your reductions). This is where your Office for Archives and Seals and Grand Treasury Mints work overtime. Place these strategically so their corruption-reduction auras overlap and cover your heartland.
⚠️ Watch out: The Marketplace chain’s Silk branch does not spawn the Entrepreneur character type. If you need those characters for your court, you’ll have to build a standard Marketplace somewhere else in your empire.
Faction-Specific Twists
Your chosen leader can bend these rules. Sun Jian’s faction gets +25% Commerce Income per Port, making coastal trade settlements absurdly profitable. Cao Cao or Ma Teng can build red-chain military buildings that also produce Food, letting you trade surplus for massive gold profits in diplomacy. Liu Bei benefits from strong peasantry-focused buildings, especially after the Nanman update. Let your faction’s unique mechanics guide your final adjustments—sometimes the generic template isn't the most optimal path.
By auditing each commandery’s strengths and applying this tailored blueprint, you transform your territory from a collection of towns into a synchronized economic machine. You’ll generate the food to feed vast armies and the gold to pay for them, all while keeping corruption in check and your people happy. Now, let’s ensure that prosperity doesn’t spark rebellion by managing public order.
How to Manage Public Order and Corruption in War of the Three Kingdoms
You’ve built a powerful economy, but now your cities are simmering with unrest and your treasury is bleeding gold to an unseen thief. In War of the Three Kingdoms, managing your empire’s stability is just as critical as winning battles—neglect it, and your hard-earned conquests will crumble from within. This section breaks down how to keep your people happy and your coffers clean.

Expanding your borders increases the risk of corruption.
The Two Pillars of Stability: Public Order and Corruption
Think of your commanderies as engines: Public Order is the fuel that keeps them running smoothly, while Corruption is the friction grinding their gears to a halt. Let’s tackle them one at a time.
Public Order is your measure of a province’s stability. Let it dip too low, and you’ll face devastating rebellions that can open a new front in your wars. Your goal is to maintain public order above 70 in every commandery. You can do this through several methods: constructing specific buildings like the Confucian Temple, adjusting tax levels, or garrisoning troops. If a newly conquered or struggling region is on the brink, the quickest fix is to open its settlement details and [Left-Click] the Tax Exemption box. This suspends income from that city in exchange for a major public order boost, buying you time to build permanent solutions.
Don’t just react to rebellions—prevent them. Check your public order every few turns, especially after conquering a new region or upgrading your city’s main building, as both actions can cause a sharp drop.
Corruption is a silent empire-killer. It’s a percentage tax on your income that scales with your empire’s size, calculated as base corruption * (1 - sum of reductions). It caps at a punishing 90%, meaning late-game empires can lose nearly all their income if unprepared. Your mission is to stack as many reductions as possible.
Building Your Anti-Corruption Network
Corruption reduction comes from buildings with overlapping “auras” that affect adjacent commanderies. Your two workhorses are the Office for Archives and Seals (from the Administration Office chain) and the Grand Treasury Mint (from the State Workshop chain). Place these in central, high-income provinces so their anti-corruption fields cover as many neighboring regions as possible. For a crucial faction-wide bonus, prioritize constructing the Copper Coin Mint whenever you control a Copper resource. This building provides a permanent –4% faction-wide Corruption reduction, a massive boost that applies everywhere.
⚠️ Watch out: Corruption buildings have limited range. Don’t cluster them all in one corner of your empire. Spread them out to create overlapping zones of control, especially along your trade routes and in your richest provinces.
Your Mid-Game Stability Blueprint
By Turn 50, you should be shifting from wild expansion to intentional consolidation. Define a “heartland” of 4-6 fully developed, stable commanderies. Here’s your action plan for each type:
- For Your Core Income Provinces: Follow the commerce/industry template from earlier, but always reserve one slot for an Outpost. This provides a garrison and public order boost, preventing your economic engines from revolting.
- For Your Breadbasket (Food) Provinces: Keep their city level at 5 or below to avoid massive public order penalties. Fill them with food-producing buildings and a Confucian Temple for stability.
- For New or Unstable Regions: Immediately enact Tax Exemption and station a cheap garrison force. Build a Confucian Temple first, then work on your anti-corruption infrastructure.
If you’ve ever watched a thriving province suddenly starve your treasury, you know the pain of mismanaged stability. By proactively building temples, strategically placing anti-corruption hubs, and using tax exemptions as an emergency brake, you transform your empire from a fragile conquest into an unshakable foundation. With public order secured and corruption under control, your economy will be ready to fund the wars to come.
Diplomacy and Strategic Alliances for Faction Growth
In the chaotic landscape of War of the Three Kingdoms, your armies are only as strong as the web of alliances supporting them. While steel and strategy win battles, it’s shrewd diplomacy and strategic partnerships that win the campaign, letting you expand your borders without bleeding your treasury dry.

Developing your faction through careful planning.
This is where your campaign truly evolves from a regional scrap into a grand strategic game. The diplomacy screen isn't just a menu for peace treaties—it’s a precision tool for managing threats, securing your flanks, and turning potential enemies into profitable allies. Your first stop should always be the Quick Deal tab on the Diplomacy Screen. A quick [Left-Click] here instantly shows you every faction willing to trade, sign a non-aggression pact, or grant military access. Use this constantly to identify easy diplomatic wins that secure your borders and fill your coffers without a single soldier moving.
Check the Quick Deal tab every few turns. New agreements often become available as your power and reputation shift, letting you snag favorable deals before your rivals do.
Beyond simple pacts, deeper bonds are forged through Strategic Marriages. This diplomatic action is a powerful way to solidify ties with a key neighbor or a rising power, creating mutual faction benefits like a massive, one-time relations boost and a lasting non-aggression period. It’s especially useful for locking down a dangerous border or integrating a powerful family’s generals into your court. Think of it as investing in long-term stability.
Sometimes, the best territory to hold is territory you don’t have to manage yourself. This is the wisdom behind Strategic Vassalage. Instead of conquering every minor warlord on your frontier, consider subjugating a weaker faction on a vulnerable border to act as a defensive buffer. They’ll fight your battles for you, absorb enemy raids, and even pay you tribute. You can even feed them troublesome territories you’d rather not govern directly, allowing you to focus on developing your core heartland commanderies in peace.
Your every action builds your Player Reputation, a hidden currency that governs all diplomacy. A high reputation fosters trust, making factions more likely to offer you favorable trade terms and alliances. Conversely, a low reputation—earned by breaking treaties or being overly aggressive—breeds distrust and can make even basic resource trades prohibitively expensive. It’s a long-term investment: honor your agreements, and the entire map will be more willing to deal with you.
⚠️ Watch out: Before declaring war, always check if your target is a vassal of a larger faction. Attacking a vassal will drag their overlord into the war, potentially opening a disastrous second front you weren’t prepared for.
Here’s the trick most guides miss: diplomacy isn't just defensive. Use it aggressively to shape the board. As Cao Cao, you can use your unique Credibility to instigate proxy wars between your rivals, weakening them both while you build strength. For any faction, offering gifts of Food or Gold to a powerful neighbor can buy you the precious time needed to consolidate your position. Remember the golden rule—fight one war at a time. Use diplomacy to ensure everyone else is either your friend, preoccupied, or too weak to matter.
With a network of allies secured by trade, marriage, and strategic vassals, and a reputation that opens doors instead of closing them, you’ve built an empire that can withstand any storm. Now you’re ready to focus your military might on the one rival that truly matters.
Advanced General Specialization and Military Management
As your War of the Three Kingdoms campaign transitions from frantic expansion to deliberate empire-building, the quality of your armies becomes more critical than their quantity. This is where you move beyond simply fielding troops and start mastering the art of military management—specializing your legendary generals into precise roles and equipping them to dominate.

General skill trees for military optimization.
General Specialization: From Warriors to Specialists
Every general has a color-coded skill tree, but the late-game trick is to stop treating them as generic "red" or "green" units and start assigning them specific, high-impact roles.
- Administrators: For your developed, high-income heartland commanderies, appoint a general with deep investments in the Blue (Strategist) tree. These skills boost construction speed, income, and public order in the province they govern, turning a commandery into a hyper-efficient economic engine.
- Army Commanders: Your main field armies need leaders who can project power. A Red (Vanguard) general specced for army-killing is ideal for offensive campaigns, as their tree reduces army upkeep and increases devastating charge bonuses.
- Duelists: Purple (Champion) generals with their high evasion are your premier duelists. Spec them with single-entity kill skills and equip them to win duels fast. A quick victory against an enemy general triggers an army-wide morale shock, often routing entire sections of their force.
- Defensive Sentinels: For holding key chokepoints or garrisoning vulnerable fortresses, a Green (Sentinel) general with skills that boost replenishment and defensive stance effectiveness is invaluable.
⚠️ Watch out: On higher difficulty settings, the AI's stat bonuses can crush your morale. To counteract this, invest heavily in the Yellow (Commander) tree's morale and resolve bonuses for your primary army leaders. This can be the difference between a wavering line and an unbreakable one.
Ancillary Management: Equip for the Role, Not the Rarity
That unique armor or legendary sword isn't just for show—it's a tool. Equip items based on a character's function, not just their rarity.
- Give your Administrator-generals ancillaries that boost Public Order and Income in their province.
- Your faction leader and heir should carry items that increase diplomatic relations or reduce mustering time, aiding in rapid army redeployment and smoother politics.
- For your top Duelists, prioritize items that add melee evasion or armor-piercing damage to ensure they win those critical one-on-one clashes.
Ancillary drops are determined by a pre-battle seed. Reloading a save won't change what you get after a victory, so don't waste time save-scumming for a specific item. Focus on proactively cycling your existing inventory to the characters who need them most.
Army Composition and Weapon Choice
Your general's weapon choice directly impacts their effectiveness on the battlefield. Generals wielding long weapons like Glaives, Spears, Great Hammers, or Great Axes are far more efficient at clearing enemy soldiers than those with short swords or axes. Assign these powerful weapons to your Red, Green, and Purple generals to maximize their killing potential.
Remember to support your legendary commanders with a balanced army. Use cavalry for flanking charges, sturdy infantry to hold the line, and archers to whittle down the enemy from a distance. A well-composed army amplifies your specialized general's strengths and covers their weaknesses.
By moving from a broad to a specialized approach—assigning precise roles, tailoring skill builds, and strategically distributing gear—you transform your military from a collection of armies into a finely tuned instrument of war, perfectly prepared for the final, kingdom-shattering conflicts.
Common Beginner Mistakes and Efficiency Tips
You've built a mighty faction, but around Turn 50, the momentum stalls. Your treasury feels thin, your armies are stretched, and the map is full of threats. This is the infamous 'Turn 50 Wall' in War of the Three Kingdoms, and hitting it is a rite of passage. Don't panic—it's a sign you need to shift from reckless expansion to smart consolidation. Here’s how to break through and build an economy that can fuel your final conquest.

Balancing diplomacy and economy for efficiency.
Stop the Bleeding: The 10-Turn Rule & Recruitment Threshold
The most common killer of mid-game campaigns is overextension. You conquer a city, but it’s a drain, not an asset. To avoid this, adopt the 10-Turn Rule: every new commandery you capture should become self-sufficient and pay for itself within 10 turns. If it can’t, you expanded too far, too fast. Focus on building up its core income structures immediately, and don’t move on until it’s no longer a resource sink.
Your military ambitions are directly tied to your treasury. Here’s a hard, non-negotiable line: halt all recruitment if your monthly income dips below 500 gold. A starving, underfunded army fights at half strength and will bankrupt your faction. It’s better to have one strong, fully-funded army than three weak ones that collapse your economy.
Check your food and income every single turn. It’s the single most important habit for long-term survival in War of the Three Kingdoms.
Build Your Fortress: The Turn 50 Heartland
Your entire strategy should pivot on a simple, powerful goal: fully develop a core of 4-6 commanderies by Turn 50 before pursuing further expansion. This is your economic and defensive heartland. Choose fertile, resource-rich provinces and build them according to the specialized templates from earlier sections. This secure core will generate the overwhelming gold and food needed to support future wars, allowing you to outlast rivals who spread themselves thin.
Protect Your Progress: Save Insurance & Focused Wars
The diplomacy screen is a minefield. Before you click that tempting "Declare War" button, always create manual saves before declaring war. This is your insurance against a costly strategic defeat or an unexpected cascade of alliances turning against you. It lets you recover from a misjudgment without losing hours of campaign progress.
Once you are at war, focus ruthlessly. Fighting on two fronts is a death sentence. Use diplomacy to secure your flanks with non-aggression pacts, even if it means sending gifts, and concentrate all your might on eliminating one enemy at a time. Let your developed heartland fund the war while your focused armies win it.
Putting It All Together: Your Efficiency Checklist
By Turn 50 in your next campaign, you should be able to check off this list:
- ✅ A Heartland of 4-6 maxed-out, specialized commanderies.
- ✅ Monthly income consistently above 500 gold (ideally much higher).
- ✅ All new territories on track to meet the 10-Turn Rule.
- ✅ Manual save file created before any major war.
- ✅ Only one primary military front, with other borders secured via diplomacy.
If you’ve wiped here before, you're not alone—this transition trips up everyone. But with these rules, you shift the game from a desperate scramble into a controlled march to victory. Your economy becomes an unstoppable engine, and your final rivals will fall not to a trick, but to your overwhelming, sustainable might. Now go claim your kingdom.