Essential Preparation and Gear for Minecraft Mining
Don't just grab a pickaxe and start digging. In Minecraft, a successful mining expedition isn't about luck—it's about preparation. This section covers the essential gear and consumables you need to survive the depths and return with your hard-earned loot.
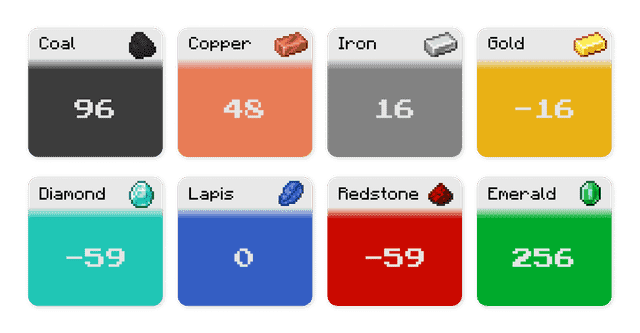
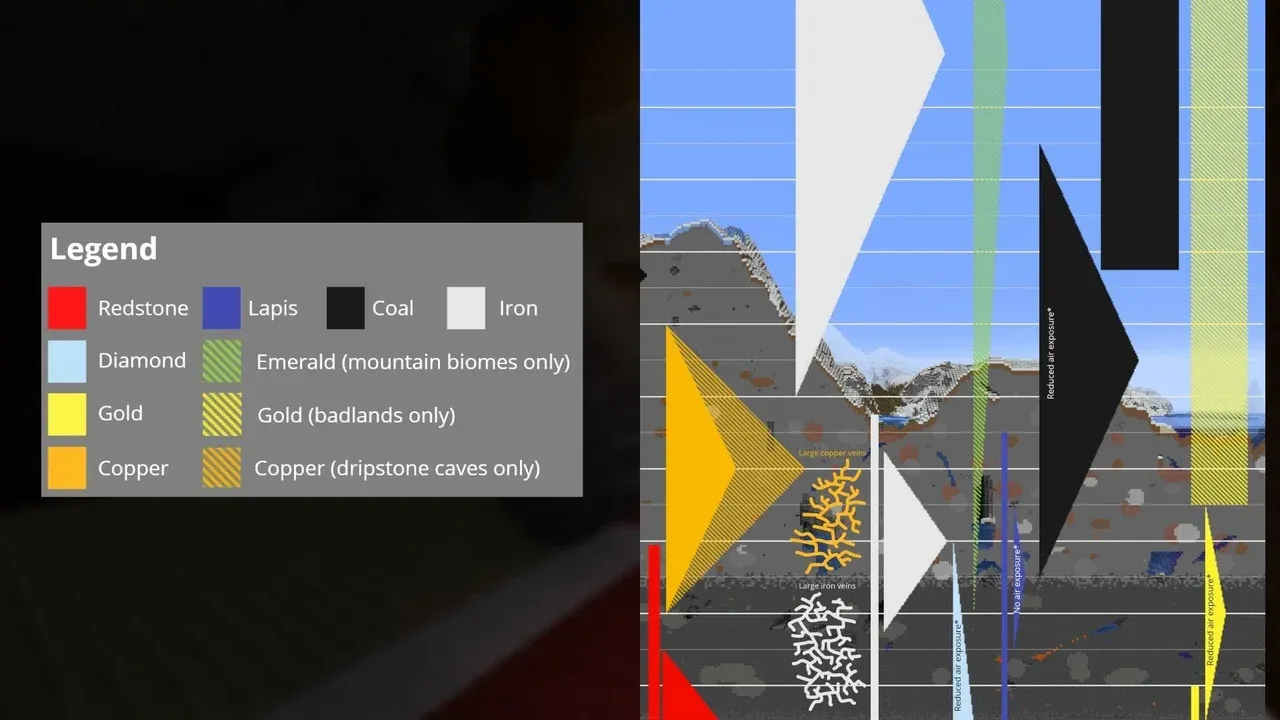
Optimal Y-levels for various ores in Minecraft 1.21.
Your adventure into the dark begins long before you break the first block. Trust me, a well-packed inventory is the difference between a triumphant haul and a frustrating death and respawn cycle. You need the right tools, supplies to stay alive, and a plan for when things go wrong.
First, let's talk tools. Your Iron Pickaxe is the absolute minimum for serious mining, as it's required to collect Diamond, Gold, Redstone, and Emerald ores without breaking them. If you've got the diamonds to spare, upgrade to a Diamond Pickaxe. With 1,561 durability, it lasts much longer and is the only tool that can mine Obsidian and Ancient Debris. Always carry a backup—there's nothing worse than your main pick breaking mid-tunnel.
Now, pack your survival kit. You'll need a Water Bucket. This is your Swiss Army knife for the underground: it can instantly turn a deadly lava flow into safe obsidian, create a safe landing pool if you fall, and even put out fires. Next, bring a full stack of high-saturation food like Steak or Cooked Porkchops. You'll constantly need to heal from minor damage and keep your hunger bar full for health regeneration. Light is your lifeline against mobs, so bring a full Stack of 64 Torches. Place them every 10-12 blocks in your tunnels to keep the darkness—and its inhabitants—at bay.
⚠️ Watch out: Never dig straight down. You have no idea what’s beneath that block—it could be a cave, a lava lake, or a long, fatal drop.
For defense, equip a Shield in your off-hand. It will block Creeper explosions and Skeleton arrows, which are your biggest threats in confined cave spaces. Finally, bring a Stack of 16 Wood Logs. This is your emergency crafting kit. From it, you can make sticks for more torches, a crafting table to repair tools, or even a new set of tools if you lose yours.
Organize your hotbar. Keep your pickaxe, sword, water bucket, and torches in easy-to-reach slots. In a panic, muscle memory saves your life.
With your Iron Pickaxe or Diamond Pickaxe in hand, your Water Bucket at the ready, and your inventory stocked with Steak, Torches, and emergency Wood Logs, you're not just prepared—you're equipped to conquer the depths. Let's go mining.
Best Layers for Every Ore in Minecraft 1.21+
You’ve got your gear and you’re ready to dig—but where? In Minecraft, randomly punching stone is a surefire way to waste hours. The game’s 1.18 Caves & Cliffs update overhauled ore generation into a system of triangular distributions, meaning each resource has a specific Y-level where it’s most abundant. Here’s exactly where to aim your pickaxe for every ore in the game.
Exploring deep underground caves where ores are most abundant.
The Diamond & Redstone Sweet Spot
For the most valuable underground treasures, head deep. Diamond ore and Redstone ore share the same optimal depth, with their peak concentration found between Y=-58 and Y=-59. This is just above the bedrock layer, placing you in the densest part of their spawn band while keeping you slightly above the massive lava lakes that form around Y=-60. Trust me, mining here will flood your inventory with redstone dust and, with a bit of patience, those coveted diamonds.
Essential Ores for Progression
Your mid-game workhorses have their own prime locations. Iron ore has two key peaks: for general underground caving, aim for Y=16, but if you're high in the mountains, check around Y=232 for massive iron veins exposed in the cliffs. Coal ore, with the widest spawn range, is most common at Y=95 and Y=136, especially within mountain biomes. For a safer, mid-level coal run that avoids deep hazards, the band between Y=40 to Y=50 is your best bet.
Niche & Biome-Specific Resources
Some ores demand a specific environment or depth. Copper ore peaks at Y=48 and is significantly more common in Dripstone Caves—if you find one, you’ve hit the copper jackpot. Gold ore is richest at Y=-16 deep underground, but receives a massive spawn boost in Badlands biomes between Y=32 and Y=79, where it can be found in stunning abundance just beneath the surface.
For your enchanting needs, Lapis Lazuli ore is centered on the stone-to-deepslate transition, with its peak at Y=0. And remember, Emerald ore is exclusive to mountain biomes like Jagged Peaks, where it generates most frequently around Y=236—so look up, not down, when hunting for gems.
While Y=-59 is king for diamonds, mining at Y=-58 gives you a one-block buffer above the worst lava. It’s a small change that can save your entire inventory.
With this map of the underground in hand, you can stop guessing and start mining with purpose. Let’s dig in.
How to Master Branch Mining for Maximum Efficiency
This is where your mining adventure gets serious. In Minecraft, randomly digging tunnels will get you resources, but mastering branch mining is what separates the hopeful prospector from the efficient miner. This systematic pattern is designed to expose the maximum number of blocks with the least effort, making it the gold standard for targeted ore hunts, especially for diamonds.

Navigating the deep dark layers.
Here’s how to set it up. First, safely descend to your target Y-level—for diamonds, that’s Y=-58 to Y=-59. Follow the cardinal rule: The 'Never Dig Straight Down' Rule. Instead, dig in a 1x2 pattern or a staircase to avoid a sudden, fatal drop into lava or a cavern. Once at your target depth, carve out a small base with a chest and crafting table. From there, begin your branch mining setup. Dig a main tunnel that’s 2 blocks high and 1 block wide. This is your trunk. Now, every 3 blocks along this trunk, start digging a perpendicular branch tunnel, also 2 blocks high and 1 block wide.
For navigation, always place torches only on the right wall while entering a tunnel. To find your way back out, just keep the torches on your left—you can't get lost.
The magic is in the 3-block spacing. By leaving a 2-block thick wall between each of your branch tunnels, you ensure that any ore vein hidden in that wall will be visible from at least one of the adjacent tunnels. You’re essentially checking every block without having to mine every block. This pattern gives you an exposure rate of around 40% of the area while only mining about 10% of the blocks. It’s pure efficiency.
A key factor to consider is deepslate mining. Below Y=0, stone is replaced by the tougher, darker deepslate. It takes significantly longer to break, which can slow your progress to a crawl. This is where enchantments become non-negotiable. An Efficiency enchantment on your pickaxe drastically cuts mining time, making deepslate layers far more manageable. Without it, your carefully planned branch mine will feel like a slog.
With your tunnels lit, your pattern set, and your efficient pickaxe in hand, you’re not just digging—you’re systematically harvesting the world. Stick to this method, and you’ll transform diamond hunting from a game of chance into a predictable, profitable operation. Let’s mine.
Advanced Mining Techniques: TNT, Beds, and Beacons
So you've mastered the basics of branch mining and know exactly where to dig for diamonds. Now it's time to graduate to the big leagues—the high-risk, high-reward techniques that let you reshape entire landscapes and hunt the game's rarest material. In Minecraft, these advanced methods turn resource gathering from a chore into a spectacle.

Large-scale mining operations in Minecraft.
Explosive Excavation: TNT and Bed Mining
When you need to clear massive volumes of stone or Netherrack, nothing beats controlled demolition. TNT mining is exactly what it sounds like: strategically placing and detonating TNT to blast out huge cavities. It's fast, fun, and perfect for creating instant quarries or clearing land for megabuilds. The catch? It's expensive, dangerous, and can destroy some of the resources you're trying to collect.
This is where Netherite mining becomes a thrilling exception. Head to the Nether and dig down to Y=15, the sweet spot for Ancient Debris. Here, the game's most valuable ore has a unique property: Blast Resistance. Ancient Debris is completely immune to explosions, while the surrounding Netherrack is not. This makes TNT the fastest discovery method, as a single blast can clear a massive sphere, leaving only the precious, indestructible Ancient Debris behind for you to collect.
For a cheaper, albeit riskier, alternative to TNT, use beds. In the Nether or The End, [Right-Click] to detonate a bed—it explodes with power similar to TNT. Dig a small tunnel at Y=15, place a bed at the end, back up, and shield yourself. The explosion clears Netherrack efficiently, leaving any Ancient Debris untouched.
The Ultimate Speed Boost: Haste II Beacons
If you're planning a truly monumental mining project, there's no better investment than a Haste II Beacon. This is the pinnacle of mining efficiency. When you stand within the beacon's pyramid range, the Haste II effect dramatically increases your mining speed. Pair it with an Efficiency V pickaxe, and you achieve "insta-mining"—the ability to break stone and deepslate instantly. Setting one up is an end-game project, requiring a Nether Star (from defeating the Wither boss) and a pyramid of 164 valuable mineral blocks (iron, gold, diamond, or emerald), but the time it saves is immeasurable.
Precision Techniques: Pokehole Mining
For a more surgical approach that increases your odds without full-scale excavation, try Pokehole Mining. This is a refinement of branch mining. After digging your main 2x1 tunnel, instead of full side branches, simply dig 1x1 holes into the walls every 4 blocks. You stand in the main corridor and "poke" your camera into each hole to check for ores in the adjacent blocks. This method exposes a surprising number of hidden ores with minimal block breaking and is excellent for conserving tool durability when you're low on resources.
Trading for Efficiency
Don't overlook surface opportunities while you're focused underground. Keep an eye out for the Wandering Trader, a passive NPC that spawns randomly in the Overworld. While his trades are often overpriced, he can be a source of coal for emeralds or a way to acquire niche blocks like coral or blue ice without traveling to distant, dangerous biomes. He's not a primary resource source, but he can fill specific gaps in your inventory.
With these advanced techniques in your arsenal—from earth-shattering explosions to the god-like speed of a Haste II beacon—you're no longer just a miner; you're a force of nature. Go carve out your legacy.
Best Pickaxe Enchantments for Minecraft Mining
Your pickaxe is more than just a tool in Minecraft—it’s your most important investment. A well-enchanted pickaxe can turn a grueling grind into a satisfying harvest, making the difference between a slow trickle of resources and a flood of diamonds. This section breaks down the essential enchantments and the strategic choice between Fortune and Silk Touch that defines high-level mining.

Navigating caves to find ore veins.
The “God Pickaxe” Setup
To create the ultimate, self-sustaining mining tool, you’ll want to combine several top-tier enchantments. This "god pickaxe" is your key to endless, efficient resource gathering.
First, the core trio for speed and longevity: Efficiency V increases your mining speed by a massive 270%, making deepslate and obsidian feel like butter. Unbreaking III effectively triples your pickaxe’s durability, letting you mine for hours. Finally, Mending allows the tool to repair itself using experience orbs you collect, making a high-tier pickaxe effectively indestructible.
The final, critical enchantment slot is where strategy comes in. You have two powerful, mutually exclusive choices: Fortune III or Silk Touch.
Always apply your enchantments to a diamond pickaxe first, then upgrade it to netherite at a smithing table. This preserves the enchantments and saves you from the anvil’s steep "Too Expensive" penalty.
Fortune III vs. Silk Touch: Picking Your Power
This is the big decision every miner faces. Each enchantment serves a distinct purpose, and the best miners carry two separate pickaxes.
Fortune III is your go-to for maximizing yields. It multiplies drops from specific ores, turning one diamond ore block into an average of 2.2 diamonds, and one coal ore into an average of 2.75 coal. It’s essential for farming diamonds, emeralds, lapis lazuli, redstone, and coal. Trust me, once you’ve mined a vein with Fortune III, you’ll never go back.
Silk Touch, on the other hand, lets you collect the ore block itself. This is a game-changer for inventory management—a stack of diamond ore blocks takes up the same space as a single diamond, letting you haul vastly more potential wealth back to base. It’s also mandatory for collecting fragile blocks like glass, ice, or glowstone without breaking them.
The Hybrid Method: The Pro Miner’s Secret
So, which one do you use? The expert answer is: both. The most efficient strategy is The Hybrid Method.
- Take a Silk Touch pickaxe (with Efficiency V, Unbreaking III, and Mending) into the mines. Use it to collect every ore block you find.
- Back at your base, set up a dedicated processing area with furnaces and an anvil.
- Use your separate Fortune III pickaxe to break all the stored ore blocks. You get the multiplied drops and all the smelting experience.
This method gives you the best of both worlds: compact inventory management in the field and maximum resource yield at home.
⚠️ Watch out: Fortune does not increase drops from iron, copper, or gold ore. For those, you’re better off smelting the raw ore blocks you collect with Silk Touch, as it grants more experience.
With a Fortune III pickaxe for riches and a Silk Touch pickaxe for utility, your toolkit is complete. Combine them with Efficiency V, Unbreaking III, and Mending, and no vein is too deep, no task too tedious. You’re not just mining—you’re farming.
Safety Hazards and Survival Tips in Minecraft Caves
Alright, you’ve got the gear, you know the layers, and you’ve mastered the mining patterns. Now comes the real test: staying alive long enough to bring all that treasure home. In Minecraft, the deepest, richest veins are guarded by silent, sudden hazards that can erase hours of progress in an instant. This final section is your survival checklist for those heart-stopping moments underground.

Specialized cave biomes introduce unique survival challenges for players.
Lava: The Silent, Sudden Threat
Your biggest enemy below Y=-54 is lava. It flows fast, hides behind innocent-looking blocks, and can instantly incinerate you and your hard-earned loot. Trust me, you’ll want to save your water bucket for this exact moment. The moment you see that orange glow, don’t panic—simply [Right-Click] with your Water Bucket on a block adjacent to the lava source. This will turn it to obsidian or cobblestone, creating a safe path and potentially revealing ore hidden behind the flow.
Always keep your water bucket in your hotbar’s first slot. Muscle memory saves lives when lava suddenly pours into your tunnel.
Gravity’s Deadly Trap: Gravel and Sand
Hearing that ominous hiss of falling gravel above you is a unique kind of panic. If a column collapses on you, you’ll start taking suffocation damage fast. Here’s the trick: the moment you’re trapped, look straight down and place a Torch at your feet immediately. The falling blocks will break as they hit the torch, freeing you before you take fatal damage. It’s a lifesaver in desert temples and deep cave ceilings.
Navigating Generated Structures: Mineshafts
While exploring, you might stumble into a Mineshaft—a sprawling, wooden structure full of loot and danger. The main threat here isn’t the dark; it’s the Cave Spider Spawners hidden in webs. These tiny mobs pack a nasty poison punch. If you’re prepared, you can use Shears on the Cobwebs to gather string, perfect for leaving a breadcrumb trail back to safety. Clear the area with torches before you start looting the minecart chests.
Your Lifeline Underground: The Infinite Water Source
Running out of water to douse lava or extinguish yourself is a rookie mistake you only make once. As soon as you set up camp, dig a 2x2 hole that’s one block deep. Place water in opposite corners, and you’ll create an Infinite Water Source. Now you can refill your bucket endlessly. This isn’t just a convenience—it’s your primary safety tool, so set it up first thing.
Building a Home Away From Home: The Safe Room
This is your anchor in the deep dark. Before you start branch mining, establish a Safe Room at Y=-58. This isn’t just a hole in the wall. Place a Bed to set your spawn point (crucial if the worst happens), Chests to stash overflow loot, and Furnaces to smelt ores on the spot. Light it up completely, seal it with a door, and you’ve created a panic room and operations center all in one. If you’ve ever lost everything to a surprise creeper, you know how valuable this is.
With these protocols in place, you’re not just mining—you’re operating. You’ve turned a dangerous environment into a calculated expedition. Now go claim that diamond vein; you’re ready for it.