How to Find Ancient Debris in Minecraft
Welcome to the Nether—a dimension of fire, peril, and the rarest ore in Minecraft. Your quest for Ancient Debris, the sole source of ultimate Netherite gear, begins here. But this isn't like mining for diamonds; you can't just dig anywhere and hope for the best. You need to understand exactly where this incredibly rare material hides.
The key to success lies in the Y-coordinate. Ancient Debris generates exclusively in the Nether, spawning anywhere from Y=8 to Y=119. However, its distribution is heavily skewed, with the vast majority concentrated much lower down. Trust me, if you’re mining above the lava oceans, you’re wasting your time.
The Sweet Spot: Y=15
After countless community tests and data-mining, the consensus is clear: Y=15 is the statistical sweet spot for finding Ancient Debris. Here’s the breakdown:
- In Java Edition, generation is heavily concentrated between Y=8 and Y=24, with the peak average right around Y=15-16.
- In Bedrock Edition, there are actually more generation attempts per chunk, but the practical advice remains the same: the peak concentration is still at Y=15.
Mining here strikes the perfect balance. You're low enough to be in the high-probability zone for spawns, but you're still above the vast, floor-level lava oceans that start around Y=10, making your operation far less hazardous.
Why Explosions Are Your Friend
Here’s the trick most guides miss: you don't find Ancient Debris by carefully mining each block. You find it by clearing away everything except Ancient Debris. This ore has a blast resistance of 1,200—that's as tough as Obsidian. It’s completely immune to Ghast fireballs and the explosions from TNT and beds. The surrounding Netherrack, however, is pathetically weak to blasts. This is the core principle behind all efficient mining strategies: use controlled explosions to vaporize the Netherrack and leave the precious, blast-proof Ancient Debris floating for you to collect.
While Y=15 is the gold standard, some players swear by Y=12 or Y=13 to avoid smaller lava pockets. Y=15 is the safest bet for consistency, but don't panic if you need to adjust a few blocks up or down.
With the generation mechanics locked in, you're no longer digging blind. You know the dimension (the Nether), the exact optimal level (Y=15), and why explosions work so well. You're ready to gear up and head into the fire. Let's get you prepared.
Best Gear and Preparation for Netherite Mining
Alright, gear up—this is where your Minecraft adventure gets serious. Mining for Netherite in the Nether isn't just about swinging a pickaxe; it's a full-scale expedition into a hostile dimension. If you're not properly prepared, you'll be leaving with nothing but a death message and regret. Let's make sure that doesn't happen.
Essential Gear: Your Survival Kit
Before you even think about your Nether portal, your inventory needs to be a fortress of utility. Here’s the non-negotiable checklist:
- The Right Tools: You absolutely need a Diamond Pickaxe. Ancient Debris can’t be mined with anything less. Trust me, you’ll want it enchanted with Efficiency V to insta-mine Netherrack, Unbreaking III to last, and Mending to repair itself using the XP you’ll get from Nether quartz and gold ore. Press [ZR] to mine, and you'll be carving through the underworld in no time.
- Pacification Wear: The Nether is crawling with Piglins, and they will swarm you on sight—unless you're wearing gold. Slip on at least one piece of Gold Armor, like Golden Boots or a Golden Helmet. This simple trick makes you neutral to them, letting you mine in (relative) peace.
- The Ultimate Defense: Lava is everywhere. A single misstep can end your run and destroy your hard-earned loot. This is why Fire Resistance Potions are non-negotiable. Craft the 8:00 duration ones, hold [ZL] to drink one before entering the Nether, and keep a couple extras hot-keyed. They are your lifeline.
- Blast Shield: If you plan to use beds for mining (and you should), you need a Shield. When you hold [ZL] to block with it positioned correctly between you and the bed, it can absorb 100% of the explosion damage. Don't even consider bed mining without one.
- Secure Storage: This is the trick most guides miss. Bring an Ender Chest. The moment you find a few Ancient Debris blocks, place it down and stash them. This creates a safety net; if a Ghast, lava, or your own bed catches you off guard, you won’t lose everything. Make it a habit to bank your loot every 5-10 finds.
Organize your hotbar before you go. Keep your pickaxe, shield, beds, food, and a Fire Resistance potion within easy reach. In the Nether, speed saves lives.
Additional Prep: Covering Your Bases
While the five items above are critical, rounding out your loadout turns a risky trip into a productive grind. Pack a stack of high-saturation food (golden carrots or steak), a stack of non-flammable building blocks like cobblestone for quick barriers and bridges, and a stack of beds—you’ll go through them fast. A bow can also be a lifesaver for dealing with Ghasts from a distance.
If you've struggled here before, you're not alone. The Nether is unforgiving, but with this setup, you're not just surviving—you're ready to dominate. Your gear is prepped, your consumables are stocked, and your escape plan is set. Let's go mine some Netherite.
How to Use the Bed Mining Strategy Safely
Time to get loud. In Minecraft, the Y=15 Bed Bombing strategy is the most efficient way to turn the Nether into your personal quarry, but one wrong move and you’ll be reading the infamous “killed by intentional game design” message. This method is all about controlled chaos—using the game's own mechanics to clear vast swathes of Netherrack in seconds.
The Core Strategy: Y=15 Bed Bombing
Your entire operation hinges on the Y=15 Bed Bombing technique. The goal is to create a chain of explosions that systematically expose hundreds of blocks, leaving the blast-resistant Ancient Debris behind for you to collect.
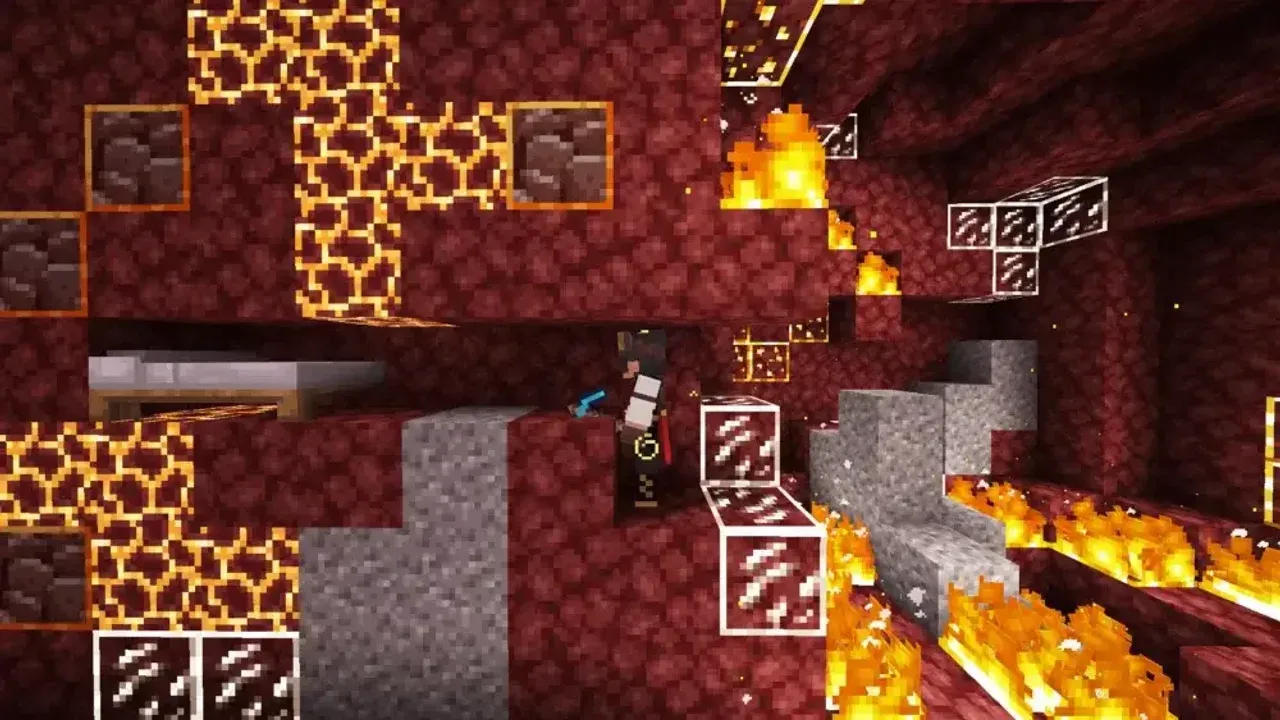
First, you need to establish your base of operations. Dig your Main Artery Tunnel at Y=15. This is a 2x1 tunnel (two blocks high, one block wide) that you’ll extend for 100-200 blocks. This tunnel is your lifeline and navigation aid in the monotonous Netherrack. From this main tunnel, you’ll dig your blast chambers.
Here’s the exact, safe sequence for each bomb:
- From the main tunnel, dig a short side branch about 5-6 blocks deep.
- At the very end of this branch, carve out your Safety Nook: a simple 1x1x1 hole in the tunnel wall at foot level.
- Place your bed at the end of the branch, with the pillow facing away from you.
- Crucially, back up into your safety nook so a solid wall of Netherrack is between you and the bed.
- Aim at the bed and right-click to detonate.
The Bed Explosion Power in the Nether is a formidable level 5. Standing in the open will get you killed, but that solid block in your safety nook absorbs the lethal blast, leaving you with only minor splash damage if you’re properly shielded.
Always have a shield raised when you click the bed. It’s your backup plan if your positioning is a hair off, and it nullifies the knockback that could throw you into a hidden lava pocket.
Maximizing Your Efficiency
Once you’ve cleared the first crater and mined any exposed Ancient Debris, it’s time to move down your main tunnel and do it again. This is where The 4-Block Rule comes in. Don’t place your next bed right next to the old crater. Instead, move 4-5 blocks down your main tunnel before digging a new side branch. This leaves 3-4 blocks of solid Netherrack between explosion points, ensuring each new blast clears a fresh, overlapping area without wasting beds on already-exposed stone.
Trust me, this rhythmic process—dig, place, shield, boom, loot—will become second nature. You’re not just mining; you’re sculpting the Nether with calculated explosions, and the Ancient Debris will start piling up. With your safety nook secured and your spacing on point, you’re ready to farm Netherite faster than you ever thought possible. Let’s make some noise.
Alternative Mining Methods: TNT and Strip Mining
Beds might be your go-to for explosive efficiency, but in Minecraft, they aren't your only option. If you’re looking to mix things up or your sheep farm is running low, it’s time to explore the TNT Tunnel Method and other alternative mining strategies.
TNT Mining: The Controlled Demolition
For players with a steady supply of gunpowder and sand, TNT offers a more controlled and inventory-friendly approach. Each block is crafted from 5 Gunpowder + 4 Sand and stacks to 64, making it easier to carry large quantities for long sessions. Its main advantage? You can detonate it safely from a distance using Redstone dust, a lever, or even a Flame Bow, avoiding the point-blank risk of bed explosions.
The TNT Tunnel Method is straightforward and powerful. At your Y=15 mining level, dig your standard 2x1 main tunnel. Instead of side branches, place TNT blocks every 4-5 blocks along the tunnel wall. You can then run a line of Redstone to connect them all and trigger a massive chain reaction with a single button press, or light the farthest block with a Flame Bow and let the fuse travel. This method carves out enormous, clean swaths of Netherrack in seconds, perfect for clearing long stretches of your mining artery.
For maximum efficiency, use a TNT-duplicating flying machine if you’re on a technical server. It’s a complex build, but it turns TNT into an endlessly renewable resource for mining.
The Slow and Steady: Strip Mining
If playing with explosives feels too chaotic, Strip Mining at Y=15 is your safest, most reliable fallback. This is classic Minecraft branch mining: dig a long main tunnel, then create parallel tunnels two blocks apart, meticulously clearing everything in your path. It’s mind-numbingly slow compared to explosions, but the risk is virtually zero. The key here is an Efficiency V pickaxe—without it, the grind becomes unbearable. This method is best for early-game players without explosive resources or those on servers where bed/TNT spam is restricted.
The Unconventional Scout: Lava X-ray Method
For a truly different tactic, try the Lava X-ray Method. This exploits the fact that Ancient Debris can generate under lava but never next to air. Drink a Fire Resistance Potion, set your FOV to 30 for a narrower, more focused view, and swim through lava lakes. Look for the distinctive texture of debris poking out from under the lava’s surface or in the gaps between lava source blocks. It’s a niche, sight-seeing approach rather than a primary mining strategy, but it can help you spot veins you’d otherwise tunnel right past.
While beds are often the king of Netherite mining, having TNT, Strip Mining, and even Lava X-ray in your toolkit makes you a versatile prospector, ready to adapt to any situation or resource pool.
How to Craft Netherite Ingots and Upgrade Gear
You’ve braved the Nether’s dangers and returned with a pocketful of Ancient Debris—now it’s time to forge it into the ultimate gear. This final crafting process in Minecraft is your ticket to true endgame power.
First, you need to convert your hard-won ore into usable materials. Place your Ancient Debris into a furnace or blast furnace. Each block smelts into one Netherite Scrap. It’s a 1:1 conversion, so 36 Ancient Debris means 36 Scraps.
Use a Blast Furnace if you have one—it smelts ores twice as fast, saving you precious time.
Next, head to your Crafting Table. The recipe for a Netherite Ingot is shapeless: combine 4 Netherite Scraps with 4 Gold Ingots. This is the single most valuable item in your inventory, so craft carefully. For a full set of armor and tools, you’ll need 9 of these ingots.
The final and most satisfying step is the upgrade. You’ll need a Smithing Table, crafted from 2 Iron Ingots and 4 Wooden Planks. Place it down and open its UI. Here’s the crucial part: if you’re playing on version 1.20 or newer, you also need a Smithing Template. These are found as loot in Bastion Remnants in the Nether, so hopefully you grabbed one on your mining trip. The Gear Upgrading process is simple: place your Diamond item in the first slot, the Netherite Ingot in the second, and the required template in the third. The output is the Netherite version of your gear, with all its precious enchantments and durability perfectly preserved.
⚠️ Watch out: Don’t try to craft Netherite items from scratch—upgrading is the only way, and it’s far more efficient since it keeps your hard-earned enchantments.
With your final Netherite Ingot spent, you’re not just wearing armor—you’re clad in the pinnacle of Minecraft craftsmanship, ready to take on anything the world throws at you.
Netherite Mining Safety and Survival Tips
This is it—the final challenge of your Netherite hunt. You’ve gathered the gear and mastered the explosive mining, but Minecraft’s Nether is a realm that punishes even a moment of complacency. The difference between a successful haul and losing everything comes down to these final, critical safety habits. Let’s make sure you get out alive with your hard-earned Ancient Debris.
Navigating the Nether Safely
Your first line of defense is knowing where to operate. While you’ll be mining at Y=15, choosing the right biome for your staging area is crucial. The Warped Forest is widely considered the safest Nether biome for setting up a temporary base or portal, as only Endermen spawn there naturally. You won’t have to constantly fend off Ghasts or Piglins while you organize your inventory. If you do venture into other biomes, always mark your path back to your portal with distinctive, non-flammable blocks like cobblestone—getting lost in the repetitive, hostile landscape is a common way to die.
Surviving Your Own Explosions
When using the bed mining strategy, respecting the blast is non-negotiable. A bed detonated in the Nether has an explosion power of 5, and dying from it triggers the unique death message: "player was killed by intentional game design". This isn’t a glitch; it’s the game’s way of saying you messed up the safety steps.
To avoid this, never detonate a bed without a solid block between you and it. For enhanced protection, try the Crawlspace Method: dig your side tunnel only 1-block high, place a Trapdoor at the entrance, and crouch to enter. This tiny space further contains the blast and protects you from falling debris. Always stand at least 4-5 blocks back with your shield raised before right-clicking the bed.
Listen for the "tsss" of a lit TNT or the distinctive whoosh before a bed explodes. These audio cues are your signal to ensure your shield is up and you’re in position.
Inventory and Health Management
The Nether will test your stamina and attention. Keep your health regeneration active by always having a full food bar. Golden Carrots are the ideal high-saturation food for this; hold [ZL] to eat them quickly without interrupting your workflow. More importantly, you must adopt a strict Loot Security Protocol. The moment you mine a few Ancient Debris, stop. Immediately place a Shulker Box (if you have one), dump the debris inside, break the box, and continue. This habit ensures that a sudden death from a hidden lava pocket or a Ghast fireball only costs you your tools, not hours of precious loot.
If you don’t have Shulker Boxes yet, make a habit of returning to an Ender Chest every 10-15 minutes. The few minutes spent banking your progress are nothing compared to the devastation of losing a full inventory of Ancient Debris.
With these protocols in place, you transform the Nether from a terrifying deathtrap into a calculated, high-reward operation. You’re not just mining; you’re executing a safe, repeatable system. Now go secure that Netherite—and make it back home in one piece.