How to Find the packs_voice Folder in The Choicer Voicer
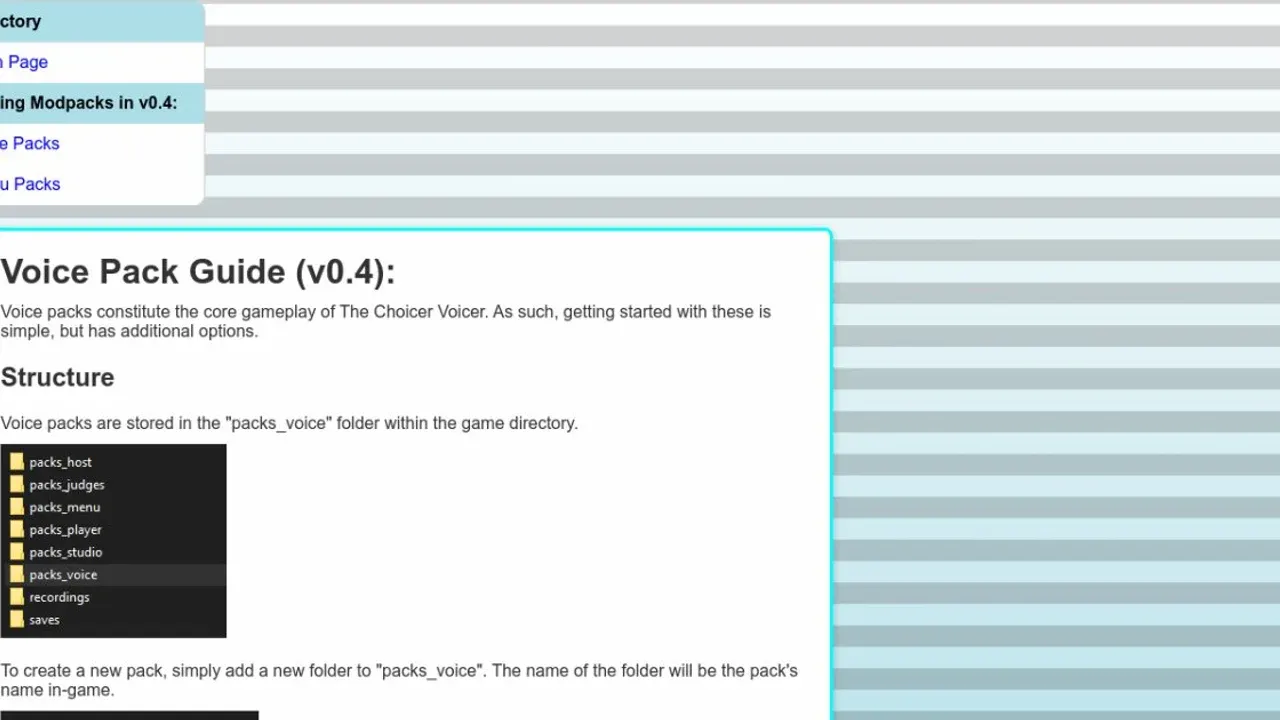
Before you add a single clip to The Choicer Voicer, you need to find the folder the game actually scans. Voice packs belong in the packs_voice folder inside the game directory, and you can reach it through the game's main menu.

The Choicer Voicer gameplay.
Finding the Voice Pack Folder
- Launch The Choicer Voicer and open the game's main menu.
- Use the in-game option that opens the game's packs folder. This shortcut takes you to the correct installation directory without requiring you to guess where the executable or game files are stored.
- In that location, find packs_voice. This is the voice-pack installation path, and the game scans this folder for voice content.
If you cannot locate the game directory manually, don't panic—this is exactly what the main-menu folder shortcut is for. Open the packs folder from the game's main menu instead of searching through your computer for the executable location.
Keep the packs_voice folder open while following the rest of this guide. Every standard voice pack and dub pack covered later is installed through this location.
Once you've found packs_voice, you're ready to create a pack folder and start adding custom content in The Choicer Voicer.
How to Create a Voice Pack Folder in The Choicer Voicer
Creating your first custom pack in The Choicer Voicer is wonderfully simple: one folder is enough to get started. Once you know the naming rule, you can build a pack around any collection of clips without wrestling with complicated configuration.

Official game screenshot.
- Open the
packs_voicefolder inside the game directory. - Add a new subfolder for your standard voice pack.
- Place your voice clips inside that new pack folder.
The folder name becomes the pack’s in-game name, so choose something clear and recognizable. For example, a folder named Retro Robot Voices will appear as Retro Robot Voices when you browse voice packs in The Choicer Voicer. Avoid treating the folder name like an internal code—this is the label players will see.
A standard voice pack needs audio clips as its only required content. You can leave out optional presentation files for now and focus on getting the folder structure right; later sections cover descriptions, subtitles, images, and other enhancements.
Keep the pack name short and specific. A clear name makes it much easier to find the right pack when your The Choicer Voicer library starts filling up.
That’s the whole foundation: create one new subfolder under packs_voice, give it the name you want displayed in-game, and add your clips. With that structure in place, your first voice pack is ready for the next setup steps.
How to Add Author and Description Files to a Voice Pack in The Choicer Voicer
Your pack can work perfectly and still look unfinished in The Choicer Voicer if players have no idea who made it or what it contains. Add two optional metadata files to give your custom voice pack proper creator credit and an in-game description.
Inside your pack folder in packs_voice, create a TXT file named _author. Enter the creator’s name or group credit in the file, then save it there. The Choicer Voicer reads this optional file and uses it to identify the creator of the pack.
Next, create a second TXT file named _subtitle in the same pack folder. Use it to write a short description of the pack, such as its theme or the type of voice clips it includes. The game displays this description in-game alongside the pack’s information.
Keep the _author credit short and make the _subtitle easy to scan. A clear creator name and one-sentence description help players recognize your pack quickly when browsing installed content.
These files are optional, so your audio still functions without them—but adding _author and _subtitle makes the pack feel complete and gives players useful context. Save both TXT files directly in the pack folder, and your metadata is ready.
How to Organize Nested Voice Pack Folders in The Choicer Voicer
Nested folders are the cleanest way to split a large collection without turning The Choicer Voicer into a wall of loose files. Think of the top-level folder as your main pack and each folder inside it as a focused subgroup—useful for separating characters, themes, or clip collections.
Creating Voice Pack Subgroups
Inside packs_voice, open your parent pack and create a child folder for the subgroup. Place the subgroup’s audio clips inside that child folder, along with any optional metadata files you want that subgroup to use. This gives you a clear structure while keeping related content together.
For example, a parent pack can contain several child folders, each with its own audio clips. You can also give those nested folders their own _author and _subtitle files when you want subgroup-specific credit or descriptions.
Keep each child folder focused. Separating clips by character or theme makes the pack easier to maintain and gives you more useful filtering options in The Choicer Voicer version 0.5.0.
How Nested Pack Inheritance Works
When you select the parent pack for gameplay, The Choicer Voicer includes audio from the parent and all child folders automatically. In other words, selecting the main pack merges its own clips with the clips stored in every nested subgroup, so you do not need to select each child folder separately.
That inheritance also affects the size and variety of the playable collection. A parent pack with several nested folders effectively presents the game with the combined content from the entire structure, while selecting a subgroup lets you work with that folder’s more focused collection when it is available as a separate selection.
Nested Folders as Tags
In The Choicer Voicer version 0.5.0, nested folders are automatically treated as unique tags. This lets you filter clips by their subgroup during pack management and gameplay setup. If you do not want nested folders to create tags, you can disable this behavior in Options.
Build your structure around the way you want to browse and filter clips: use the parent pack for the complete collection, and child folders for precise groups. Once you understand that the game inherits every child folder and labels nested folders as tags, organizing large voice packs becomes much less intimidating.
How to Choose Supported Audio Formats for Voice Packs in The Choicer Voicer
The right file format can make or break a custom pack in The Choicer Voicer. Stick to the supported extensions, and pay close attention to duplicate filenames—otherwise, the game may quietly use a different version of your clip than you intended.
Supported Audio Formats
Inside the packs_voice pack folder, use audio clips in any of these formats:
- WAV
- MP3
- OGG
These are the supported voice-pack audio formats in The Choicer Voicer. You can keep different formats in the same pack, but matching filenames require extra care.
Duplicate Filename Priority
If two or more audio files share the same basename, The Choicer Voicer uses this priority order:
WAV overrides MP3, and MP3 overrides OGG.
For example, if your pack contains intro.wav, intro.mp3, and intro.ogg, the game recognizes the WAV version. If intro.wav is removed, it uses MP3; if only the MP3 and OGG files remain, it uses MP3.
⚠️ Watch out: Don’t leave older versions of a clip beside a replacement unless you want the priority rule to choose between them. Give each clip a unique basename or remove the unused file.
Avoid Compressed WAV Files
Avoid compressed WAV files in your packs_voice audio clip collection because the game engine cannot process them. A file with the .wav extension is not automatically safe if it uses an unsupported compression method.
For the smoothest setup, check your WAV exports before adding them to the pack, and use MP3 or OGG when appropriate instead of relying on a compressed WAV. With valid WAV, MP3, or OGG clips—and no accidental duplicate basenames—your voice pack is ready for the next testing step.
How to Meet Voice Clip Length Requirements in The Choicer Voicer
A clip can look perfectly fine in your pack and still fail when The Choicer Voicer tries to use it. Keep your timing within the game’s limits, and remember that the selection screen does not fully verify every file right away.
Each audio clip in packs_voice must be 60 seconds or shorter. The game’s Settings let players choose a voice clip length range from 0 to 60 seconds, so clips outside the range may not appear during normal selection. The default range is much narrower: 0 to 5.5 seconds.
That default setting is useful for standard voice-pack gameplay, where short prompts are easier to mimic and score. If you create longer clips, check the selected range before assuming the pack is broken—but never exceed the 60-second maximum. A clip longer than that remains invalid even if you widen the Settings range.
⚠️ Watch out: The voice-pack selection screen may still show corrupted, invalid-format, and 60-plus-second clips as selectable. Validation is delayed until the game generates a gameplay batch, so an apparently installed pack can fail only when a batch starts.
To test your timing properly, select the pack and generate a gameplay batch. If the game errors during that process, inspect the clips for corruption or excessive length and replace the problem files. Keep every clip at 60 seconds or shorter, and aim near the default 0 to 5.5 seconds range when you want reliable standard gameplay.
With those limits handled, your voice pack should survive the point where The Choicer Voicer actually loads its clips—not just the point where it displays the pack.
How to Add Subtitles to Voice Clips in The Choicer Voicer
Subtitles make voice packs much easier to follow, especially when a clip is distorted, fast, or buried in a noisy game-show moment. In The Choicer Voicer, each clip gets its own subtitle file—but the filename has to match perfectly.
Create a TXT file in the pack folder using the audio clip’s exact basename, then change only the extension to .txt. For example, place voice_file.txt beside voice_file.mp3 in packs_voice:
packs_voice/
└── Your Pack/
    ├── voice_file.mp3
    └── voice_file.txt
The subtitle filename must preserve the same basename as the audio clip. That means voice_file.txt matches voice_file.mp3, while a differently named file will not be linked to that clip. Keep the text file paired with its audio file in the same pack folder so The Choicer Voicer can associate the caption correctly.
Check the spelling, spacing, and capitalization of both filenames before testing. The safest method is to copy the audio filename, remove its extension, and add .txt.
In version 0.5.0, you can also manage captions inside Extras by opening Edit Voice Packs & Clip Metadata. This editor lets you add or edit captions for supported clips, which is useful when you want to adjust subtitles without manually rewriting each TXT file. Once the filenames or captions are correct, test the pack in The Choicer Voicer to confirm the text appears with the intended voice clip.
How to Add Images to Voice Clips in The Choicer Voicer
Images make voice packs in The Choicer Voicer much easier to recognize at a glance, especially when you’re browsing a large collection. The setup is simple: give an image the same basename as its audio clip, and the game will connect them automatically.
Match an Image to a Voice Clip
Inside your voice pack folder, add a PNG, JPG, or WEBP image that shares the exact audio basename. For example, an audio file named voice_file.mp3 can use an image named voice_file.png, voice_file.jpg, or voice_file.webp. The extension can differ, but the basename must match exactly.
The Choicer Voicer supports PNG, JPG, and WEBP for clip images. Keep the filename spelling and punctuation consistent with the audio file—if the names do not match, the game will not treat the image as belonging to that clip.
Use a Fallback Image
If you do not want to create a separate image for every clip, add _pack_filler_image to the voice pack folder. This shared fallback image is used for clips that do not have their own matching image.
The game checks images in a fixed order:
- It looks for a matching PNG, JPG, or WEBP image using the audio clip’s exact basename.
- If no matching image exists, it looks for _pack_filler_image in the pack.
- If _pack_filler_image is also missing, the game displays the default no_image graphic.
Use individual images for your most memorable clips and _pack_filler_image for the rest. You’ll save time without making the entire pack feel generic.
Once the filenames are matched correctly, install or reload the pack and check the clip preview to confirm its image loaded. With the right image priority in place, your The Choicer Voicer pack will look polished and be much easier to browse.
Best Audio Setup for Voice Packs in The Choicer Voicer
In The Choicer Voicer, clean volume is the difference between a clip that scores reliably and one that sounds rough or gets judged inconsistently. Before you add recordings to packs_voice, aim for speech that is clearly audible without pushing the recording into distortion.
Record or amplify speech so the waveform is substantial enough for accurate scoring. The game compares sampled audio, so very quiet clips with small waveforms may produce inaccurate scores even if you can technically hear them. If a line sounds faint during playback, raise its level in your audio editor before exporting it.
Listen to every clip at the volume you expect to use in-game. A waveform that looks tiny is a warning sign—make the voice more prominent before packing it.
Loud recordings need the opposite treatment. In your audio editor, de-amplify excessively loud clips before placing them in packs_voice; lowering overly loud recordings helps prevent scratchy or distorted playback. This is especially useful for clips that sounded acceptable in Audacity or another player but become harsh inside The Choicer Voicer.
Version 0.4.13b also changed how loud audio behaves: the limiter that caused loud audio to sound crusty was removed. That makes careful volume control even more important in The Choicer Voicer 0.4.13b, since the game no longer provides that limiter as a safety net.
With substantial waveforms and restrained volume, your voice pack will sound cleaner and give the scoring system a better signal to compare. Balance each clip before exporting, and you’ll avoid the most common audio-quality problems.
How to Test an Installed Voice Pack in The Choicer Voicer
Before you start a game in The Choicer Voicer, take a minute to confirm that your pack actually loaded correctly. A quick preview catches missing filenames, unloaded images, and broken clips before they interrupt your next performance.
Open the Customization Menu, select an installed voice pack, and browse its available clips. The game shows each clip’s filename and the loaded image, and you can play the voice clip directly from this list. Check several files—not just the first one—to make sure the naming and image links are being recognized consistently.
If you’re playing version 0.5.0, you can also preview a clip from the voice-pack selection screen by clicking its thumbnail. This is a handy second check because it lets you hear the clip while choosing a pack, before launching gameplay.
Use the Customization Menu to test individual filenames, then use the voice-pack selection screen to confirm the pack behaves correctly from the selection stage.
Version 0.5.0 also adds dedicated readme and error-reporting tabs on the voice-pack selection screen. Open the pack’s information there and inspect any reported loading errors before playing. The Choicer Voicer must preload clips for detailed error reporting and filtering, so large packs can take several seconds to finish loading—don’t assume the game has frozen.
Once the filenames, images, previews, and error tabs all look right, generate a gameplay batch and listen for the clips in action. With this quick verification routine, you’ll know your The Choicer Voicer pack is ready instead of discovering a problem mid-round.
How to Curate Voice Pack Size and Images in The Choicer Voicer
A huge voice pack can look impressive, but in The Choicer Voicer, more clips do not automatically mean better gameplay. Because selection is random, a handful of weak recordings can quietly bury the lines you actually wanted players to hear.
Prioritize Quality Over Pack Size
When curating a pack in the packs_voice folder, favor memorable, clear clips over sheer quantity. Avoid adding large numbers of mediocre clips just to make the pack feel substantial—every included clip can be selected during gameplay, so filler content has a real effect on what players hear.
The Choicer Voicer uses uniform clip selection: after you choose a pack and sub-pack, the game samples clips uniformly from that available content. A larger pack is therefore sampled more often and can dilute its standout clips if it contains too many forgettable recordings. Keep trimming until each clip feels worth encountering.
Make a test pass through the pack and remove anything that feels merely “good enough.” A smaller collection of consistently funny, recognizable, or well-recorded clips usually makes a stronger voice pack.
Give Standout Clips Their Own Images
Use varied clip images throughout your voice pack instead of relying only on _pack_filler_image. Give notable clips individual image assets so they stand out when players browse or preview the pack. This adds visual variety and makes it easier to recognize the best material at a glance.
You do not need a unique image for every single clip, but the most important or memorable lines deserve their own artwork. A shared fallback image is useful for less significant clips; varied images are better for keeping the pack engaging.
Version 0.5.0 also makes large collections easier to browse through the voice-pack selection search bar. Prefix a query with author: to find packs by creator, which is especially helpful when you have several custom packs installed.
With a tightly curated clip list, varied images for your highlights, and author: search available in The Choicer Voicer, your pack will be easier to browse and far more consistent in play. Keep the quality high, and every random pick has a better chance to land.
How to Create Dub Packs in The Choicer Voicer
The Choicer Voicer’s version 0.5.0 adds a more ambitious way to build custom content: dub packs. Unlike ordinary voice packs, these packs connect spoken audio samples to a video, letting players mimic clips normally or perform a full scene in Dub Mode.
What Makes a Dub Pack Different?
A dub pack lives in the packs_voice folder like a standard voice pack, and its clips still work as regular prompts in normal gameplay. The difference is that a dub pack can also provide the timed audio and video needed for Dub Mode, where your performance is matched to a scene.
To make a functional dub pack, include both of these components inside the dub pack folder:
- Metadata for every audio sample, including when each sample plays
- An OGV video
The game uses the sample metadata to synchronize your recorded performance with the video. Without that timing information or the required video asset, the pack cannot function as a complete dub experience.
Treat a dub pack as a video project, not just a larger voice pack. Every sample needs a clear place in the scene, so planning the audio and timing together will save you a lot of cleanup later.
How Dub Mode Works
In Dub Mode, you can retake your performances indefinitely, which gives you room to experiment with delivery and timing. There’s one catch: you cannot hear your recordings until the session ends. The game waits until all samples are complete, then plays back the finished dub with the video.
That makes dub packs especially useful for rehearsing scenes, but it also means you should focus on timing and consistency during each take. With the version 0.5.0 dub-pack system, you get both standard voice-pack gameplay and a dedicated video-dubbing format in one package—build the required assets carefully, and your custom scene is ready to perform.
How to Prepare Audio Samples for a Dub Pack in The Choicer Voicer
In The Choicer Voicer, a good dub pack starts long before you place dub_video.ogv in the pack folder. The editing stage determines whether your samples feel natural, stay synchronized, and give players clear prompts to mimic.
Build the Source Audio
- Acquire the source video that players will dub. This video is the foundation of the dub pack, so choose the finished footage you want to pair with the player’s recordings.
- Extract the source audio from the video using an audio editor. You’ll use this extracted track to create the individual samples that The Choicer Voicer plays during gameplay.
- Optionally separate the vocals from the background audio. Isolate the dialogue or vocal performances for your samples, then retain the music or background noise as a separate track. Save that background audio inside the dub pack as
_backing_track.ogg; it plays alongside the player’s recordings and helps preserve the scene’s original atmosphere.
Cut and Name Your Samples
Open the extracted audio in Audacity or another audio editor, then cut the track into individual voice samples. Keep each sample loud enough to hear clearly and ideally under 6 seconds long. Cut at logical speech points so every clip forms a coherent prompt rather than starting or ending in the middle of an awkward sound.
Name the exported clips sequentially to preserve their order. Begin filenames with numbers such as 01_SampleName and 02_AnotherSample, followed by a short description of the line. This makes the samples easier to manage while you prepare their metadata in The Choicer Voicer.
Keep your working audio project open until the dub pack is finished. You’ll need the original timeline to verify each sample’s exact starting position.
While cutting each sample, use Audacity’s position indicator—or the equivalent readout in your audio editor—to record its exact start time. Note the time as hh:mm:ss plus milliseconds for every exported clip. For example, if a sample begins at 44.048 seconds, you can use the reference filename 07_MyClip_44-048 to remind yourself where its timestamp belongs.
Once all samples are exported, keep the numbered files together with your timestamp notes. You’ll enter those start times in The Choicer Voicer’s clip metadata editor next, linking each sample to the moment when it plays in the source video. With clean cuts, clear audio, and organized filenames, your dub pack is ready for accurate metadata work.
How to Add Dub Metadata in The Choicer Voicer
In The Choicer Voicer, metadata is what turns a folder of audio samples into a properly synchronized dub pack. The clips may already be edited, but you still need to tell the game when each sample plays and which extra details should appear during gameplay.
- From the main menu, open Extras, then select Edit Voice Packs & Clip Metadata. Open the editor for the installed dub pack you want to configure. You’ll see the exported audio samples available for metadata editing.
- For each exported sample, enter its timestamp in seconds—the exact point in the video when that sample plays. These timestamps synchronize the player’s recordings with the video, so take care when transferring the start times you recorded during audio editing.
- Use the sample metadata options to add captions and assign images. Captions identify the spoken line during playback, while images can help represent the character or moment connected to that clip.
- Add dub character tags when a scene contains multiple audio sources. These tags identify which character each sample belongs to and let players filter which characters they want to dub. In Dub Mode, audio from unselected characters retains its original audio during playback.
- Mark individual samples as dub only when they should appear exclusively in Dub Mode. This keeps specialized clips out of regular voice-pack gameplay while preserving them for the full dubbing experience.
Keep your timestamps organized beside the sample names while you work. A single incorrect timestamp can make a recording play out of sync even when the audio clip itself is perfectly edited.
Save your metadata after checking every sample, especially its timestamp, caption, image, and character tag. With the timing and filters configured, your The Choicer Voicer dub pack is ready to pair player recordings with the video.
How to Install the dub_video.ogv File in The Choicer Voicer
The finish line for your dub pack is the video file—get this wrong, and The Choicer Voicer won’t load the pack at all. Once your audio samples and metadata are ready, install the converted video using the exact filename the game expects.
Install the Required Dub Video
- Convert the source video to OGV. The Godot Engine currently supports OGV for this playback, so formats such as MP4 or AVI won’t work for the dub video.
- Rename the converted file to dub_video.ogv—including the underscore, lowercase letters, and
.ogvextension. - Place dub_video.ogv directly inside your dub pack folder within the existing
packs_voicefolder. Keep it alongside the dub pack’s audio samples and metadata rather than placing it in a separate video folder. - Return to The Choicer Voicer and reload or select the dub pack to check that it appears correctly.
⚠️ Watch out: The dub pack fails to load if an OGV file with this exact name is absent. A correctly converted video with another filename still won’t satisfy the requirement.
With dub_video.ogv installed, you can use the dub pack for clip-by-clip playback or Freestyle Dub Mode, where the entire video plays live. In Dub Mode, saved performances store audio data and reconstruct playback using the dub pack metadata rather than saving a video file. That means the original dub pack—and its metadata—must remain available for replays to work properly.
Your dub pack is now ready for playback. Verify the exact filename and OGV format before troubleshooting anything else; once those two details are correct, you’re set to start dubbing.
How to Create Contestant Voice Lines in The Choicer Voicer
In The Choicer Voicer, custom contestant voice lines belong inside a contestant pack—not a standard voice pack—so start by building the correct character folder. The pack also needs a visible contestant image, because that character represents you during the game show.
Create a Contestant Pack
- Open the Customization Menu and choose Add New Pack. Creating the pack in-game generates default settings for you.
- Alternatively, manually create a folder for the contestant pack under the packs_player folder in the game files.
- The packs_player folder is accessible from the main menu, making it easier to reach the correct location without hunting through the installation manually.
Place the contestant’s character assets in that pack folder. This is where you’ll later add the audio files used for the contestant’s reactions; keep the pack separate from your regular voice content so The Choicer Voicer can treat it as a playable contestant.
Add the Contestant Image
Add a file named player to the contestant pack folder. The file can use the PNG, JPG, or WEBP format, but PNG is the best choice when you need transparency. The game does not natively support animated image formats, so use a still image for the contestant.
The image is displayed unscaled, meaning a small source image produces a small contestant and a large source image produces a large one. Aim for roughly 500 pixels wide by 1000 pixels tall, or use an image that is at least 1000 pixels tall for a clear result.
Position the bottom edge of the character so it touches the studio floor. If you want to shift the character upward, add empty space below the character inside the image rather than expecting the game to reposition or resize it.
Test the image in a quick game show before recording a full set of lines. Since the image is unscaled, checking its size and floor alignment early can save you from rebuilding the pack later.
Once the contestant pack exists in packs_player and its player image is aligned correctly, you have the foundation for a custom contestant. Add the reaction audio through the contestant customization tools next, and your character will be ready to speak during The Choicer Voicer matches.
How to Configure Contestant Reactions in The Choicer Voicer
The contestant reactions are what give your custom character a personality in The Choicer Voicer. Whether they celebrate a perfect match, complain about a rough score, or greet the host, you can configure all nine audio events—but the setup depends on your game version.
The Nine Contestant Audio Events
A contestant pack can have one reaction for each of these events:
- Introduction greeting when the host introduces the contestant
- Winning reaction when the contestant wins the game
- Losing reaction when the contestant loses the game
- Judge score of 0
- Judge score of 1
- Judge score of 2
- Judge score of 3
- Judge score of 4
- Judge score of 5
These reactions are configured through Player Customization for the contestant pack. The game uses the assigned audio according to the result or score the contestant receives.
Version 0.4.12 and Earlier
Older versions use three fixed reaction filenames inside the contestant pack’s packs_player folder. Add the audio files to the pack and use these names:
- talk_cheer — plays for scores of 4 or 5 and when the contestant wins the game
- talk_upset — plays for scores of 0 or 1 and when the contestant loses the game
- talk_greet — plays when the host introduces the contestant
Version 0.4.12 and earlier supports WAV, MP3, and OGG for these legacy contestant reaction files, with WAV preferred. The older system does not separate every judge score into its own audio event: scores 4 and 5 share talk_cheer, while scores 0 and 1 share talk_upset.
If you want a simple setup that works with the older format, start with talk_greet, talk_cheer, and talk_upset. You can always move to individual reactions after updating to version 0.4.13 or later.
Version 0.4.13 and Later
Version 0.4.13 and later adds an experimental reaction-slot system. Instead of relying only on talk_cheer, talk_upset, and talk_greet, you can assign separate audio files to the winning reaction, losing reaction, introduction greeting, and each judge score from 0 through 5.
Place the audio files in the contestant pack, then enter each exact filename beside its matching reaction field in the Details page of Player Customization. You can reuse one file across multiple events, or leave an event empty if you do not want the contestant to play audio for that reaction. The newer system keeps the older setup as its default arrangement for backward compatibility.
If you are building a pack for both older and newer versions, keep the legacy filenames in place and configure the newer reaction fields as well. That gives your contestant a working greeting, win reaction, loss reaction, and score responses across the available systems.
With the nine events mapped out, your contestant can react to every major result in The Choicer Voicer. Set up the three legacy files first if you want reliability, then customize individual score reactions when your version supports them.
How to Assign Reaction Slots in The Choicer Voicer
The experimental reaction-slot system gives your contestant much finer control than the older three-file setup. In The Choicer Voicer version 0.4.13 and later, you can assign separate audio to nine different events instead of bundling several reactions together.
Assigning the Nine Reaction Slots
Open Player Customization for your contestant pack, then go to the Details page. The experimental slot system contains nine reaction slots:
- Winning reaction
- Losing reaction
- Introduction greeting
- Judge score of 0
- Judge score of 1
- Judge score of 2
- Judge score of 3
- Judge score of 4
- Judge score of 5
Before assigning anything, place your audio files inside the contestant pack folder within packs_player. The Choicer Voicer supports WAV, MP3, and OGG files for these reactions. In the Details page, type the exact filename—including its extension—into the field beside the reaction slot you want to use.
For example, if your contestant pack contains cheer.wav, enter cheer.wav in the appropriate reaction field. You can use the play button beside that field to test the assigned file immediately. If the filename is wrong, the file is missing, or the game cannot load it, the reaction filename field turns red.
Test each slot as soon as you assign it. A filename that looks correct can still fail if even one character or the file extension does not match.
You do not need a unique recording for every event. The Choicer Voicer lets you assign one audio file to multiple reaction slots—for example, the same line can handle both Judge score of 4 and Judge score of 5. You can also leave any slot empty; that reaction simply plays no audio.
Backward Compatibility in Version 0.4.13 and Later
The default slot setup in version 0.4.13 and later mirrors the older talk_cheer, talk_upset, and talk_greet behavior. That means existing contestant packs can continue using the familiar reaction arrangement while newer packs gradually adopt individual slots for more precise results.
Once every filename loads successfully and the play buttons confirm the correct clips, your contestant is ready to react exactly how you want during The Choicer Voicer matches. With nine flexible slots—and no requirement to fill them all—you can build anything from a compact classic setup to a fully voiced contestant.
How to Configure Contestant Names and Colors in The Choicer Voicer
In The Choicer Voicer, your contestant’s folder name and the identity shown during gameplay are separate settings. If the character pack is already created, use the in-game Player Customization menu to control what other players see and hear during the game show.
Set the Contestant Name and Colors
- Open Player Customization and select the contestant pack you want to edit.
- On the Overview page, set the in-game contestant name. This display name is separate from the modpack folder name, so changing it does not require renaming the folder.
- On the same Overview page, choose two colors for the contestant. These colors are used on the contestant podium and the score screen.
Add the Introduction Text
Open the Details page and enter the contestant introduction text. This is the text shown when the host introduces the contestant at the start of the game show.
The Details page also includes an introduction preview. Use the interface preview to check the text formatting before you start a match—here’s the trick most guides miss: a preview is much faster than discovering an awkward introduction in front of your group.
Keep the display name and introduction text distinct. The name identifies your contestant throughout the game, while the introduction text controls what appears during the host’s opening presentation.
Once the Overview page has the right name and two colors, and the Details page has a polished introduction, your contestant identity is ready. The game will present your custom character exactly as configured.
How to Diagnose Voice Pack Installation Errors in The Choicer Voicer
If a voice pack refuses to appear—or its clips vanish during gameplay—don’t panic. In The Choicer Voicer, most installation failures come from one misplaced folder, a mismatched filename, or an audio file that only reveals its problem when the game builds a batch.
Check the Voice Pack Folder Structure
Start by verifying the complete hierarchy: the game directory should contain packs_voice, which should contain your pack folder, followed by the audio and metadata files. The pack must not be one folder too deep. For example, the audio files should sit inside the pack folder the game scans, not inside an extra duplicate folder created when extracting a ZIP archive.
Check the filenames as well. Audio clips, subtitle files, and matching images must use the required basenames so The Choicer Voicer can associate them correctly. Remove accidental extensions such as .txt.txt, and make sure your operating system has not hidden a second file extension.
⚠️ Watch out: A pack can look correct in your file manager while still being nested one level too far. Open the final pack folder and confirm that the audio files are immediately inside it or inside an intentionally created subgroup.
Force the Game to Validate the Clips
The pack-selection screen may not detect every problem immediately. Select the suspect pack on the voice-pack selection screen and start batch generation. This forces The Choicer Voicer to process the clips and can expose corrupted files, unsupported formats, or clips longer than 60 seconds.
If you’re using version 0.5.0, inspect the load-error and readme tabs on the voice-pack selection screen before deleting or replacing anything. These reports can point to the specific file causing trouble, saving you from rebuilding the entire pack.
Large packs may take several seconds to preload on the voice-pack selection screen. Wait for preloading to finish before deciding that the pack failed; selecting a large pack and immediately backing out can make a working pack look broken.
Replace Problem Audio
Once you identify a suspect clip, go to packs_voice and replace the invalid source audio. Convert it to an uncompressed supported format, then keep it within the 60-second limit before testing again. Avoid compressed WAV files, since the game engine cannot process them.
Test one replacement at a time when possible. That way, if the batch fails again, you’ll know which file needs attention instead of guessing across the whole pack. If the pack loads but a clip still produces no sound, preview that clip from the game’s customization tools and verify that the file itself plays normally outside the game.
With the folder hierarchy checked, the load-error and readme tabs reviewed, and every suspect clip validated through batch generation, you’ve covered the most common The Choicer Voicer installation failures. Replace bad source audio, wait through large-pack preloading, and test again—your custom pack should be ready for the next round.