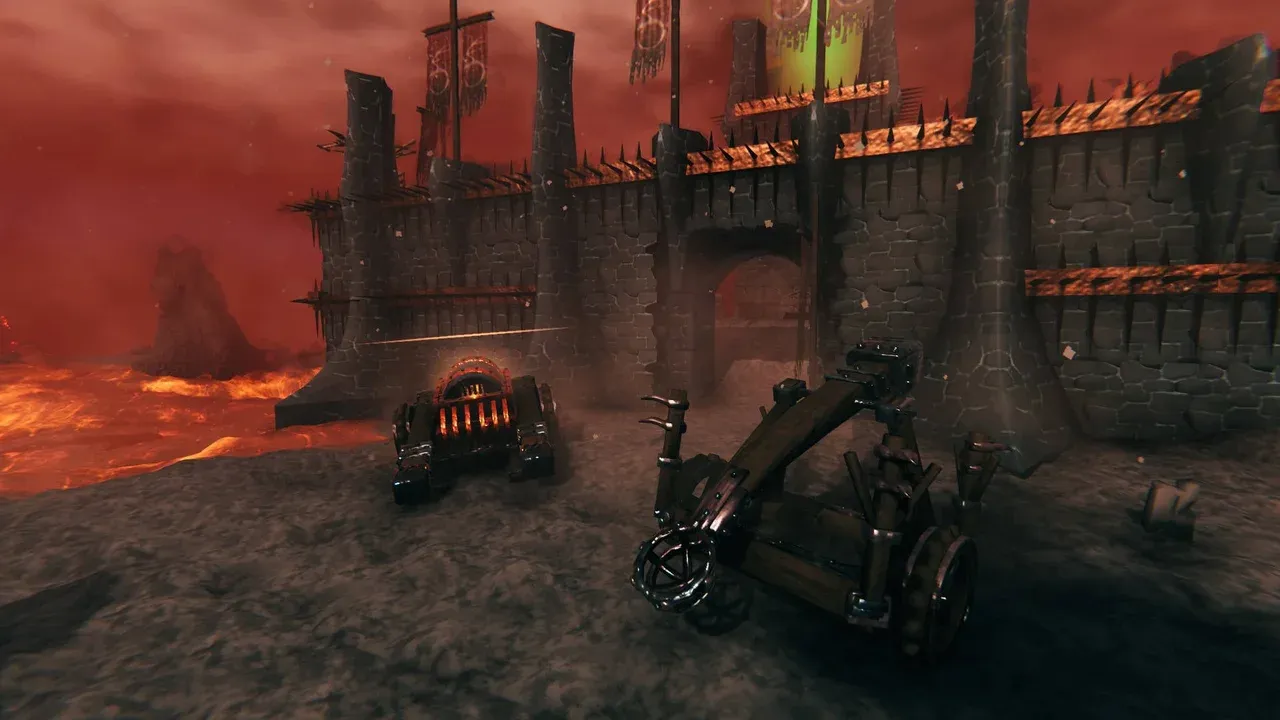
The walls of a Charred Fortress are built to a specification. They ignore every damage type in the game except Pickaxe, and they only register Pickaxe at tool tier 5 — a tier no weapon and no hand tool in Valheim reaches. The best pickaxe you can carry, the Black metal pickaxe, stops at tier 3, and there is no tier 4 for players at all. Exactly one object in the game occupies that column, and it is not a tool you hold. It is a wheeled machine: the Battering Ram.
Knowing that is the easy part. The Ram is not swung, aimed or fired. You attach to it the way you attach to a Cart, walk it into contact with the wall, and its two metal-capped beams begin punching on their own — 600 pickaxe damage a hit, past your shoulders, for as long as there is firewood in the hopper. Bring the wrong end of the machine to the door and it will punch away happily without taking a single point of health off it. Load the hopper too early and twenty-five logs will burn down to nothing while you are still clearing archers off the parapet, because the fuel burns whether or not anyone is holding the arms. And the punch that finally opens the wall leaves you standing in the gap you just made, with the siege engine behind you and the garrison in front.
So the Ram is a vehicle problem far more than a combat one, and nearly every way it fails a player is a vehicle failure: wrong orientation, wasted fuel, or a hole opened at the wrong moment. Before any of that, though, there is a cheaper question to settle. A Charred Fortress has no roof, and a ladder costs wood. That case deserves a hearing first.
A Charred Fortress Only Accepts One Kind of Damage, at One Tier
Stand at the base of the outer wall and look at what the game thinks it is made of. A Charred Fortress is not one object with one health bar — it is four kinds of part, and their numbers have almost nothing to do with each other. A wall segment carries 1500 health, and the exterior wall is three of those layers thick. A strip of bronze spikes: 1500. A gate: 6000, the toughest thing on the structure by a wide margin. The interior tower, the one you actually came for, is walled to the same 1500 but only one layer deep.

And the pillars holding all of it up have exactly 1.
One health. Swing a Black metal pickaxe at one — the best pickaxe in the game, the tool that opens Flametal ore veins — and nothing happens. Not a small number, not a chip. Nothing. That single figure is the clearest statement of the problem anywhere in the Ashlands: if durability were what stopped you, a 1-health pillar would have fallen the moment you touched it. The fortress isn't tough. It is filtered.
The filter has two stages. The first is damage type: the walls, pillars, gates and spiked defences accept Pickaxe damage and nothing else, which quietly disqualifies your entire arsenal — every sword, mace, atgeir, arrow, fireball and lightning bolt you own. The second stage is the one that catches people out, because it disqualifies your pickaxes too. Those parts only register Pickaxe damage of tool tier 5 or higher.
Tool tier is Valheim's permission check for terrain and deposits, and you have been living with it since the Black Forest without thinking about it. Silver veins want tier 2 before they take damage at all; black marble, Giant remains and Flametal ore want tier 3. Below the threshold nothing is reduced or halved — the hit simply does not land. It is a lock, not a resistance.
Here is the ladder as the game's own damage table lists it. Antler pickaxe, tier 0. Bronze, tier 1. Iron, tier 2. Black metal, tier 3. That is where the player column ends — there is no tier-4 pickaxe, no upgrade path, no gem socket that promotes one. Tier 4 in that table belongs entirely to creatures and a boss attack. Tier 5 holds exactly one entry in the whole game, and it isn't a creature or a boss either. It is the Battering Ram.
That two-tier gap is the entire reason a siege machine exists in this game: not because the walls have too much health, but because Iron Gate built a threshold above every hand tool and then put a single vehicle on the far side of it. The Ram is described as a siege engine with a slight resemblance to a Cart but significantly larger, carrying two long punching mechanisms meant to wreck structures at close range, and it can destroy any structure capable of receiving damage — fortress doors and walls included. It is not a better pickaxe. It is a different category of object.
Two honest wrinkles, before anyone builds a plan on this. The first is that the rule leaks. The fortress documentation concedes outright that "some segments of the walls can be mined with any pickaxe. This might be due to a bug," and players do report the tower door taking hand-pickaxe damage. If a segment starts registering hits for you, enjoy it — but treat it as the documented probable bug it is, not as a route in. A breach plan that depends on finding a soft panel is a plan that works once and then strands you at the next fortress, standing in front of walls that behave the way the rule says they should.
The second is that the wiki argues with itself about what else clears tier 5. The Charred Fortress page names a Battering Ram or a Catapult firing Explosive payloads as the sources that get through; the damage page's pickaxe tier table lists only the Battering Ram, and never places Explosive payload anywhere in the tier system at all. Both statements are in front of you and neither cancels the other, so this article will not pretend the question is settled.
What is settled is the machine's behaviour. The Ram shipped with the Ashlands in patch 0.218.15 on 14 May 2024 and has not been touched by a single stable patch since — the only siege-adjacent fix in that entire window was the catapult's stacked-item duplication bug in 0.218.21. Current stable is 0.221.12 from 19 February 2026, and nothing announced for the 1.0 launch on 9 September 2026 touches siege equipment. Whatever the machine did on launch day, it still does.
Which means you can stop swinging. There is no tool to upgrade to, no tier-4 pickaxe waiting behind another boss, and no amount of persistence that turns a tier-3 swing into a tier-5 one. The decision in front of you was never which pickaxe — it is whether to build a machine at all. And on that, four independent sources think you probably don't need one.
You Might Not Need the Ram at All
The fortress has no roof.

That is the counter-argument in one sentence, and it is a strong one. A Charred Fortress is a tall rectangle of wall around an open courtyard, with nothing overhead but cinders. So you do not have to go through the wall — you have to get on top of it. A stack of wooden ladders does that. So does a hoe and the patience to raise the ground into a ramp, and so does one of the giant rocks that generate naturally around the biome, if your fortress happened to spawn beside one. Once you are up on the parapet you can walk the full circuit, shoot down into the yard, take out the ballistae on the corners first and then the spawners in the interior, and jump off the outside wall if it turns bad — after checking what is underneath you, since a great deal of the Ashlands is lava. A feather cloak turns that escape from a gamble into a plan.
This is not one contrarian voice. The fortress documentation's own tips section says outright that it is easier to build a wooden ladder to get on top of the wall than to use a Battering Ram on the gates or walls. A dedicated Ashlands siege guide leads with the same line — siege equipment exists, and you do not need it, because the fortresses are open-top. A player thread arguing about whether a pickaxe does anything to these walls at all ends up giving the same advice anyway: build up so you can jump over the walls, and leave the outer walls intact so the castle becomes yours. And when a player posted a thread asking why his fuelled ram wasn't working, the first useful reply told him to give up on the machine and raise the ground instead. Four independent sources, arriving at the same place from four directions.
The second half of their argument is better than the first. If you go over the wall, the wall is still standing. The gates stay shut. The perimeter stays exactly as indestructible against everything in the biome as it was against you — and you have just acquired a walled compound in the place you had to beat The Queen to reach at all, for the price of some wood. Seen that way, the Ram is not merely unnecessary; it is actively destructive of something worth keeping. Punch a hole in the perimeter and you have converted a fortress into a ruin with a doorway. (The building's full anatomy — the ramps, the corner emplacements, what stands where — lives in our {{post:jmxkz2sc3973ezdmhfeh8afm|Charred Fortresses}} guide. This article only cares about it as a target.)
One asterisk on the free base, and it is worth knowing before you plan a bedroom in there: intact walls are not a sealed lid. Fallen Valkyries hover, and Voltures are among the fastest things in the game. Both come in over the top no matter what the gates are doing. Everything that walks stays out. Everything that flies does not care.
There is a third ram-free route, and it is the funniest one: the Trollstav. Summon a couple of trolls inside the walls and let them dismantle the garrison while you stand somewhere else. It genuinely trivialises the fight. But look at the entry fee. The staff needs a Bloodstone, Bloodstone comes out of a Charred chest, and Charred chests are inside a fortress you have already opened. The trolls only occasionally break a wall — the guide recommending the tactic says plainly it is not a reliable way in — and they are hostile to you once the Charred are dead. The Trollstav is a tool for your second fortress onward. It cannot open the first one.
What none of it solves
Getting into a fortress and getting into the tower are two different problems, and the counter-case only solves the first one.
The ladder puts you in the courtyard. The Bell fragments are not in the courtyard. They sit on an altar inside the central tower — a separate walled structure with its own gate, standing in the middle of the yard you just climbed into, and it is the entire reason you sailed out here. Two ram-free ways into it are documented, and both read like exactly what they are. You can pickaxe a hole in the ground and pass underneath the tower wall — you are digging terrain, not masonry, so an ordinary pickaxe is fine — except that the world has a floor you cannot dig below, and if the tower is sitting near it there is simply nothing to tunnel through. Or you can drop in from above, through the gap between the spikes that cap the tower, which works, and then leaves you sealed in a small room with your loot and no way out unless you brought a portal or the ladders to climb back up. Neither is something you would volunteer for twice.
And on your first fortress you cannot bring the other machine. The Catapult is built with Charred cogwheels. Charred cogwheels drop from Skuggs — the bone ballistae bolted to the fortress corners. Skuggs exist nowhere except inside Charred Fortresses. The loop closes on itself: the catapult is a machine you can only build after you have already taken a fortress apart, which means it is never available for the fortress you are standing outside right now. On fortress number one, the complete list of options is a ram or a ladder.
It is worth knowing what the catapult would buy you later, because it is the Ram's opposite in nearly every respect. It burns no fuel; you load it by pointing at the bucket and pressing a hotbar key, and loading is firing. It is stabilised by planting the spiked legs at its corners, which also hurt anything that touches them. Its ammunition is real ammunition: an Explosive payload is made at a level-1 Workbench, five rounds at a time, from Sulfur ×2, Proustite powder ×3 and Asksvin hide ×2, and each round detonates for 400 pickaxe, 100 pure and 100 chop damage inside a three-metre radius. Grausten payloads are the cheap rounds you throw first to walk the aim in. None of which makes it a wall-breaker: the documentation's own verdict is that the catapult is much less effective at damaging structures than the Battering Ram. Its advantage was never power but reach — it lobs things over obstacles, so it can hit what you cannot: the spawners in the courtyard, from outside the wall, without you ever going in. That is its job. Whether its explosive rounds also clear the threshold on the wall itself is the argument the last section left standing, and it stays standing here.
How many times you are doing this
That is the number that actually decides it, and the game has already picked it for you.
A Bell altar drops 2 to 4 Bell fragments when destroyed. A Bell costs 3 fragments at the Black forge. Summoning Fader takes 3 Bells. Nine fragments, at two to four per altar, is three to five towers opened — and there is no shortcut hiding in that arithmetic, because fragments come only from altars and altars sit only inside towers. Whatever method you choose for the tower in front of you now, you are choosing it three to five times.
The green beam is your progress bar, incidentally: it comes off the altar, so killing the altar puts it out, which is how you tell from a long way across the biome which fortresses you have already emptied. You will not run out of targets — there are twenty fortresses per world. You will just run the same errand until Fader has his bells.
So the decision comes out fairly clean.
If what you want is a fortress — a walled outpost in the Ashlands with the gates shut and everything inside it dead — skip the machine. Climb in, clear it from the parapet, leave the perimeter intact, and keep watching the sky for the things that fly, because they are still coming in. You will have something better than a hole in a wall.
If what you want is Bell fragments on a schedule, build the machine. The ladder route is genuinely fine right up to the second it deposits you in the courtyard, at which point you are standing in front of a sealed tower with two finicky, documented, faintly humiliating ways into it — and then you get to do the whole thing again at the next fortress, and the one after that.
Which leaves exactly one question before you commit. Three things go into this machine. Two of them are errands you can run in an afternoon. The third is the reason it was worth thinking this hard about whether you needed it.
What a Ram Costs, and Why the Flametal Is the Only Hard Part
Start with the verb, because the verb is wrong. You do not craft a Battering Ram. There is no station to walk up to, no recipe list to scroll, nothing that turns your materials into an item you then carry around. The Ram is a build piece. You equip the Hammer, open the build menu, go to the Misc tab — the same tab that holds the Cart — and place it on the ground like a wall segment. Everyone says "craft" because that is the word Valheim trained us to use for anything with a cost, but the mechanic is placement, and the difference matters: what you are choosing when you select it is not just whether to spend the materials, it is where the machine will exist.

That makes the first requirement something you cannot put in your inventory. The Ram only appears in the Hammer menu if a Workbench is standing in range — 20 metres at level 1, extending 4 metres per upgrade to a 36-metre maximum at level 5. Building inside that radius needs no roof and no cover over the bench; you can drop one on bare ash and it works. If you are unsure whether you are inside the circle, select the Workbench itself in the hammer menu and the game draws the radius on the ground as a white ring. A bench costs 10 Wood and has no prerequisites at all, which produces the small comedy of this whole enterprise: the cheapest object in Valheim is a hard requirement for one of the most expensive.
Then the bill, and it is short:
| Material | Amount | Weight each | Through a wooden portal? |
|---|---|---|---|
| Flametal | 10 | 12 | No |
| Surtling core | 2 | 5 | Yes |
| Ashwood | 20 | 2 | Yes |
One widely-read fortress guide writes the Ashwood as ten. Two independent wikis both put it at twenty, so bring twenty. And note what is not on that list: fuel. The Ashwood here is chassis, not firewood — feeding the machine is a separate load and a later problem.
Ashwood is the errand you can finish before dinner. It comes off Scorched Trees, the black skeletal things standing all over the Ashlands, and a stone axe is enough to fell one — the tier gate on Ashwood is the biome itself, not your equipment. A felled log breaks into roughly twenty pieces of wood, about two-thirds of it Ashwood, so one or two trees covers the whole build with change left over. Two things worth knowing while you are out there: Scorched Trees do not regrow and cannot be planted, so a stripped area stays stripped, and Ashwood cannot be fed into a charcoal kiln, which catches out anyone used to burning surplus timber into Coal.
Surtling cores are the errand that might quietly send you home. Two is a trivial number, right up until you check your chest and find zero. Cores are not an Ashlands resource — they come from Burial Chambers down in the Black Forest, from Surtlings themselves, from recycling the bonfires in a captured Fuling village, and from smashing naturally spawned Dvergr lanterns. All of that is content you cleared a hundred hours ago, and everything you have built since has been eating them: a smelter, a charcoal kiln, every portal in your network back to the Meadows, the Ward at your main base, and five more swallowed by the Blast furnace you needed for this project in the first place. A late-game player being short exactly two cores is not an edge case, it is the normal state of a late-game player. Check before you sail, not after. They weigh 5 each and teleport without complaint, so restocking is a portal trip rather than a voyage.
Flametal is the material this section is named after, and the reason is a chain of prerequisites rather than a difficult mining trip. Flametal ore comes out of the veins scattered through the Ashlands, and mining them requires at least a Black metal pickaxe — the same tier-3 tool that cannot make a mark on the fortress wall is exactly the tool that gets you the metal to build the thing that can. The ore is useless as ore. It becomes Flametal only in a Blast furnace, burning Coal, and the Blast furnace is itself an Artisan table piece, which means it sits behind Moder. If you have Ashlands access at all you have almost certainly cleared that chain already, but it is worth saying plainly: no Moder, no Artisan table, no furnace, no Flametal, no Ram.
Now the part that decides where you build. Ten Flametal weighs 120, and Flametal does not pass a wooden portal. Not "slowly", not "at a penalty" — the portal simply refuses it. The other two materials are the opposite: 20 Ashwood is 40 weight and 2 cores are 10, both freely teleportable, so you could shuttle them anywhere in the world in a single trip through a portal you already own. The recipe splits cleanly into two things you can send and one thing you have to carry.
That leaves two routes, and you should pick one deliberately. Either you smelt your Flametal in the Ashlands and place the machine beside the wall you intend to open, or you stand up a Portal – Stone — Greydwarf eye ×10, Grausten ×30, Molten core ×2, built at a Stonecutter — which is the only portal that will move metal, and which the wiki flags as a priority build the moment you establish an Ashlands foothold. The stone portal is worth having regardless, because it is what turns the Ashlands from an expedition into a commute. But if you do not have one standing yet, the answer is not to haul 120 weight of metal across a biome. It is to build the Ram where the Ram is going to work.
The alternative most people imagine — assemble it at home where everything is comfortable, then ship it out — is not a plan the evidence supports. Getting anything to the Ashlands at all means a Drakkar, since the surrounding water boils and takes 1 to 30 blunt damage a second off every other hull depending on how deep into it you sail. The Catapult is explicitly documented as cargo: two of them will ride a Drakkar if you build floors and roofs for them, though they cannot be placed on the ship directly. Nothing anywhere says whether a Ram can do the same, in either direction. Do not build a siege plan on an undocumented maybe.
So the packing list for the trip is genuinely small. A Hammer, ten spare Wood for the Workbench, the twenty Ashwood, the two cores, and either ten Flametal in your pockets or a furnace already running near the coast. Everything else about this machine — where it points, what it burns, what happens when the wall gives — depends on a decision you make in the next thirty seconds, which is where on the map you press the button.
Put it near the fortress. You now have a siege engine standing in the Ashlands and a wall some distance away, and dragging it over there is the easy part. Pointing it correctly is where most players lose the siege.
Only One End of the Ram Does Damage, and You Stand at That End
Walk a full circle around the machine before you touch it, because you are about to make a decision you cannot see the consequences of until it is too late to matter.

One end carries two large wheels, and the chassis behind them holds a riveted iron housing with a barred grate set into it — the furnace. The opposite end carries two long timber beams tipped with heavy dark metal caps, and flanking those, two shorter angled struts rising beside them. Those struts are the handles. They are the "pair of smaller arms" the documentation tells you to stand between, and they sit at the same end as the capped beams. That is the entire geometry of the Battering Ram, and everything that goes wrong with one goes wrong because a player got it backwards in their head rather than on the ground.
The capped beams are the only part of this machine that damages anything. Not the wheels, not the furnace housing, not the chassis. Push the wheel-and-furnace end into a fortress wall and the beams will swing out into open air on the other side, hitting nothing, while the part in contact with the masonry does precisely nothing to it.
Here is why this catches so many people, and it is not a skill problem. The two most detailed write-ups of this machine both explain orientation using the words front and back — and they apply those words to opposite ends. Neither is being careless; there is no label on the machine and no in-game vocabulary to defer to, so each writer picked an end and called it the front. Read either one on its own and you will follow it confidently. Read both, or read one after half-remembering the other, and you will drive a working siege engine at a wall the wrong way round. The physical geometry is not in dispute — the screenshots settle it completely. Only the words are. So throw the words out and use the landmarks: wheels and iron furnace box at one end, capped beams and short struts at the other.
What that failure actually looks like is documented, and it is worth reading closely because every symptom in it says success. A player posted a thread asking why his Ram would not hurt a fortress door: he had put wood in it, pressed use, and moved it against the door, and — his words — "those logs are punching it, but no damage dealt." Fuel in. Attached. Animation playing. Beams swinging on a timer exactly the way the guides said they would. The only thing missing was the part nobody thinks to list as a symptom, which is numbers coming off the wall. The reply that solved it took one line: he was pushing the machine at the door rather than taking the handles and bringing it in from the arm end.
So build yourself a two-second check and run it every time, before anything else happens:
- The capped beams are pointed at the wall.
- The wheels are pointed at the rest of the Ashlands.
If the wheels are the thing kissing the masonry, you are wrong, and no amount of shoving will change it. Note that you cannot lean on the furnace glow for this. The grate lights up orange when there is wood in it and sits dark when there isn't — and at the moment you are doing this work the machine should still be cold, so learn to read it unlit, by the wheels and the iron box.
Steering it is the easy half, and you already know how, because it is a Cart. Face the machine from between the two short struts, press interact, and you are attached; finding the exact spot can be fiddly the first time, but once you have it you can pivot freely and walk the whole thing wherever you want. There is no aiming step to perform after that. No cursor, no deploy prompt, no stabilise button, no legs to plant — the spiked legs belong to the Catapult, which is a different machine with a different job. You aim a Ram by walking it until the beams face the wall, and that is the whole interface. Getting off is the same interaction in reverse: use it again while looking down at it, or dodge-roll clear. Commit both of those to muscle memory now rather than later. You will want them in a hurry, and the moment you want them is not the moment to be discovering which key it was.
The genuine obstacle out here is the ground, not the fortress. This is a 4 × 3.5 × 5.5 metre vehicle, and the terrain around a Charred Fortress is broken enough that it will hang up on rises a player jogs over without noticing. The most detailed hands-on account of driving one gives a single fix, and it is a good one: carry a Hoe and use its Level Ground function as you drag, cutting yourself a path rather than fighting for one. It is one source's advice rather than a documented mechanic, but it costs you nothing and it addresses the thing that actually stops these machines.
Then close the distance. Do not park "near" the wall and hope the reach covers it — walk the beams into contact and get as tight as the ground allows, because the machine's business end has to be the part touching the target, and there is no forgiveness margin on that. Do all of it cold, with the hopper empty. Positioning is unpaid work; you have not started any clock yet.
Which means the machine is now standing where it needs to stand, aimed the only way that does anything, and still completely inert. Everything after this point is loud. Before it burns a single log, it wants a bench beside it and something over its head.
One Workbench Is What Keeps the Machine Repairable
You have already built one Workbench out here — the Ram could not have been placed without it. The only question this section asks is whether that bench is still standing beside the machine, because a bench back at the smelting camp is a bench that does nothing for you now.

Start with what you are insuring. The Ram is a build piece with 3000 durability, and that number is doing more work than it looks like it is: it means the machine has a health bar, it means things can take it away from you, and it means the game files it under the same category as a wall you built. No source anywhere documents the Charred singling out siege equipment, so do not picture the garrison charging your investment specifically. What is documented is more general and quite bad enough — a Ram is a player-built structure, and Valheim's hostiles attack player-built structures they can path to. Park 120 weight of Flametal against a wall full of things that can path to it and the arithmetic takes care of itself.
The machine's resistance profile is where it gets lucky, and it is worth being precise about how lucky. Two independent data sources describe the Ram, and they agree on exactly three lines: Pierce is halved, Poison does nothing, Spirit does nothing. They disagree about the rest of the profile, so those three are the only ones you can count on — everywhere else, the safe assumption is that the damage lands. The good news is that three lines cover most of what a fortress throws. The bone ballistae on the corners fire 120 Pierce bolts every two seconds; a Charred Marksman's arrow is 90 Pierce. All of that arrives at half value against the chassis. What the agreed list does not cover is a Charred Warrior's 150-damage slash, or the Warlock attack that bundles 100 Pierce with 20 Blunt and 70 Fire — of which only the Pierce portion has a documented discount. The ranged storm is largely wasted on the machine. The things that walk up to it are not.
Repair is free, which is the whole argument for doing it early
Which brings you to repair, and to a piece of honesty that has to come before the instructions.
No source anywhere documents repairing a Battering Ram by name. The machine's own reference page has no repair section and does not mention repair once. What exists instead is the general rule, stated plainly for every build piece in the game: damaged pieces are repaired with the Hammer, at no resource cost, consuming stamina, and only while you are in range of the crafting station that corresponds to the piece — a Workbench for a wooden part, a Stonecutter for a stone one. The Ram's corresponding station is the Workbench; that is the same field on its build entry that decides whether it appears in the Misc tab in the first place. And the machine's own stated design analogue, the Cart, is documented for this in as many words: carts are repairable using the hammer, like any other structure, but it must be done near a Workbench.
So what follows is the standard build-piece procedure applied to a 3000-durability Workbench piece, not a ram-specific recipe somebody has written down and tested. Equip the Hammer, stand inside the bench's radius, and repair. It costs you nothing but stamina, which is the single most important thing about it: there is no reason to ration it, no material to hoard, and no sensible argument for waiting until the machine looks bad. Repair between waves, not during them.
One genuine open question rides along with that. The Workbench rule as written says a bench must have a roof and 70 % cover to enable crafting and repairing, while building inside its radius and suppressing spawns need no cover at all. Nobody has established which side hammer-repairing a placed vehicle falls on — it is a repair, but it is a repair of a structure rather than of an item on your person, and no source resolves it. The rule is what it is; this article is not going to adjudicate it for you. What it will suggest is that a scrap roof over the bench costs a handful of wood and removes the question entirely, which is cheaper than finding out the hard way with a Warlock on the parapet.
One bench, four jobs, and the one it cannot do
Now look at what that one bench is actually doing, because it is the best value in the siege. Ten wood, no prerequisites, a 20-metre radius, and four jobs at once:
- It makes the Ram placeable — the machine does not appear in the Hammer menu without it.
- It makes the Ram repairable, per everything above.
- It suppresses creature spawns inside its radius, natural spawns and event creatures alike.
- It powers the Hoe. Raising terrain needs a bench in range; the Level Ground function you cut the approach with does not, so the bench upgrades what your hoe can do rather than enabling it.
Two footnotes on the suppression bubble. Most player-base structures are attacked on sight by anything that can reach them — campfires, bonfires and braziers are the only exceptions, and a Workbench is not one of them, so the bench is itself a target with 200 points of durability. And whenever the zone reloads, an upgraded bench's extended radius briefly snaps back to 20 metres, which lets things spawn inside the area you thought you had covered.
Then there is the job the bench cannot do, and it is the one you will feel. The Effigies of Malice inside the fortress are physical creature spawners, and physical spawners are explicitly not suppressed by player-base structures. Spawn-proofing stops the biome from generating enemies around your camp. It has no effect whatsoever on the objects inside the walls whose entire function is to produce Charred. Your bubble buys you quiet ground behind you. It buys you nothing in front of you.
What the bench cannot cover, the dome can
Cinders are the other thing the bench does not touch. Cinder rain falls around you within a 60-metre radius, it sets fire to the structures it lands on, and it has a 32.1 % chance of setting the ground itself alight for 30 seconds. The rate depends entirely on the weather: Ash Rain drops roughly 1.8 cinders a minute, which is background noise, while Cinder Rain runs about 49 a minute and a thunderstorm about 54. On top of that, the Ashlands is the biome where wooden build pieces catch fire and the fire spreads — that shipped as a headline feature of the update, not as a bug. Whether the Ram in particular ignites is not recorded anywhere, and this guide is not going to invent an answer in either direction. What is recorded is that everything else in your camp is flammable, that a 49-cinder minute is not rare, and that fire in this biome travels.
The fix for both problems is one build piece: the Shield generator. Iron ×5, Copper ×5 and a Shield core, built at that same Workbench, 1500 durability of its own. It projects a 30-metre spherical dome that prevents falling cinders from setting alight what is underneath it, and absorbs any projectile whose origin is outside the radius — ballista bolts, Marksman arrows, Warlock fireballs, all of it stopped at the dome's edge. It runs on bones of any kind, holds ten, and burns one fuel per 500 damage absorbed; rain costs it nothing. Best of all, the dome is one-way: a projectile fired from inside is not absorbed on its way out, so you can still shoot back out of your own bubble. Thirty metres is enough to cover the bench, the machine and the ground you are standing on with room to spare. If you have the Iron, the Copper and a core, stop thinking of the generator as base decoration. It is siege equipment, and it is the only thing in the game that answers both cinders and the fortress's ranged output with a single placement.
The drag out, and the player doing the dragging
One hazard belongs to the drag rather than the camp. Morgen carries 100 Pickaxe and 100 Chop damage on nearly every melee attack — 200 and 200 at two stars — which makes it one of the very few creatures in the biome that meaningfully chews structures rather than people. It is very rare and it spawns out in the middle of the Ashlands, not inside fortresses, so it is a transit problem: the thing most capable of wrecking your machine finds you on open ground, halfway between your foothold and the wall, at the exact moment there is no bench within twenty metres to fix the damage.
And while the camp protects the machine, check what is protecting you, because the Forsaken Powers were rebalanced in Call to Arms and older Ashlands guides describe the versions they had before. Bonemass now grants 25 % resistance against Pierce, Slash and Blunt, 100 % reduced block stamina cost and 5 stamina returned per block — which is aimed squarely at the arrows and the melee that will be aimed at you rather than at the chassis. Fader now grants a 100 % Adrenaline increase, a 50 % reduced stagger meter modifier and 50 % fire resistance — worth filing for later rather than for now, because Fader's power sits on the far side of nine Bell fragments and three to five opened towers, which is to say on the far side of every fortress this article is about. If a guide tells you to bring a power for its old effect, check the current one first.
None of which costs anything you would notice, which is why the order is worth getting right: bench and dome before fuel, and the bench placed where it is not the first thing something walks into. Then treat the Hammer as a habit rather than an emergency measure. A free action you postpone becomes a decision you have to make under fire.
Camp up, machine repairable, dome overhead. Everything left on the checklist is measured in wood — and wood is the one thing on this list that starts costing you the moment you spend it.
Fuel It Last: 25 Wood Buys 500 Seconds Whether You Use Them or Not
Look into the hopper behind the barred grate and you find the least dramatic answer available: firewood. Wood, Finewood, Corewood or Ashwood, fed into the slot on the furnace housing — the same grate that has been sitting dark through everything you have done so far. There is no siege ammunition anywhere in this machine. Nothing to make, nothing to stockpile, nothing that runs out except the ordinary timber you have been cutting since your first day in the world. The twenty Ashwood in the recipe was chassis; this is a separate load, and it is the only running cost the Ram has.

All four woods are listed identically, with no stated difference in burn time between them. Nothing documented favours Ashwood over plain Wood — worth knowing, because Scorched Trees do not regrow and ordinary trees do. Burn the cheap stuff.
The hopper holds 25 units, and it burns one every 20 seconds. A full load is therefore 500 seconds — eight minutes and twenty. That is the entire runtime a stuffed machine has in it.
What those 500 seconds buy is this: once the Ram is fuelled and someone is attached at the capped-beam end, the beams punch on their own, every few seconds, with nothing to press. It is not a weapon you trigger; it is an engine you switch on by standing in it. Be aware of what nobody publishes, though — neither data source gives the interval between punches. "Every few seconds" is the whole of it. So do not turn eight minutes and twenty seconds into a number of hits, or into a time by which the wall will be open. The honest unit of measurement for this machine is punches, not minutes, and that arithmetic belongs to the next decision you make.
Now the trap, which is the reason this step sits here in the order rather than three steps earlier.
The fuel burns whether or not anyone is holding the arms. An idle fuelled Ram will not punch anything — it just sits there and empties its own hopper on schedule. Nothing warns you. The grate glows exactly the same way it would if the machine were working.
Run the same 25 logs through two orders and the difference is total. Fuel first, then go and do the sensible-looking preparation — clear the Skuggs off the corners, drop the Warlock watching from the parapet, walk back — and you can return to a cold machine with a dark grate and an empty hopper, having spent every one of those 500 seconds on an unattended vehicle. The wall has not been touched once. Clear first, then fuel, and all 500 seconds are spent with the beams in contact and something coming off the masonry.
So carry the wood, do not carry a fuelled Ram. Loading the hopper is the last action before the breach, not part of setting up: the machine is already in contact with the wall, already turned so the capped beams are the part touching it, with the bench standing and the dome up. Treat the 25 as one uninterrupted working session rather than a reserve you are drawing on, because the clock does not stop for you to reconsider. Keep the rest of the stack in your pockets, where it isn't burning.
The grate is glowing, then, and the beams are swinging on their own. Which leaves exactly one decision — where to point them. The most obvious target on the fortress is the wrong one.
Break the Wall, Not the Gate — Then Survive the Hole You Just Made
The gate is the obvious answer. It is door-shaped, it is where a road would arrive if this place had roads, and it is the only part of the perimeter ever designed to open. It is also 6000 health — the single toughest object on the fortress, and worth more punches than the entire three-layer wall standing beside it.

Everything from here comes off one figure. Each punch deals exactly 600 Pickaxe damage and 0 Chop. Two independent data sources agree on it to the digit, and you can watch it happen: attach to a fuelled machine, walk the capped beams into a boulder, and a floating white 600 appears at the point of impact. It is not an average and not a range. No source ties it to your skills, your food or your armour. The Ram hits for 600, or — if you got the orientation wrong — for nothing at all.
Divide the fortress by that number and the whole assault becomes a very short table:
| Target | Health | Punches |
|---|---|---|
| Pillar | 1 | 1 |
| Wall layer | 1500 | 3 |
| Spike strip | 1500 | 3 |
| Inner tower wall (one layer) | 1500 | 3 |
| Outer wall (three layers) | 4500 | 8 |
| Gate | 6000 | 10 |
Two things about that table before you use it. First, the counts are punches and only punches — nobody has ever published the interval between swings, so there is no honest way to turn any row into a number of seconds, and this guide will not invent one. Eight punches is eight punches, however long the machine takes to throw them. Second, the outer-wall row is the total-damage reading: 4500 across the span, divided by 600, rounded up to eight. If every layer insists on absorbing its own three, call it nine. The difference does not change a single decision you are about to make.
Because the decision the table makes for you is stark. Ten punches for the gate; eight for the three-layer wall a few metres to its left; three for the tower wall you actually care about. The fortress documentation states it as plainly as anything in the game: the exterior walls are easier to break through than the gates, and the tower walls are easier still. The gate is the toughest thing on the structure and it leads to the same courtyard the wall does. There is never a reason to hit it.
So pick a span of wall away from the gate, away from anything you might want intact, and walk the beams into it. Then, when you have crossed the courtyard and lined up on the central tower, pick your spot on that wall with real care, because this is where a 600-damage machine becomes a liability. The Bell altar has 10 health and no resistances at all. It sits directly under the green cone of light — which means the beam pouring out of the tower roof is a marker telling you exactly where the centre of the room is, and exactly where not to aim. A single punch anywhere near it deletes it. The Charred chests along the tower's inner walls are sturdier at 200 health, and they resist most of what you can throw at them, but "sturdier than an object with 10 health" is not a safety margin. Open the tower off-centre, three punches, and stop.
One optional row: those spike strips are 1500 apiece, so three punches each, and a fortress carries 78 of them at 2–5 Scrap bronze a strip — about 273 scrap bronze in total if you are systematic about it. That is a scrap-farming decision, not a breaching one. It is listed here so you know the machine can do it, not because the siege needs it.
The punch that opens the wall is the one that puts you in it
Now the part the table cannot warn you about, and it follows directly from where you have been standing this whole time.
You operate the Ram from the capped-beam end, between the two short struts, with the machine punching past your shoulders. That is the only orientation that works. It is also the orientation that guarantees that the moment the last layer falls, you are standing in the doorway you just made — a fresh gap in the wall, a 4 × 3.5 × 5.5 metre siege engine directly behind you, and a courtyard directly ahead. The machine's own reference notes the trap in as many words: breaking fortress doors or walls while there are enemies inside can easily trap you between the Ram and the army of enemies, where you can be overwhelmed quickly. The most detailed hands-on account of driving one calls the operator incredibly vulnerable and recommends, flatly, that you have someone covering you.
Your exits are the two you already learned attaching to the thing: use it again while looking down at it, or dodge-roll clear. No new mechanic, no emergency button. Which is precisely why they need to be muscle memory before the eighth punch rather than after it — the correct moment to detach is before the last layer gives way, not once you are looking through the hole at what is on the far side of it.
What is on the far side of it
At full strength, a fortress generates with up to 3 Charred Warlocks, 5 Charred Marksmen and 4 Skuggs, plus 2 Effigies of Malice. The first group is placed once, at world generation, and does not respawn — everything you kill from a parapet or through the gap stays killed. The Effigies do not work that way.
The Skuggs are the reason a slow approach is not automatically a safe one. Those corner ballistae detect players and tamed creatures out to 40 metres inside a 75° cone, vertically and horizontally, take a one-second warm-up, and then put a 120 Pierce bolt downrange every two seconds. Your machine shrugs most of that off. You do not.
The rest of the roster is worth reading as damage numbers rather than as names. A Charred Warrior carries 600 health unstarred, doubling and tripling with stars, and swings for 150 Slash or thrusts for 160 Pierce — and staggers at 50 %, so it can be broken open rather than simply out-traded. A Charred Marksman is fragile at 200 health but pokes 90 Pierce from range. A Charred Warlock is the problem: 600 health, an attack every eight seconds that bundles 100 Pierce, 20 Blunt and 70 Fire, a summon on a ten-second cycle, and a coin-flip chance of wearing a 60-armour Charred Helmet. All three share one profile — resistant to Pierce, very resistant to Fire, immune to Poison, and weak to Spirit damage. Bringing fire to the Ashlands is a beginner's instinct and a bad one. Spirit is what these things do not want to see.
The Ram cannot solve the spawners
This is the machine's hard limit, and it is arithmetic rather than opinion. Each punch deals 0 Chop. An Effigy of Malice has 500 health and is weak to Chop — the one damage type your siege engine does not produce in any quantity. You cannot park the Ram in the courtyard and grind the spawners down with it, and no amount of fuel changes that.
So bring an axe. It is the cheapest line item in the entire operation and the only thing that stops the fight renewing itself. An Effigy activates the moment a player is within 60 metres — which is to say it has been running since well before your first punch landed — and attempts a spawn every 12 seconds within four metres of itself, skipping the attempt whenever enough of its own output is already crowded nearby. That skip rule is the cap you will actually feel, and it works locally, within 20 metres of the spawner. There is a global ceiling as well — a spawner also skips when a hundred creatures are already alive within a kilometre — but that is not a number a courtyard fight will reach. Nor is everything it produces a pushover: a small fraction arrives starred, at roughly 4.75 % for one star and 0.25 % for two, and a two-star Charred Warrior is an 1800-health problem with the machine blocking your retreat.
There is one staging routine worth repeating, with a label attached: it comes from a single session write-up rather than from documented behaviour. That player set the Ram at the door, lured the garrison out into the open before committing, kept archers off the machine, and kept an unnamed spare portal on the hotbar so it could be dropped and connected without typing under pressure. The lure and the portal are good instincts. The "at the door" part is the one detail the durability numbers argue with — put it on the wall.
Which leaves the one thing the order of operations has to say out loud, because this article's two operating rules point in opposite directions. Detaching stops the punching. It does not stop the burn. Everything between the outer wall and the tower — the fight through the gap, the courtyard, two Effigies taken down with an axe — happens while the hopper empties on an unattended machine, and because nobody has published a punch interval, nobody can tell you how much of the load the tower's three punches will still have to work with. So keep the rest of the wood in your pockets and plan on a second load at the tower. Wood is the cheapest thing in this operation, and the only one that spends itself while you are busy elsewhere.
The Ram breaches. That is the whole of its contribution, and it is a large one — but it does not clear the courtyard, it does not touch the spawners, and it will happily obliterate the altar you sailed out here for. When the fragments are finally in your pocket, look back through the hole. Your siege engine is parked in a gap in someone else's wall, and you have a decision to make about it.
Smash It, Pocket It, or Point It at a Silver Vein
Equip the Hammer and point it at the machine, because the Hammer is what you have used for everything else out here — it placed the Ram, and it has been repairing it between waves all afternoon. Nothing happens. There is no deconstruct option on a Battering Ram. Middle-click a wall you built and it comes apart and hands the wood straight back to you; do the same to the machine you sank ten Flametal into and the game simply does not offer.

That is not a bug and it is not specific to this machine. Valheim's refund rule — deconstruct with the Hammer, get everything back — holds for ordinary build pieces and has exactly one class of exception, which is vehicles. Carts, boats, catapults and Battering Rams all work the same way: the Hammer cannot take them apart, and their materials drop only when the thing is destroyed by damage. Recovery here is not an unbuild. It is a demolition, and you are the one who has to perform it.
So draw a weapon and hit your own siege engine until it comes apart, then pick the pieces up off the ground: 10 Flametal, 2 Surtling cores and 20 Ashwood — the entire recipe, exactly as you paid it. Nothing is lost in the conversion. The only thing the game charges for taking the machine back is the indignity of wrecking it yourself, which is the same toll it charges on a cart or a longship.
Two things ride along with that swing. The first is that recovered is not home. Ten Flametal weighs 120 and is under precisely the restriction it was under on the way in — it will not pass a wooden portal. Metal in your pockets and an ordinary portal standing beside you means the metal stays exactly where it is. Unless a Portal – Stone is already up, smashing the Ram converts a machine you could drag into cargo you have to carry, across the ash and onto the ship you arrived in. Getting the materials back and getting them home are two separate problems, and hitting the machine only solves the first one.
The second is a place not to do it at all. Smashing your own vehicle inside a Dvergr base registers as a hostile act toward the Dvergr — they are one of the few factions you can turn against you without meaning to, so do your demolition outside their lanterns.
Now the argument for leaving the weapon sheathed, which is stronger than it looks at the end of a siege you have already won. You have been thinking about this thing as a fortress tool because a fortress is what you built it for. It is not a fortress tool. It is a mining engine that happens to open walls.
Each punch spreads its 600 pickaxe damage over an area around the impact rather than concentrating it in a point, which is why the beams that took a wall layer apart in three hits will just as happily flatten a Copper deposit, a Silver vein, a bed of Giant remains, or any of the giant rocks lying around the world. And the tool-tier ladder that made this entire article necessary now runs the other way for you. Silver veins refuse anything under tier 2; black marble, Giant remains and Flametal ore veins refuse anything under tier 3. A machine that punches at tool tier 5 clears both by two full tiers. There is no node anywhere in the world that is allowed to say no to it.
The best case is a Stone Golem. It is the one creature in the game not immune to pickaxe damage, and it is Very Weak to it — a doubling that turns a single punch into 1200 and takes the Golem apart in one hit, from a machine you are pulling rather than a weapon you are swinging.
There is exactly one job it cannot do, and it is the one you would assume a pair of enormous swinging beams could manage: it cannot cut a tree. Zero chop, every punch, permanently. Something that deletes a boulder in three hits will stand in front of a Scorched Tree all day and achieve nothing.
So decide before you swing, because the swing does not go backwards. If you need the Flametal and you have a stone portal — or the appetite to carry 120 weight of metal by hand — take it apart and pocket the recipe. If there is anything within dragging distance worth 600 pickaxe damage, leave the hopper empty and keep the machine: the next fortress tower and its altar, or the ore field you have been putting off because a Black metal pickaxe made it a whole evening's work.
You know where the handles are. Take the arms again, walk it out through the hole you made, and go find the first Silver vein you have ever been able to simply erase.