How to Master Core Mechanics in Hollow Knight
Your adventure through Hallownest begins not with a roar, but with a whisper—the quiet hum of Cornifer in the distance, the soft chime of collected Geo, and the steady rhythm of your nail. Hollow Knight is a world that rewards patience and punishes haste, and your survival hinges on mastering its core trio of mechanics: health, soul, and movement. Before you dive into the sprawling caverns, let's lock down these fundamentals to ensure your journey is one of discovery, not constant frustration.

Mastering movement and resource management is vital for survival.
Your Lifelines: Health and Soul
At the top-left of your screen, you’ll see two vital meters: your Masks (health) and your Soul meter. Think of them as two sides of the same coin, both fueled by your primary weapon. Striking enemies with your Nail fills the white Soul meter. This precious resource is your key to survival, as it powers both healing and powerful spells.
Healing, called Focus, is your most important action. When you have enough Soul (about three nail strikes' worth), hold [A] to Focus and restore one Mask. This is your only way to recover health outside of benches. But here’s the catch: the Focus action roots your Knight in place, and taking any damage will interrupt the heal, wasting that Soul. You must find a safe moment—a lull in combat or after you’ve staggered a boss.
⚠️ Watch out: Never try to heal mid-attack. Wait for an opening, like after dodging a boss's combo, or you'll just take more damage.
This creates Hollow Knight's core tension. Do you spend Soul to heal a wound, or save it to unleash a Vengeful Spirit spell for burst damage? Early on, err on the side of healing. Staying alive to learn an enemy's patterns is always better than going for a risky kill.
Mastering Your Nail: More Than Just Swinging
Your Nail is far more versatile than a simple sword. The standard Nail Combat slash is performed with [X]. You can also aim overhead by holding Up + [X], perfect for hitting descending foes or hitting certain switches. But the real game-changer is the Pogo or Down Slash.
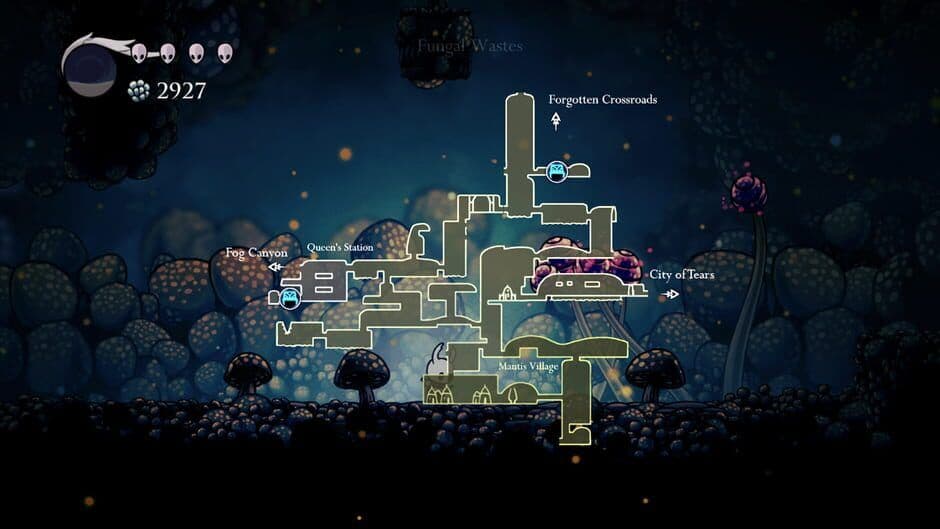
By jumping and pressing Down + [X], you’ll strike directly downward. If you hit an enemy, a spiked surface, or even certain environmental objects like purple mushrooms, you’ll bounce off them. This Pogo technique is essential. It lets you cross over spikes safely, reach higher platforms by bouncing off enemies, and traverse entire areas like the Fungal Wastes.
Practice pogoing on the weak flying enemies in the Forgotten Crossroads. Getting comfortable bouncing on moving targets will save you countless times later.
One final combat nuance is Knockback. Every time your nail connects, your Knight is pushed backward slightly. This feels great when spacing out melee foes, but it’s a silent killer near bottomless pits. Always be aware of your footing, especially on narrow platforms. Give yourself ample room from ledges during combat.
With these core systems understood—managing Soul between healing and spells, using your nail's full moveset, and respecting knockback—you have the foundation to face anything Hallownest throws at you. Let's move on to finding your way.
How to Reach Dirtmouth and the Forgotten Crossroads in Hollow Knight
Your adventure in Hollow Knight begins not in the depths, but in the quiet, forgotten village on the surface. Your first goal is to find your footing in this strange new world, which means reaching the main hub and stepping into the first major exploration zone.
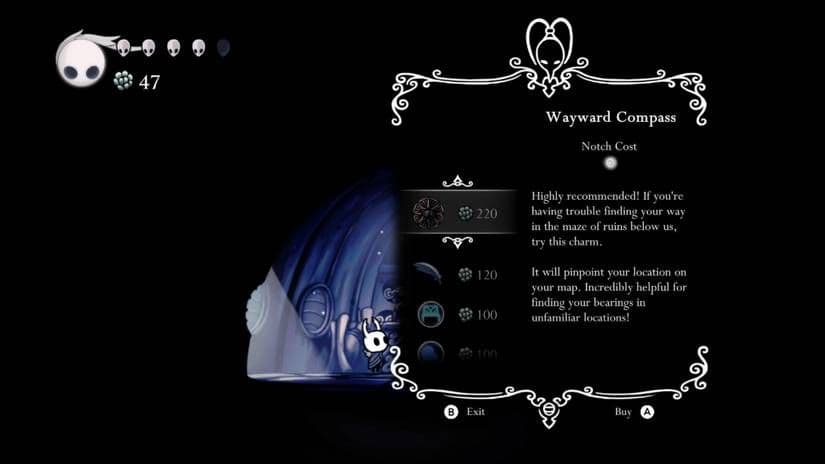
The Wayward Compass helps new players track their position on the map.
Your journey starts in the surface village of Dirtmouth. This sleepy town is your main hub for vendors, benches, and the well entrance that leads down into Hallownest. Here, you’ll meet Elderbug, an NPC standing near the well who provides initial lore and gentle guidance. Take a moment to speak with him—he’ll set the somber tone for your adventure. Before you descend, find a bench in Dirtmouth. Benches are found throughout Hallownest; press [A] to sit, which saves your game, fully restores your Masks (health), and, once you have the right tools, updates your map. Trust me, making a habit of sitting at every bench you find is your first key to survival.
Always sit at a new bench, even if you’re at full health. It sets your respawn point, which can save you a brutal walk back if things go wrong.
From Dirtmouth, your path forward is down the large well in the center of town. This drops you into the Forgotten Crossroads, the first exploration area below Dirtmouth well. This cavernous network of tunnels is where you’ll cut your teeth, facing weak flying enemies and learning the lay of the land. If you’ve played other Metroidvanias, you’ll recognize this as your initial playground—a place to practice combat, earn some early Geo, and get thoroughly lost.
The layout can feel overwhelming, but don’t panic. Your immediate objectives here are simple: explore cautiously, listen for the distinctive humming of the cartographer Cornifer (more on him in the next section), and most importantly, find another bench. Establishing a safe point deep in the Crossroads makes every subsequent attempt at exploration much less punishing.
With Dirtmouth as your safe haven and the Forgotten Crossroads laid out before you, you’ve taken the essential first steps into Hallownest. Let’s go.
How to Find Cornifer and Buy Maps in Hollow Knight
Wandering the twisting tunnels of Hallownest without a map is a surefire way to get lost and frustrated. In Hollow Knight, your first major exploration goal is to find the friendly cartographer, Cornifer, to turn those blank screens into a navigable guide.

Exploring the vast world to find the cartographer.
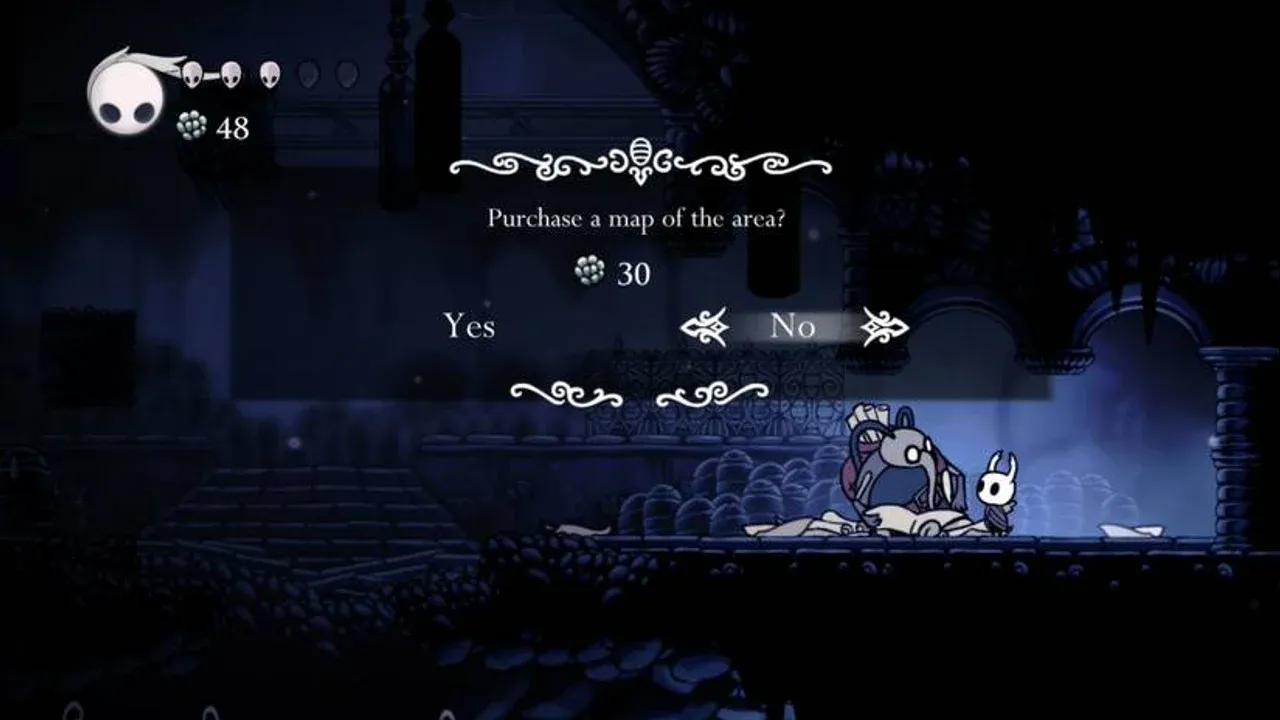
Your search begins in the Forgotten Crossroads. From the base of the well you descended from Dirtmouth, head left. You’ll pass through a vertical shaft with platforms and flying enemies—a decent spot to grind a little Geo if needed. Keep going until you enter a room where you’ll hear a distinctive, cheerful humming. Follow the sound, and you’ll find Cornifer, the cartographer, sitting on the ground with his supplies scattered around him. Speak to him and purchase the Forgotten Crossroads map for 30 Geo. This is your single most important early purchase.
If you somehow miss Cornifer here, don’t panic. He’ll leave a note behind, and you can purchase the map later in Dirtmouth after finding his discarded calling card.
Now, you have a map, but it’s not quite ready to use. Head back up to the surface village of Dirtmouth. Directly to the left of the well entrance, you’ll find a small shop. Inside is Iselda, Cornifer’s wife, who runs the map shop. Here’s where you make your map functional and powerful.
Your shopping list from Iselda should be:
- The Wayward Compass for 220 Geo. This charm is non-negotiable for beginners—it shows your exact location on the map. Equip it immediately.
- The Quill for 120 Geo. This isn't a charm; it's a permanent tool. Once you have it, resting at any Bench will automatically draw all the rooms you've explored since your last rest onto your map.
- The Bench Pin and Vendor Pin for 100 Geo each. These let you mark the locations of benches and shops directly on your map, making planning your routes much easier.
Trust me, investing your early Geo here will save you hours of aimless wandering. With the map, Quill, and Wayward Compass, you transform from a lost bug into a confident explorer, ready to chart the depths of Hallownest.
How to Recover Geo and Manage the Shade System in Hollow Knight
Death in Hollow Knight isn't the end—it's a second chance. This is the game's signature Souls-like mechanic, and understanding it turns a devastating loss into a manageable setback. Your Geo, the precious currency you've collected, is on the line every time you fall, but it's never truly gone until you give up on retrieving it.
Combat encounters are the primary cause of death and Shade generation.
When your Knight falls, you'll respawn at the last bench you rested at. Two things happen immediately: your Soul meter becomes cracked, reducing your maximum Soul capacity by roughly half, and a dark spirit called your Shade spawns at the exact spot where you died. This Shade holds onto every single piece of Geo you were carrying. If you've wiped here before, you're not alone—this system trips up everyone at first. The only way to restore your full Soul capacity and reclaim your lost Geo is to venture back and defeat your own Shade.
How to Reclaim Your Shade and Geo
Your primary strategy for Shade Retrieval is a direct return mission. Head back to your death location—your Shade will be waiting, typically near the entrance of the corridor where you fell. In combat, the Shade is more of a persistent nuisance than a powerful foe; it floats slowly and fires a simple projectile. The trick is aggression. Rush it down and attack quickly with your Nail before it can become fully aware and start maneuvering. Defeating it instantly restores your full Soul meter and returns all your lost Geo.
If your death was deep in a dangerous area, consider clearing a safe path back to the Shade before you engage it. That way, you have a clean escape route with your Geo safely recovered.
Sometimes, your Shade can get stuck in a brutally difficult or nearly inaccessible spot, like a room swarming with enemies or perched over spikes. If the thought of fighting your way back there is daunting, especially if you're holding a large amount of Geo, Hollow Knight provides a safety net.
In Dirtmouth, head to the far right side of town to find a locked door. After purchasing the Simple Key from Sly in his shop (found in the abandoned village at the bottom of the Forgotten Crossroads), you can open it to meet Confessor Jiji. This NPC serves a crucial purpose: for the cost of one Rancid Egg (an item found in various corners of the world), she will summon your Shade directly to her chamber. This allows you to recover your Geo and Soul in complete safety, no matter where you died. It's an invaluable service when you're sitting on thousands of Geo and don't want to risk a perilous retrieval run.
Managing the Risk of Permanent Loss
The real danger of the shade system comes with a second death. If you die again before defeating your first Shade, a new Shade spawns at your new death location, and the Geo held by the original one is permanently lost. This is why panicking and rushing back without a plan can hurt more than the initial death.
Here's the mindset shift that helps: treat death as a temporary loan, not a penalty. Your Geo is simply being held for you at a specific location. With smart Shade Retrieval, either through direct combat or Confessor Jiji's service, you can almost always get it back. To minimize stress, make a habit of spending your Geo on permanent upgrades—maps, charms, or nail upgrades—before venturing into unknown, dangerous territory. That way, even if the worst happens, you've already converted your earnings into lasting power.
Master this cycle, and you'll stop fearing death in Hollow Knight. You'll see it for what it is: a minor detour on your journey through Hallownest.
Best Early Game Charms and Builds in Hollow Knight
You’ve learned the basics, mapped the Forgotten Crossroads, and managed your Geo—now it’s time to truly customize your Knight. In Hollow Knight, your survival and power spike dramatically once you start building your first charm loadout. This is where you shift from simply reacting to the world to actively shaping your playstyle.
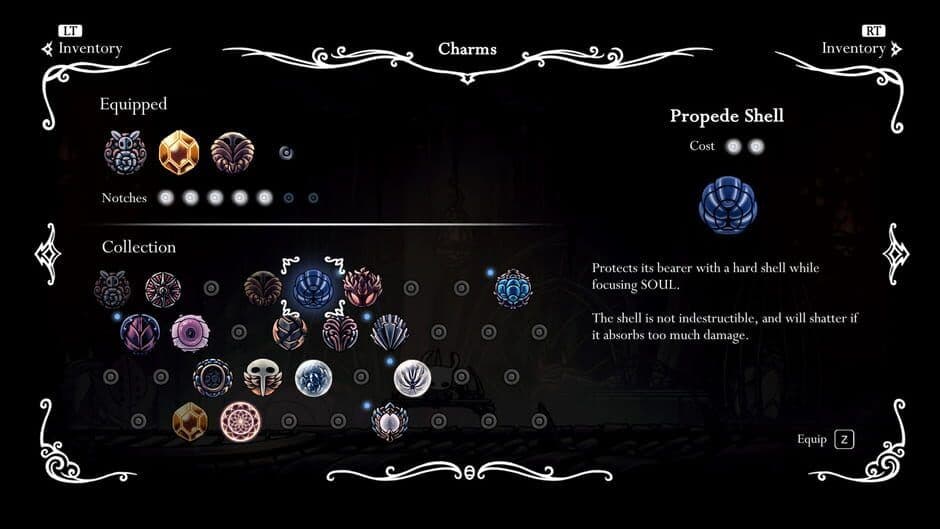
Charms can significantly alter your combat effectiveness.
The key to this system is Charm Notches, slots in your inventory that limit how many charms you can equip at once. You start with three, and finding or buying more is a top priority. Charms are your primary way to boost survivability, damage, and utility, and the right early combination can turn a brutal fight into a manageable challenge.
Your first major charm purchase should be the Wayward Compass from Iselda in Dirtmouth—it’s essential for navigation, as covered in a previous section. For your actual build, focus on charms that give you breathing room and sustain. Two fantastic early options come from Sly, a merchant you’ll first meet in the Forgotten Crossroads.
To unlock Sly’s shop in Dirtmouth, you need to find him in the Forgotten Crossroads first. Head to the bottom-right village area, past the Gruz Mother boss. Free the trapped bug in the center of the abandoned huts—that’s Sly. He’ll thank you and reopen his shop back in Dirtmouth.
Once Sly is in Dirtmouth, visit his shop to the right of the well. Here, you can purchase the Stalwart Shell. This 2-notch charm is a beginner’s best friend: it reduces knockback and grants you longer invincibility frames after taking a hit. This means you’re less likely to get stun-locked by rapid enemy attacks, giving you a crucial moment to reposition or heal.
Also consider buying the Gathering Swarm for 300 Geo. This 1-notch charm summons a swarm of tiny flies that automatically collect any Geo dropped by enemies, even if it falls into spikes or pits. It saves you from losing precious currency and lets you focus purely on combat.
For a more offensive early option, don’t miss the Soul Catcher charm. You can find it in the Ancestral Mound within the Forgotten Crossroads (the same area where you get the Vengeful Spirit spell). This 2-notch charm increases the amount of Soul you gain per nail hit, meaning you’ll fill your meter faster for both healing and casting spells. It’s a fantastic way to address the core Soul management struggle.
Here’s a simple, powerful early-game build you can assemble quickly:
- Wayward Compass (1 notch): Never get lost.
- Stalwart Shell (2 notches): Survive combo hits and recover safely.
- Soul Catcher (2 notches): Generate Soul faster for more heals or spells.
This 5-notch setup uses your starting three slots plus two more you can find early (one is sold by Salubra in the southeastern Forgotten Crossroads, but you’ll need the Mothwing Cloak to reach her). It creates a balanced foundation: you’ll navigate confidently, withstand more punishment, and have the resources to recover from it.
⚠️ Watch out: Healing with Focus roots you in place. With Stalwart Shell, you’ll have a slightly safer window after being hit, but always look for a boss’s stagger or a clear opening before you try to heal.
With this charm setup, you’re not just surviving Hallownest—you’re building the adaptable foundation needed to conquer its first major bosses and delve deeper with confidence. Let’s go.
How to Defeat the False Knight and Unlock Spells in Hollow Knight
Deep in the Forgotten Crossroads, a thunderous pounding echoes through the caverns—your first major skill check awaits. The False Knight stands as Hollow Knight’s introductory gatekeeper, a towering armored bug guarding the path to your first true power.
Discovering secrets in Hallownest.
You’ll find him in the center of the map within the Forgotten Crossroads, behind a massive iron gate. This fight teaches you the fundamentals: reading tells, spacing your attacks, and, most importantly, the boss stagger mechanic. Land enough consecutive hits, and he’ll slump over, dazed. This brief window is your golden opportunity—either step back and use [A] to Focus and heal, or unleash a burst of damage. Don’t get greedy trying to do both.
⚠️ Watch out: His overhead mace slam creates a shockwave. Jump over it, then punish him from behind while he recovers.
Once you whittle down his health, the armor will crack and he’ll collapse. Claim your reward: the City Crest. Take this back to the surface and drop down the well in Dirtmouth, heading right this time. Use the Crest on the massive stone door to unlock the path toward the City of Tears for later. But first, your real prize is back where the fight began.
Return to the boss arena. Smash through the weakened left wall to discover the Ancestral Mound. Inside, you’ll meet the Snail Shaman, a mysterious NPC who has been watching your progress. For defeating the False Knight, he grants you the Vengeful Spirit ability. This is your first magic spell, and it’s a game-changer. Press [B] to fire a ranged Soul projectile that cuts through enemies. It consumes a hefty chunk of your Soul meter, so use it wisely.
Vengeful Spirit isn’t just for combat. It’s your key to progression. Certain environmental barriers, like those odd, face-shaped rock walls, can only be destroyed with this spell, opening up entirely new regions.
With Vengeful Spirit in your arsenal, you’ve officially graduated from basic bug to a spellcasting adventurer. You’ve conquered your first major boss, learned the vital stagger mechanic, and unlocked the magic that will define your journey through Hallownest. This combination of skill and new power is your ticket to the lands beyond.
How to Reach Greenpath and Unlock the Mothwing Cloak in Hollow Knight
The path to Greenpath is your first real test of Hollow Knight’s Metroidvania design. You've mastered the Forgotten Crossroads, but a lush, overgrown region lies to the west, blocked by a simple barrier that your new spell was made to shatter.

The Knight, protagonist of Hollow Knight.
First, you need to get there. From the Forgotten Crossroads bench near Cornifer, head west. You’ll pass through a room with a toll machine (a future Stag Station) and eventually reach a dead end blocked by a dense wall of infested vines. Here’s the trick most guides miss: this is where your new ability, Vengeful Spirit, pays off. Stand back and press [B] to blast the vines away, clearing the entrance to Greenpath.
Navigating Greenpath and Finding Hornet
Stepping into Greenpath feels like entering a different world—it’s humid, vibrant, and filled with new, more aggressive flora and fauna. Your immediate goal is to find Hornet Protector, the boss who guards the area's prize. Work your way through the winding, platform-heavy paths, generally heading west. You’ll cross thorny vines, acidic waterways, and encounter enemies that spit projectiles or charge at you.
Listen closely as you explore. You might hear the hum of another cartographer or the distinct, high-pitched cooing of a trapped Grub hidden behind a breakable wall.
Eventually, you’ll reach a large, open arena with a mossy platform in the center. This is where Hornet Protector awaits. This fight is a major skill check, demanding quick reflexes and smart positioning. She’s fast, leaps across the screen, and throws her needle. Focus on dodging her dashes and look for openings after her lunge attacks to get in one or two nail hits. Healing is tough here—only attempt it when she’s staggered or recovering from a throw.
Claiming Your Prize: The Mothwing Cloak
Once you defeat Hornet Protector, she’ll drop a shimmering item: the Mothwing Cloak. This isn't just a trophy—it’s the game-changer you’ve been waiting for. Press [ZR] to dash forward, covering ground instantly and passing through most enemies. This ability revolutionizes everything: combat, platforming, and exploration. You can now dash over spikes, through projectiles, and reach platforms that were just out of jump range.
With the cloak equipped, take a moment to explore Greenpath more thoroughly. There’s a hidden area here where you can meet the Hunter. Find him tucked away in a secluded nook (often requiring some clever platforming with your new dash), and he’ll provide the Hunter’s Journal, a log to track every enemy you encounter. It’s a fun collectible for completionists.
You’ve just unlocked Hollow Knight’s first major mobility upgrade. The Mothwing Cloak opens up vast portions of the world for re-exploration and propels you toward the next major regions. With this new speed at your command, you're ready to bound into the Fungal Wastes and beyond. Let's go.
Hollow Knight Fast Travel: Stag Stations and Shortcuts
Navigating the sprawling caverns of Hallownest can be a daunting trek, but you don't have to walk everywhere. In Hollow Knight, mastering the Stagway system is your key to unlocking the entire kingdom—turning hours of backtracking into moments of swift travel.

The atmospheric world of Hollow Knight.
Your ticket to the network is finding a Stag Station. These are unique rooms marked by a large, ornate bell and a toll machine. When you find one, interact with the machine and pay the Geo fee to unlock it. This one-time payment makes the station a permanent fast travel point for the rest of your adventure. Once unlocked, ring the bell to summon The Last Stag, the ancient, friendly bug who will transport you between any stations you’ve discovered.
Always listen for the soft, melodic humming that echoes near a Stag Station. It’s a dead giveaway you’re close, saving you from wandering past a crucial travel hub.
While the Stagway is your primary fast travel, don’t overlook the power of unlocking shortcuts. As you explore, keep an eye out for environmental interactions—many are permanent. Attack wooden levers to lower gates or raise bridges, and always strike suspicious-looking walls. Breaking through a weak section can create a vital new path between areas, saving you a trip back to the surface the next time you need to pass through.
If you’re a completionist, there’s a special reward for mapping the entire transit system. After you’ve discovered every other Stag Station in Hollow Knight, you’ll gain access to the Stag Nest, a hidden area that serves as the Stag’s ancestral home and offers a unique piece of lore.
With the Stagways unlocked and key shortcuts opened, you can stop retreading old ground and start charting new territory with confidence. The whole kingdom is now connected.
Essential Exploration Rewards: Mask Shards and Grubs in Hollow Knight
Your journey through Hallownest isn't just about reaching the end—it’s about growing stronger with every hidden nook you explore. In Hollow Knight, your survival hinges on two critical, permanent upgrades: more health and more magic. Here’s how to find them.

Building Your Health Bar with Mask Shards
Your health, displayed as Masks, starts painfully low. To increase it, you need to hunt for Mask Shards. These pale, fragmented artifacts are scattered across every region, tucked away in secret rooms, guarded by tough enemies, or hidden behind clever platforming challenges.
Listen for a soft, ethereal chiming sound when you’re near a Mask Shard. That audio cue is your best friend for tracking them down.
You’ll need to collect four Mask Shards to forge one complete, permanent health Mask. Don’t worry about finding them all at once—exploring off the beaten path naturally leads you to many. Some are rewards for rescuing Grubs, while others are simply waiting for a curious Knight to stumble upon them. Each new Mask you earn is a game-changer, giving you the breathing room to survive tougher boss encounters.
The Rewarding Hunt for Grubs
If you hear a faint, high-pitched cooing while exploring, stop and investigate the nearest wall. That sound means a helpless Grub is trapped in a glass jar nearby. Break the wall to free it, and the grateful larva will teleport back to its father.
That father is Grubfather, found in the top left area of the Forgotten Crossroads. Every Grub you rescue adds to the joyous pile in his den. As you return more of his children, Grubfather rewards you with Geo, Charms, and, crucially, Mask Shards. This makes rescuing Grubs one of the most rewarding side activities in Hollow Knight—it directly fuels your character’s power.
Expanding Your Soul Vessel
Just as Mask Shards increase health, Vessel Fragments expand your magical reserves. Your Soul meter, used for both healing and casting spells, has a base capacity that often feels insufficient. To increase it, you must find Vessel Fragments.
You need to collect three Vessel Fragments to form one complete Vessel, which adds a new segment to your Soul meter. These fragments are often hidden in more dangerous or obscure locations than Mask Shards—think spike-filled chambers or areas guarded by aggressive foes. The payoff is immense: a larger Soul pool means more healing during a boss fight or more spells to unleash without having to re-engage in melee.
With a keen ear for Grub calls, an eye for breakable walls, and a commitment to thorough exploration, you’ll steadily transform your Knight into a resilient force. These collectibles are the bedrock of your strength in Hollow Knight, turning a daunting journey into a triumphant adventure.