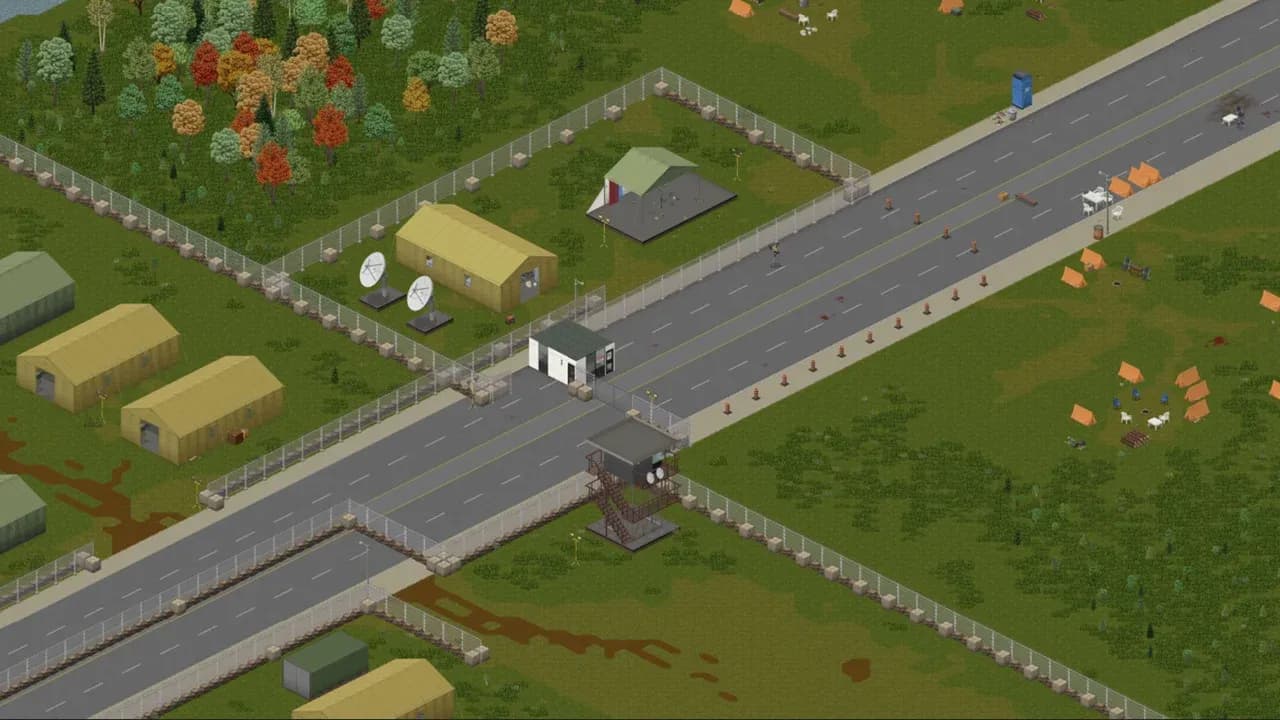
Three roads run from Valley Station into Louisville, and the Louisville border camp is the only one of them you can open with nothing in your hands. That is precisely why it buries people. The other two checkpoints are sealed from the Valley Station side and want a sledgehammer or a welding torch before they will let you through. The border camp on Dixie Highway has a hole in its eastern fence that asks for nothing at all. So the survivor least equipped to be standing there is exactly the one the map funnels in — and the hole works the same way going out, at walking pace, one load at a time.
That single detail decides the whole trip. The breach will not pass a vehicle, so the camp's five generators are not coming home with you and never were. Four sections of the army checkpoint plus one shipping container hold almost everything worth the walk; the rest is refugee highway, some 350 tiles of it, which PZwiki — on a page written for Build 42 — sums up as having "almost no useful loot in it, apart from tents and generators." Plan the exit and the run plans itself.
The Only Door You Can Open Without a Sledgehammer
The exit problem starts a long way south of the wire. Coming north toward the panhandle that Louisville and Valley Station share, the Dixie Highway bridge over the Salt River outside West Point is always blocked with ruined cars. The rail bridge sitting right beside it is the one that gets you across, and there is a smaller bridge further upstream if you would rather not run a car down a railway. Everything after that is a choice between three doors, and PZwiki's line about them is worth taking literally: from Valley Station exactly three roads enter Louisville, all of them guarded by military checkpoints, all of them zombie hotspots, "with the Dixie Highway checkpoint being especially bad."
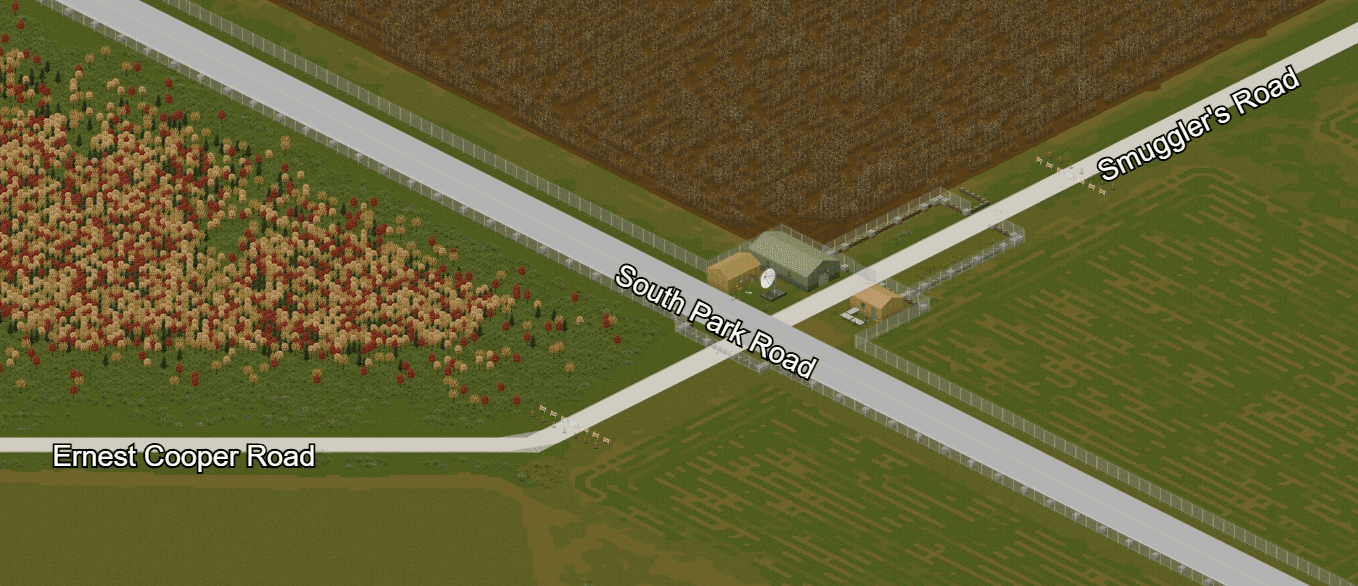
The Ernest Cooper Road checkpoint: three tents and a handful of chests, and no horde standing on top of them.
The thing that actually makes the choice for you is not the map, it is what is in your inventory when you set off. The Louisville Road checkpoint at 13425x4073 and the Ernest Cooper Road checkpoint at 14525x4017 are both completely fenced off on the Valley Station side, and the fix is blunt: welding tools or a sledgehammer will be needed to remove the fences. Both of them have an openable gate on the Louisville side — which sounds generous until you notice which side you are standing on. That gate is not an entrance. It is what those checkpoints become after you are already inside the city: a clean exit, and a free re-entry on every trip after the first. Approaching from the south with empty hands, they are walls.
If you do have the tool, both routes start the same way. Turn off Dixie Highway onto Appletree Lane just before the highway bends toward the main entrance, then follow Bearcamp Rd east.
- Louisville Road checkpoint — take Bearcamp Rd east to the intersection with Louisville Rd, then head north to the border fence. Cut through and you are standing in southern Louisville.
- Ernest Cooper Road checkpoint — stay on Bearcamp Rd past the Louisville Rd turn, continue to the intersection with Washington Rd, turn onto Washington, then onto Ernest Cooper Rd, then north to the fence. Coming out the far side puts you in far south-east Louisville.
What you give up by taking a quiet door is immediate loot, and not much of it. Both small checkpoints carry the same three-tent set: a barracks with a chest beside each bed holding assorted military gear, a second tent for firearms, and a third for communications — at Ernest Cooper the third is described as an armory tent. That is three tents and a handful of chests, against a main checkpoint and campsite complex on Dixie Highway holding zombies in the thousands, enough that clearing it is a siege measured in several days or even weeks. You are trading a small pile of military gear for not being seen. Ernest Cooper is the smallest checkpoint on the fence and correspondingly the quietest arrival; it is also where Ernest Cooper Road ends and Smuggler's Road begins, with a small refugee campsite further up it, and there is a matching campsite further up Louisville Road. Neither is a destination. They are the first thing you loot after you have already won the crossing.
Build 42 opened a fourth door, and it is nowhere near the other three. At the Ashville Road military post — the easternmost point on the Exclusion Zone border, south of Louisville International Airport — the map-edge fence is no longer indestructible the way it was in Build 41, so you can now get into the checkpoint by walking along the fence. That makes it the one substantial installation on the whole border that a toolless survivor can enter without a horde attached: barracks tents, a supply tent, a communications room, a guard tower, and two repurposed produce warehouses, one of them converted into a mechanic garage, cafeteria and armory for military equipment. The catch is the drive. It is the far end of the fence, and you reach it on foot from wherever you can park.
So make the call before you leave, not at the fence line. Sledgehammer or welding torch in the bag means Appletree Lane and Bearcamp Rd, a small checkpoint cut open on the quiet side, and a gate that will still be there tomorrow. Nothing in the bag means the border camp, or the long haul east to Ashville Road — and choosing the camp commits you to something the other doors never ask of you.
Drive to the Roadblocks, Walk In Through the Train Yard
What it asks is that you park.
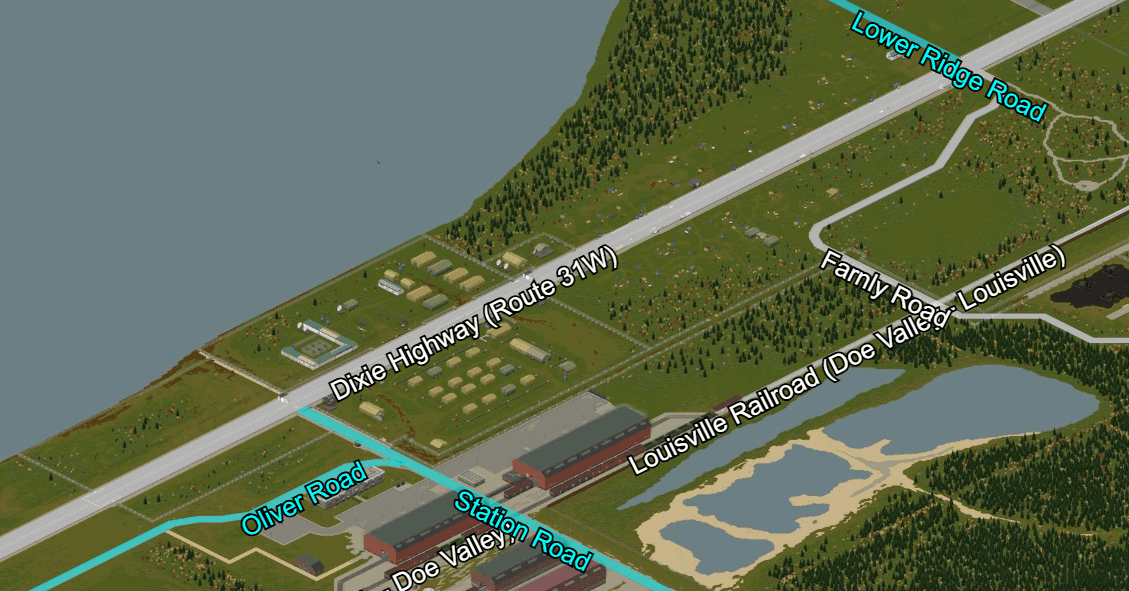
Approach from the south on Dixie Highway and turn east at the train yard; the breach is along the fence line beyond it.
Dixie Highway takes a car almost all the way in, which is exactly the misconception worth killing before you set off. Just short of the fence line the road is choked with a pile of ruined vehicles, and further ahead that pile ends at roadblocks. Neither is a real barrier. There are only a few zombies on that stretch of highway; kill them, steer around the wreck pile, and shove the roadblocks aside, and you have cleared the road right up to the wire. It feels like progress. It is not entry. The main route into and through the camp is protected by fences and gates that do not open easily, and the main army checkpoint stays fenced off from both sides — from the highway you just cleared and from the Louisville side beyond it. Clearing the road buys you a parking space, nothing more.
The way in is a turn you make before you reach any of that. Approaching from the south, you turn east through the train yard and then follow the fence line until the break appears. The yard is Kentucky Rail Freight & Logistics at 12549x4362, a rail repair and cargo train station, and it is the landmark that keeps this from being a guessing game — it sits about 125 tiles west of the army checkpoint at 12674x4402, at almost the same latitude. Turn at the yard, walk the fence, and the hole is there.
One note on the sourcing, because it matters for a route you are going to walk in the dark. PZwiki's dedicated border camp page — the one carrying the turn east through the train yard, the trees and the vehicle restriction — is flagged as last updated for 41.78.19, against a current stable build of 42.20. The separate Exclusion Zone border page, flagged 42.12.3, independently lists "the broken fence to the East" as one of the ways into this checkpoint, so the breach is confirmed for Build 42; the finer detail of how you walk it rests on the older page.
The trees are what turn this from a shortcut into a commitment. The breach will not permit vehicle access through the area unless an axe is used to clear them, and until somebody spends that axe and that time, it is a foot door. Which means the car does not follow you in. It sits where you left it, outside the wire, on a highway you have already cleared.
Stage it deliberately, because that parked car is the only container in this operation that does not walk. Leave it on the cleared highway short of the wreck pile, nose pointed back south the way you came, close enough to the train yard turn that you can reach it without crossing the camp's frontage. That position does three jobs at once: it is your ride home, it is a drop point you can reach without going through anything, and it is the reason your pack should be near empty on the way in. Load it with what lets you make a second and a third trip, and leave it the space you are going to need on the way back.
Then look at how long the camp is, because that is what the round trip actually costs. The army checkpoint sits at the southern end. The refugee camp lies north of it at 12497x4050 — roughly 350 tiles of open highway between the two ends. Anything you pick up at the far north end has to come back down that entire corridor, back along the fence, back through the same hole you squeezed in by, and out to the car. There is no second exit that a loaded survivor can use. The breach is the neck of the bottle in both directions, and every load you take out passes through it at walking pace.
That geometry has one immediate payoff just inside the wire. East of the main camp, at 12728x3972, is a small half-burned neighbourhood along Farnly Road, and inside the fence there are four houses the military used. There is not much loot in them beyond firearms and medical items — but firearms and medical items are precisely the category that comes out on a person's back, and the furniture shoved around outside each house tells you the army had the same idea about space that you are about to have. Several houses south of the fence have been burned, possibly torched deliberately by the military, so do not plan on those. If your first run through the breach is a short one to test the route and see how the walk back feels loaded, those four houses are a better target than the camp proper.
Four Sections Worth Opening, and 350 Tiles of Tents That Aren't
Inside the wire the camp reads as one enormous installation and behaves as two completely different places. The army checkpoint at the southern end is a military facility that was abandoned mid-shift. Everything north of it is where civilians were living. That line is the entire looting plan, because it separates chests of military gear from somebody's barbecue.
The 14 July collapse is why the southern half still pays, and also why it is dangerous. A protest at the camp turned into a fight between the army and the crowd, the noise of it pulled thousands of infected down onto the fence, breaches opened, and the military pulled back rather than held. Nobody packed the checkpoint up; it was left standing with its containers full, which is why the Exclusion Zone border page — the Build 42 one — describes the checkpoint as carrying loads of containers and military chests with firearms, medicament and military gear, and rates it one of the easiest places in the game to level Electrical purely on the volume of electronics sitting in it. The thousands are still there. Emptying this camp properly is a siege of several days to several weeks, and that is a project, not a trip.
So the route below is not a clearing plan. It is the order you loot in when you have decided not to fight the camp: it minimises the time you spend between tents, it puts the densest weapons last so you are not hauling a rifle past three sections you have yet to search, and it never doubles back into ground you have already made noise in. The four sections have fixed compass positions, and because the barracks repeat on two corners they come to six stops. Coming off the fence line from the east you arrive at the checkpoint's south-east corner, and from there one loop takes in everything:
- Medical centre, south-east. First aid supplies and furniture, with a generator standing next to the tent. It is the first thing the eastern approach puts you on top of, and medicine is the lightest high-value thing in the camp.
- Barracks, south-east. Military clothing and equipment, immediately alongside the medical centre.
- Offices, south-west. Multiple offices, military radios, computers and a quarantine area. Walk the southern edge west to reach it. This is the electronics stop, and it comes early while your hands are still empty enough to be selective about which radios and computers are worth stripping.
- Barracks, north-west. The same section repeats on the opposite corner, so you take the western side of the checkpoint north to reach it. There is a second generator on the West barracks.
- Kitchen and eating area, north-east. Basic restaurant loot — food, ingredients, basic kitchen gear — with a third generator at the kitchen tent. You reach it by running east along the top of the checkpoint.
- The shipping container, then the armory, north-east. The armory tent holds military weapons and equipment. The container that also holds weapons sits to the west of that tent, which means this approach walks you into it before you reach the armory. Open it on the way past. Come at the armory from any other direction and the container is the thing people walk straight by.
The order also puts all three generators inside the checkpoint — medical tent, West barracks, kitchen tent — early enough that you can count them rather than discover them.
One more stop sits near the northern gates, between the checkpoint and the refugee half: a tent with multiple computers, a small stage with a microphone, and a professional camera. That is the interview set used for General John McGrew, Dr Jeff Galbraithe and others, which fits the podium, news vans and cameras scattered around the same ground. Practically, it is more electronics in a place you already have to walk past.
North of that, the returns fall off a cliff. The refugee half also has three sections, and none of them is an armory. The press area sits just north of the checkpoint: a press-conference pen with a fence between army and press and a ring of orange cones laid down to keep refugees out, holding microphones and cameras. Beyond it is the refugee area, the main portion of the camp — tents, barbecues and radios strung along the entire highway into Louisville, vehicles frequently parked along the whole length of it, and a fourth generator next to the burger store. At the far north end is the radio shack belonging to LBMW - Kentucky Radio, with ham radios, a camera and the fifth generator. That is the entire inventory of the stretch that makes up most of the camp's footprint, and PZwiki's Build 42 assessment of it is exactly as bleak as the list looks: tents and generators, and not much else.
There is one object up there that justifies the walk on its own terms, and it is the metal drum. The camp around Louisville is one of the few places in the game it can be found, and it still cannot be crafted without mods, so if you want one this is where you come for it. Know what you are collecting, though, because Build 42 rewrote it. It is a one-tile movable at encumbrance 15 that needs no tools to pick up. It no longer collects water or any other fluid, unlike prior versions, and it is no longer a charcoal source — charcoal now comes from a Charcoal Burning Barrel, a Charcoal Burning Pile or a Dome Kiln. What it gained is heat: the drum is now a heat source, which it never used to be. If that is what you need it for, the refugee stretch is worth walking. If you were expecting a rain barrel, it is not.
Which leaves five generators standing in a camp you have now stripped, and a very short question about which of them is coming with you.
Everything You Take Out Has to Fit on Your Back
None of them. That is the honest answer, and the arithmetic that produces it is short enough to do before you leave home.
Your carry capacity runs from 6 units at Strength 0 to 20 units at Strength 10. A generator is 40 encumbrance. So take the most favourable survivor the game allows — Strength 10, pack empty, nothing in either hand — pick up one generator and you are carrying 200% of your maximum. That is Extremely Heavy Load, and it is not a debuff you walk off. Running is disabled. Sprinting is disabled. You walk 75% slower. Your attack speed drops 28%, which is academic anyway, because a carried generator cannot be attacked with — the thing occupying your hands is not a weapon and does not let you hold one. Your endurance stops recovering, so the deficit only deepens. Your health ticks down toward 75% while you carry it. And 200% is the ceiling of good outcomes: at Strength 0 the same generator is more than six times your capacity, and everything in between gets worse in proportion.
Now put that survivor on the actual route. From the kitchen tent at the checkpoint's north-east corner, they walk south through the camp, east along the fence line, through a hole in the wire narrow enough that it will not pass a car, and out to a highway parking space — at a quarter of walking speed, unable to run, unable to swing at anything that notices, with health draining the whole way, in a camp that still holds thousands. If they somehow finish that walk, the reward is a machine they may not be able to switch on: connecting a generator requires Electrical level 3, the Electrician or Engineer occupation, or a copy of the How to Use Generators magazine.
The vehicles parked along the refugee highway are on the wrong side of that same hole, so they are no help either. A generator you cannot drive out is a generator you leave standing.
So pack the run as an outbound weight budget. You are at this fence because you had no sledgehammer, which means every one of those 20 units is loot rather than tools. One round trip through the breach, for a Strength 10 survivor, spent deliberately:
- Firearms and ammunition, from the armory and the shipping container. The densest value per unit in the camp, and the entire reason the checkpoint pays.
- Medical supplies, from the medical centre. Cheap in weight, and the category the Farnly Road houses top up on your way back out.
- Military radios and computers, from the offices. Electronics you cannot get out of a house, and the reason PZwiki rates this place for Electrical XP.
- Left standing: all five generators, the kitchen loot, and every tent and barbecue on the refugee stretch.
The metal drum is its own trip. At 15 encumbrance it is 75% of a maxed survivor's capacity on its own, leaving 5 units for anything else — it is the one heavy object in the camp that comes out on foot, but only as the load, never as an addition to one. Walk it down from the refugee stretch with a near-empty pack, or do not collect it.
The alternative is to spend an axe on the trees east of the camp and turn the breach into a vehicle route, and if you are going to do that, check the trunk before you plan around it. Every trunk in the game clears 40 at full condition except the Chevalier Cossette at 30 and the Race Car at 20, and capacity scales with condition — so a trunk rated at exactly 40, like the Chevalier Dart, the Dash Rancher or the Masterson Horizon, refuses a generator after any damage at all. Load it from outside the vehicle; climb in while carrying one and you set it back down on the ground. What does not work is arriving on foot with a plan for the generators, because the hole you came in by is the same hole every load leaves by, and it only ever fits a person.
Which raises the question you should probably have asked before loading the car at all: whether the loot you actually want was ever at this address.
When Ready Prep Beats the Whole Camp
PZwiki asks that question on the camp's own page, and answers it against the camp. Directly beneath the warning that the extreme number of zombies all around the camp means you should take precautions before looting anything inside it, the page recommends that the army surplus store inside Louisville offers the same amount of weapons, armor and tools at "significantly lower risk." That is a wiki page telling you not to make the trip it documents. On the loot, it is right. On the trip, it leaves out the two facts that decide whether you can act on the advice at all.
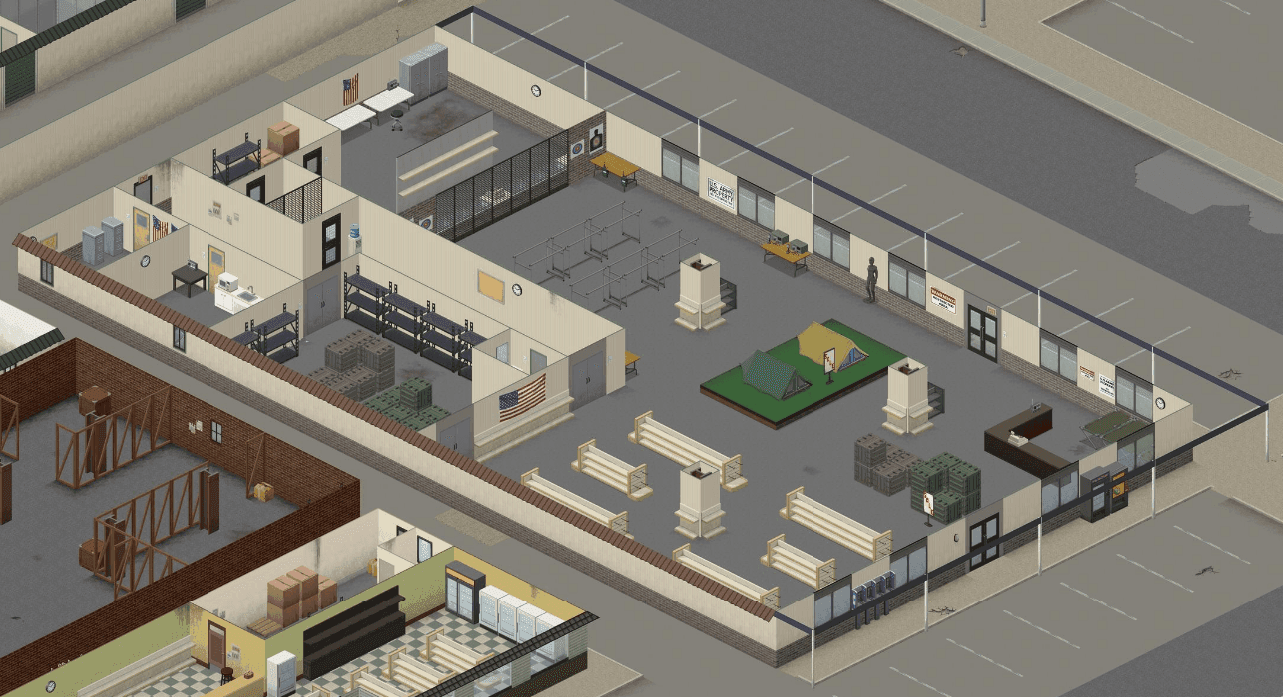
Ready Prep's shop floor is open. The caged gun section at the back is the part that wants a sledgehammer.
The first is where those stores actually are. There are two in Louisville, and neither is a chain outlet — every army surplus store in Knox Country is a separate business, five of them in total, with Jamieton Army Surplus down in Doe Valley, Guns Unlimited in Echo Creek and Well Regulated Militia Gear & Supply in Irvington. The two inside the city are Ready Prep at 1104 4th Street, 12222x1320, and Stars & Stripes at 13555x1273. The army checkpoint you have been planning around sits at 12674x4402. That is roughly 3,000 tiles of city between the fence and either storefront — not a detour, not the next block over, but the entire north-south run of Louisville. Most of the city is moderate in density and downtown is utterly infested with thousands upon thousands, and the route from the border to 4th Street passes through all of it. You also cannot spawn in Louisville without mods, so this is never a short hop from home. It is an expedition with a second expedition stacked on top.
The second fact is that the part of a surplus store you came for is locked. The standard layout is a main shopping area plus a separate firearms selling area, and that firearms area is usually walled off by security doors and metal shutters, which makes the store hard if not impossible to fully loot without a sledgehammer. Both Louisville stores follow the pattern. Ready Prep's gun-store section is shuttered and needs welding or a sledgehammer to get inside. Stars & Stripes keeps its firearms behind reinforced metal grating or two secured doors, with the guns in display cases along with ammunition and magazines. So the store that was supposed to be the low-risk alternative to a toolless breach in a fence turns out to want exactly the tool the toolless breach existed to avoid. The surplus store is not a way into Louisville. It is what you do once you are already inside Louisville with a sledgehammer in your hands.
That does not make the stores worthless to a survivor without one, because the open half of a surplus store is genuinely open, and it is stocked with the things the camp made you leave behind. Ready Prep's storefront is shelves of military clothing plus camping and survival supplies, with a secondary surplus storage room holding more of the same and a kitchen and an office in the back. Its position on the north-western industrialised edge of the city, next to the Egener EX factory, is the part that matters: PZwiki expects fewer zombies there than in the densely populated urban centre, which is not a claim anyone makes about the border camp.
Stars & Stripes sits exclusively inside The Grand Ohio Mall, between Sheba Jewellers and Hair O Genesis, with a large storefront and a storage area carrying military gear from backpacks to aiming skill books, boots and more. Across the store type generally you get medicaments, military and hunting gear, tarps, tent pegs, full tent kits, and tents and stretcher beds out in the main shopping area. Set that against the border camp's Build 42 verdict of almost no useful loot apart from tents and generators, and the comparison is unkind: the surplus store has the tents, indoors, in a building, without a siege. Stars & Stripes carries its own caveat, though — like all buildings in Louisville, high zombie density and low water availability make your survival odds lower than anywhere else on the map.
Which puts the whole argument on the sledgehammer, and the sledgehammer is not something Louisville hands you. Under apocalypse loot settings, the best single container in the game for one is a Police SWAT vehicle's car seat at 4.80%, followed by that same vehicle's trunk at 4.71%. Below that sits a long flat tier of trade-vehicle trunks at 1.19% — the Blacksmith, Carpenter, Construction Worker, Electrician, Fire, Mechanic, Plumber and Metal Welder vehicles among them. And no building or room container in the game beats 1.11%, with the safehouse loot rooms down at 0.24%. Those are the odds of at least one spawning, and they get worse in practice, because loot spawns diminish over time and the effective chance drops as your save ages. Read that distribution and it says the sledgehammer is a roadside find, not a city find: you get it out of parked work vehicles and police vehicles on the way, in the weeks before you ever see the Exclusion Zone fence, and the longer you put the trip off the thinner your chances get.
It earns the search. At encumbrance 6 it rides in the Back slot, two-handed when you swing it, and it does 40 door damage where an axe does 35 — but the reason it is worth six units of your carry budget is that destroying tiles, walls, doors and other objects is a function exclusive to the sledgehammer, triggered from the right-click contextual menu with it equipped. Nothing else in your bag opens a shutter or a reinforced grating. It also has a 4× endurance modifier and cannot be used at all once you are Exhausted, so you cut the firearms room open before the fight that gets you to it, not after.
So here is the rule, and you can apply it standing over your stash before you turn the key.
- No sledgehammer, no welding torch, and you want military weapons this week — the border camp, through the eastern breach, run as the light-loot trip your carry budget allows. It is the only one of the three Valley Station roads that opens for you, both surplus firearms rooms are sealed against you, and 3,000 tiles of city stand between you and the ones you cannot open anyway.
- No tool, and no deadline — Ashville Road, at the far eastern end of the fence. Walking in along the map-edge fence costs you distance instead of blood, and a supply tent, an armory and a communications room is a better first haul than anything you will drag out of the Dixie Highway breach.
- Sledgehammer or welding torch in the bag, and you want the largest safe haul — Ready Prep. Skip the camp entirely: cut a small checkpoint on the quiet side of the fence, head north-west, and loot a building on the industrialised edge where the density is lower, the storefront and storage room are already open, and the same tool that got you through the wire opens the shuttered gun section.
- Already established inside Louisville, or working the north-east of the city — Stars & Stripes, with the tool, for breadth rather than volume: backpacks, boots, aiming skill books, display-case firearms, ammunition and magazines. The Grand Ohio Mall is deep in the city, so go there off an existing base, never off a cold drive from Valley Station.
The version of this trip that gets people killed is the one where you read the surplus store recommendation, believe it replaces the camp, and drive to 4th Street with nothing that opens a shutter. Tonight, open your bags before you open the map. If there is a sledgehammer in there, you have no reason to stand in front of the Dixie Highway checkpoint at all. If there is not, then the real objective of your first Louisville run was never the camp's armory — it is the police cruiser or the tradesman's van you pass on the way there.